

[ad_1]
Amazon OpenSearch Service (successor to Amazon Elasticsearch Service) is a completely managed service that makes it straightforward to deploy, safe, and run Elasticsearch cost-effectively at scale. Amazon OpenSearch Service helps many use instances, together with software monitoring, search, safety info and occasion administration (SIEM), and infrastructure monitoring. Amazon OpenSearch Service additionally gives a wealthy set of functionalities corresponding to UltraWarm, fine-grained entry management, alerting, and anomaly detection.
On this two-part put up, we present you methods to use anomaly detection in Amazon OpenSearch Service and configure alerts for top CPU utilization in purposes. In Half 1, we focus on methods to arrange your anomaly detector.
Resolution overview
Anomaly detection in Amazon OpenSearch Service mechanically detects anomalies in your Amazon OpenSearch Service knowledge in near-real time through the use of the Random Lower Forest (RCF) algorithm. The RCF algorithm computes an anomaly grade and confidence rating worth for every incoming knowledge level. Anomaly detection makes use of these values to distinguish an anomaly from regular variations in your knowledge.
The next screenshot exhibits a pattern anomaly historical past dashboard on the Amazon OpenSearch Service console.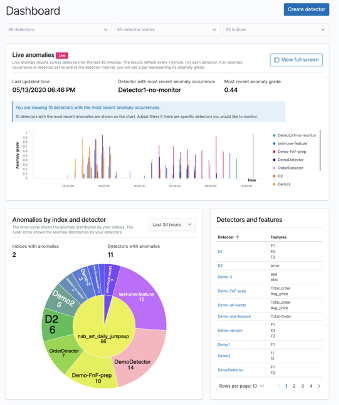
You possibly can configure anomaly detectors by way of the Amazon OpenSearch Service Kibana dashboard or API. The important thing components for creating an anomaly detector are detector creation and mannequin configuration. Within the following steps, we create an anomaly detector for software log recordsdata with CPU utilization knowledge.
Create a detector
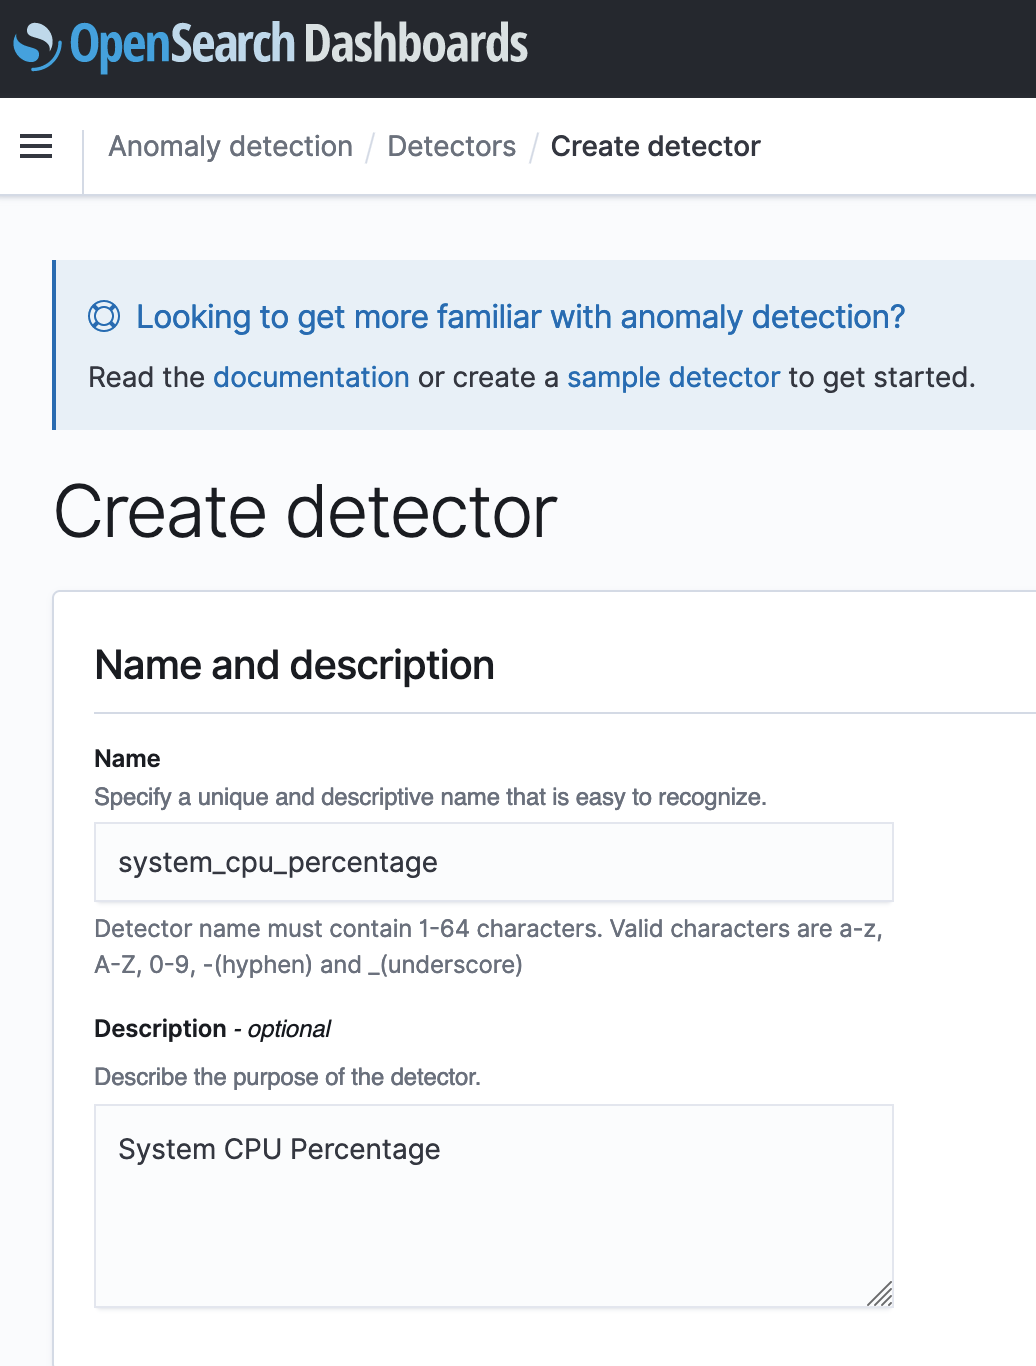
Step one in creating an anomaly detection resolution is making a detector. A detector is a person anomaly detection process. You possibly can have multiple detector, and so they all can run concurrently. To create your detector, full the next steps:
- On the Anomaly detection dashboard inside your Kibana dashboard, select Detectors.
- Select Create detector.

- For Identify, enter a singular identify in your detector.
- For Description, enter an optionally available description.

- For Index, select an index the place you need to determine the anomaly.
- For Timestamp subject, select the timestamp subject out of your index.
Optionally, you’ll be able to add a knowledge filter. This knowledge filter helps you analyze solely a subset of your knowledge supply and cut back the noisy knowledge.
- For Information filter, select Visible editor.
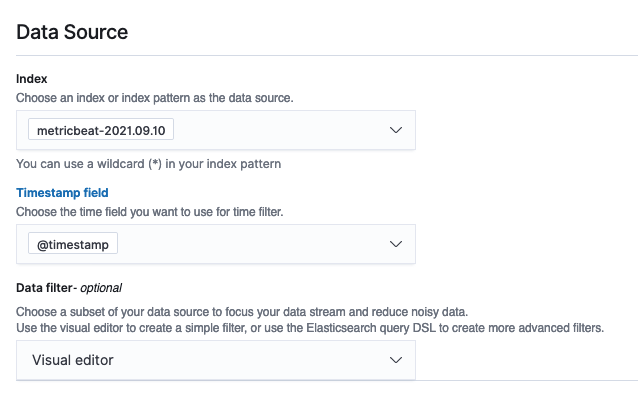
- Select your subject, operator, and worth.

Alternatively, select Customized expression and add in your personal filter question.
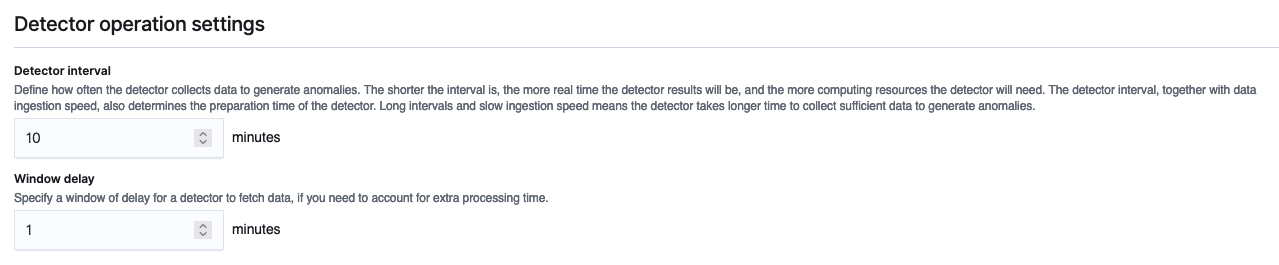
- Set the detector operation settings:
- Detector interval – This defines the time interval for the detector to gather the info. Throughout this time, the detector aggregates the info, then feeds the aggregated outcomes into the anomaly detection mannequin. The variety of knowledge factors depends upon the interval worth. A shorter interval time leads to a smaller pattern measurement. We suggest setting the interval based mostly on precise knowledge. Too lengthy of an interval would possibly delay the outcomes, and too brief would possibly miss some knowledge factors.
- Window delay – This provides additional processing time to make sure that all knowledge throughout the window is current.
Configure the mannequin
So as to run the anomaly detection mannequin, it’s essential to configure sure mannequin parameters. One key parameter is characteristic choice. A characteristic is a subject within the index that’s monitored for anomalies utilizing totally different aggregation strategies. You possibly can apply anomaly detection to multiple characteristic for the index specified within the detector’s knowledge supply. After you create the detector, it is advisable to configure the mannequin with the best options to allow anomaly detection.
- On the anomaly detection dashboard, underneath the detector identify, select Configure mannequin.

- On the Edit mannequin configuration web page, for Characteristic identify, enter a reputation.
- For Characteristic state, choose Allow characteristic.
- For Discover anomalies based mostly on, select Subject worth.
- For Aggregation methodology, select your acceptable aggregation methodology.

For instance, should you select common(), the detector finds anomalies based mostly on the common values of your characteristic. For this put up, we select sum().
- For Subject, select your subject.

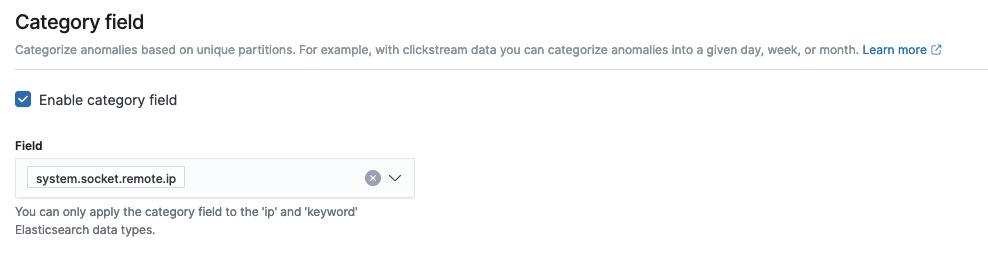
As of this writing, Amazon OpenSearch Service helps the class subject for top cardinality. You should utilize the class subject for key phrase or IP subject sort. The class subject categorizes or slices the supply time collection with a dimension like IP addresses, product SKUs, zip codes, and so forth. This supplies a granular view of anomalies inside every entity of the class subject, that can assist you isolate and debug points. For instance, the CPU utilization proportion doesn’t assist determine the precise occasion inflicting the problem. However through the use of the host IP categorical worth, chances are you’ll capable of finding the precise host inflicting the anomaly.
- Within the Class subject, choose Allow class subject.
- For Subject, select your subject.
- Within the Superior Settings part, for Window measurement, set the variety of intervals to think about in a detection window.
We suggest selecting the window measurement worth based mostly on the precise knowledge. Should you count on lacking values in your knowledge or in order for you the anomalies based mostly on the present interval, select 1. In case your knowledge is repeatedly ingested and also you need the anomalies based mostly on a number of intervals, select a bigger window measurement.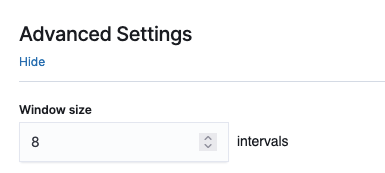
Within the Pattern anomaly historical past part, you’ll be able to see a preview of the anomalies.
- Select Save and begin detector.

- Within the pop-up window, choose when to start out the detector (mechanically or manually).
- Select Verify.


Abstract
This put up defined the totally different steps required to create an anomaly detector with Amazon OpenSearch Service. You should utilize anomaly detection for a lot of use instances, together with discovering anomalies in entry logs from totally different companies, utilizing clickstream knowledge, utilizing IP tackle knowledge, and extra.
Amazon OpenSearch Service anomaly detection is obtainable on domains working any OpenSearch model or Elasticsearch 7.4 or later. All occasion varieties assist anomaly detection, aside from t2.micro and t2.small.
Within the subsequent a part of this put up, we cowl methods to arrange an alert for these anomalies utilizing the Amazon OpenSearch Service alerting characteristic.
Concerning the Authors
 Jey Vell is a Senior Options Architect with AWS, based mostly in Austin TX. Jey focuses on Analytics and ML/AI. Jey works carefully with Amazon OpenSearch Service workforce, offering structure steerage and technical assist to the AWS prospects with their search workloads. He brings to his function over 20 years of know-how expertise in software program improvement and structure, and IT administration.
 Jon Handler is a Senior Principal Options Architect, specializing in AWS search applied sciences – Amazon CloudSearch, and Amazon OpenSearch Service. Based mostly in Palo Alto, he helps a broad vary of consumers get their search and log analytics workloads deployed proper and functioning nicely.
[ad_2]