

[ad_1]
Amazon Redshift is a quick, absolutely managed cloud information warehouse that makes it easy and cost-effective to investigate all of your information utilizing customary SQL and your current enterprise intelligence (BI) instruments. Amazon Redshift makes use of SQL to investigate structured and semi-structured information throughout information warehouses, operational databases, and information lakes, utilizing AWS designed {hardware} and machine studying (ML) to ship one of the best price-performance at any scale.
Prospects have reached out to us with a must migrate their Amazon Redshift clusters from one AWS Area to a different. Among the frequent causes embody provisioning their clusters geographically nearer to their consumer base to enhance latency, for cost-optimization functions by deploying their clusters in a Area the place the pricing is decrease, or for migrating clusters to a Area the place the remainder of their deployments are. This submit supplies a step-by-step strategy emigrate your Amazon Redshift cluster to a different Area utilizing the snapshot performance.
Overview of answer
This answer makes use of the cross-Area snapshot function of Amazon Redshift to carry out inter-Area migration. The concept is to take a number of guide snapshots of your Amazon Redshift cluster earlier than the cutover deadline to make sure minimal information loss and emigrate the cluster to a different Area throughout the outlined upkeep window. It is best to plan for the upkeep window to be throughout a interval of low or no write exercise to reduce downtime. The time taken to repeat over the snapshots is determined by the scale of the snapshot. Earlier than the migration, it’s a good suggestion to estimate how a lot time it takes to repeat over snapshots to the goal Area by testing with comparable or bigger measurement datasets in your staging environments. This will help along with your planning course of.
After you copy the snapshots to the goal Area, you’ll be able to restore the newest snapshot to create a brand new Amazon Redshift cluster. Snapshots are incremental by nature and observe adjustments to the cluster because the earlier snapshot. The copy time is relative to the quantity of knowledge that has modified because the final snapshot.
When a snapshot is copied to a different Area, it could additionally act as a standalone, which implies that even when solely the newest snapshot is copied to the goal Area, the restored Amazon Redshift cluster nonetheless has all the information. For extra data, check with Amazon Redshift snapshots. Cross-Area snapshot performance will also be helpful for establishing catastrophe restoration in your Amazon Redshift cluster.
The next diagram illustrates the structure for cross-Area migration throughout the identical AWS account.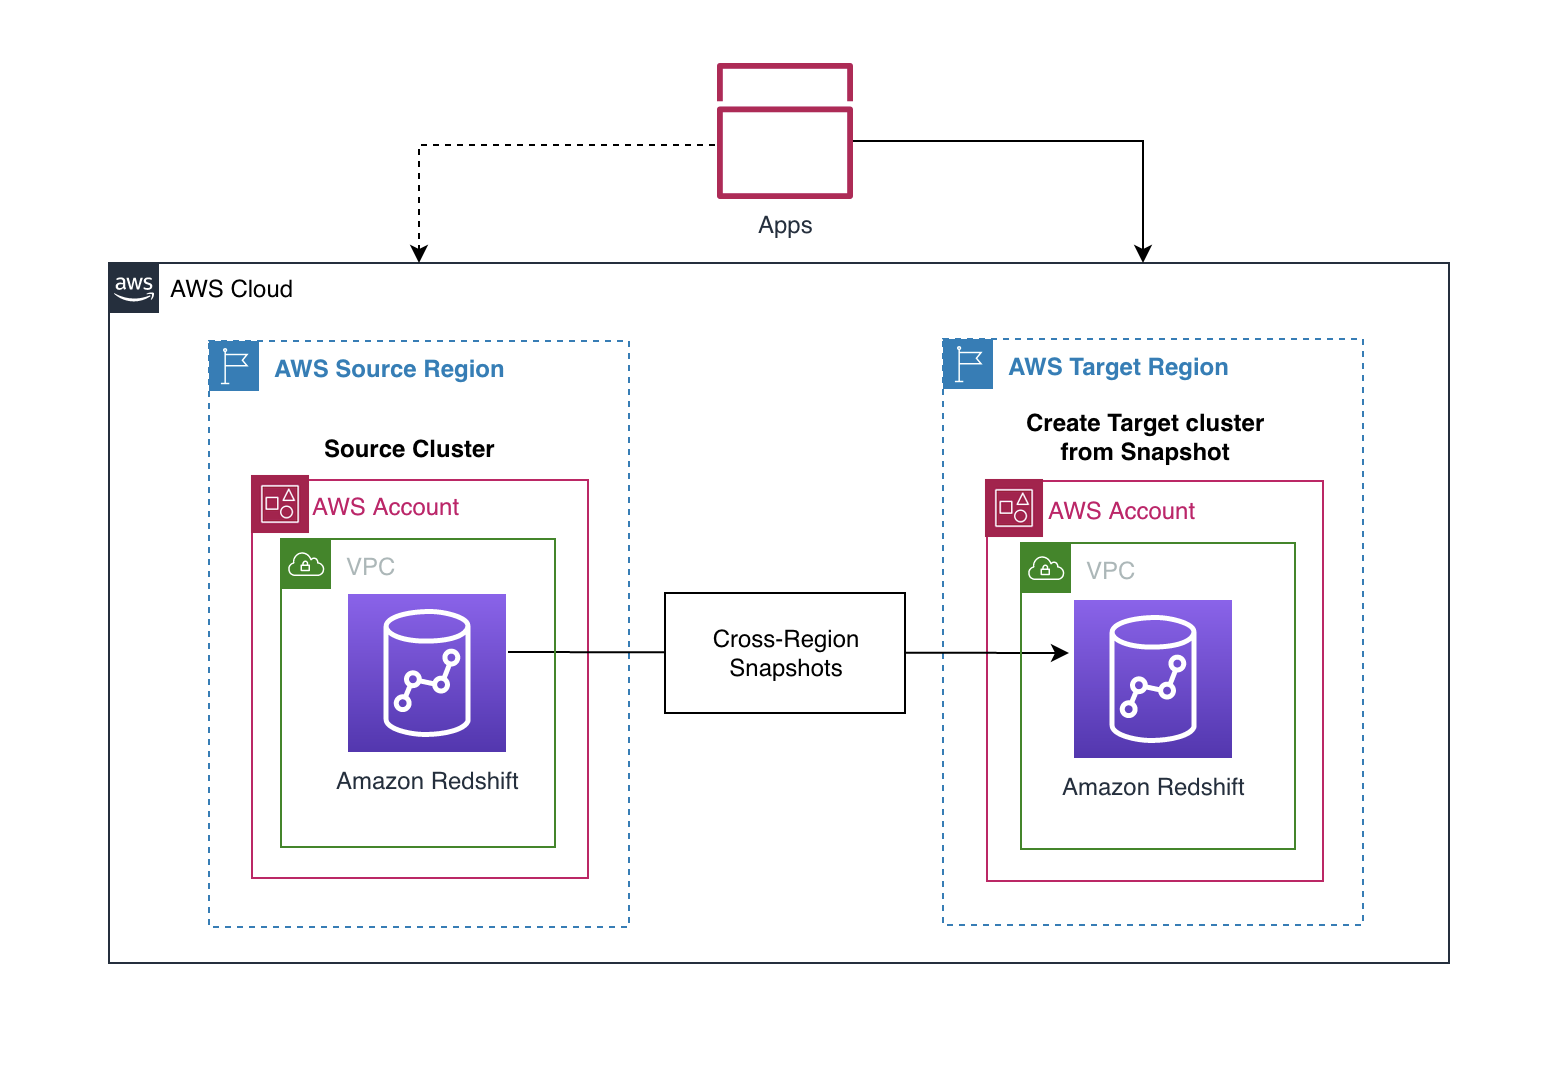
The answer contains the next steps:
- Configure cross-Area snapshots of the supply Amazon Redshift cluster earlier than the cutover deadline.
- Restore the newest snapshots to create a brand new Amazon Redshift cluster within the goal Area.
- Level your functions to the brand new Amazon Redshift cluster.
For encrypted snapshots, there’s an extra step of making a brand new encryption key and performing a snapshot grant earlier than you’ll be able to copy the snapshot to the goal Area.
Stipulations
For the migration course of, choose a upkeep window throughout when there’s low write exercise, and concentrate on the RTO and RPO necessities of the group.
The next steps stroll you thru establishing an Amazon Redshift cluster within the supply Area and populating it with a pattern dataset. For this submit, we use US West (Oregon) because the supply Area and US East (N. Virginia) because the goal Area. If you have already got a supply Amazon Redshift cluster, you’ll be able to skip these prerequisite steps.
Create an Amazon Redshift cluster within the supply Area
To create your cluster within the supply Area, full the next steps:
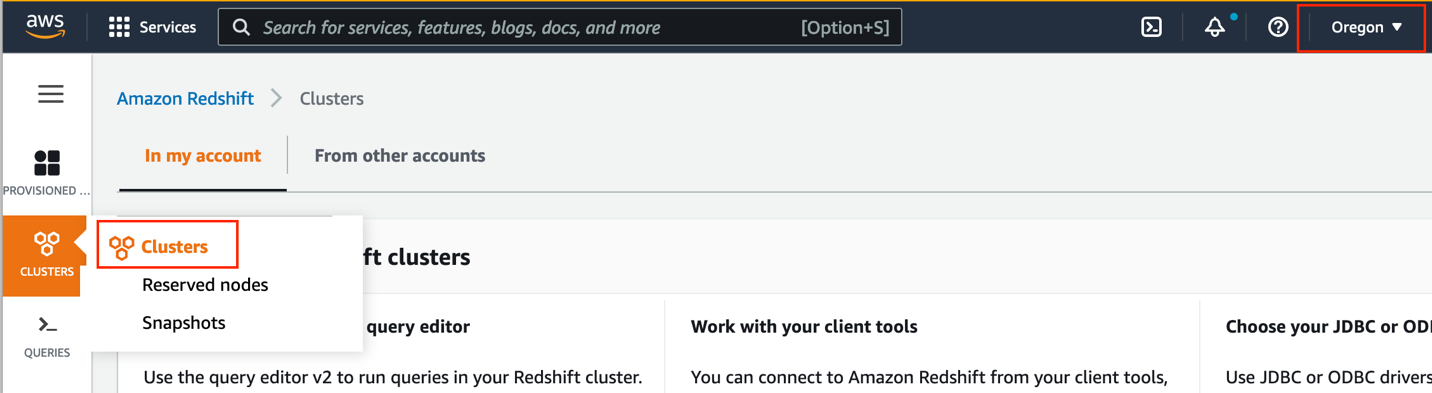
- Open the Amazon Redshift console in your supply Area.
- Select Clusters within the navigation pane and select Clusters once more on the menu.
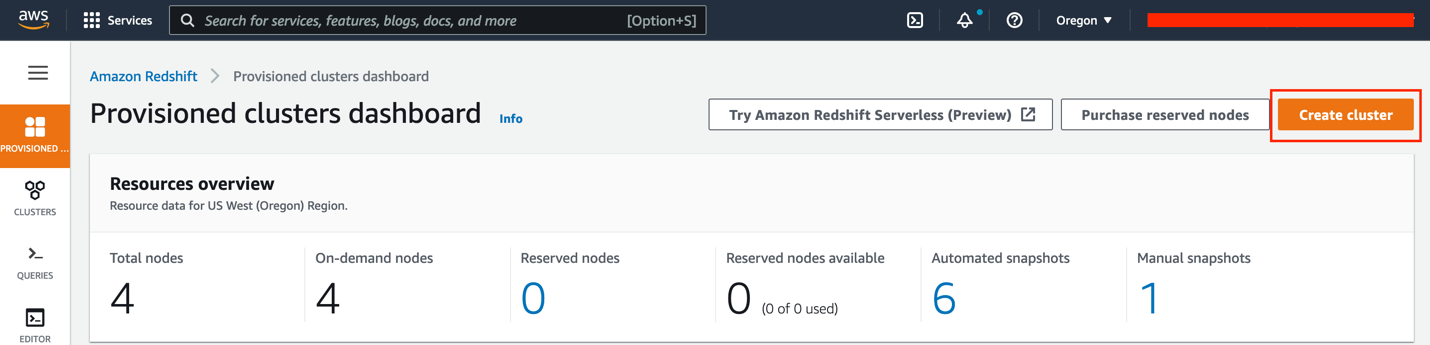
- Select Create cluster.
- For Cluster identifier, enter
redshift-cluster-source. - Choose Manufacturing for cluster use.
This selection means that you can choose particular occasion sorts and cargo the pattern information of your selection. Observe that you’re charged for Amazon Redshift situations and storage for all the time till you delete the cluster. For extra details about pricing, see Amazon Redshift pricing.
- For Node sort, select your most well-liked node sort.
- For Variety of nodes, enter the variety of nodes to make use of.
For this submit, we use 4 dc2.massive situations.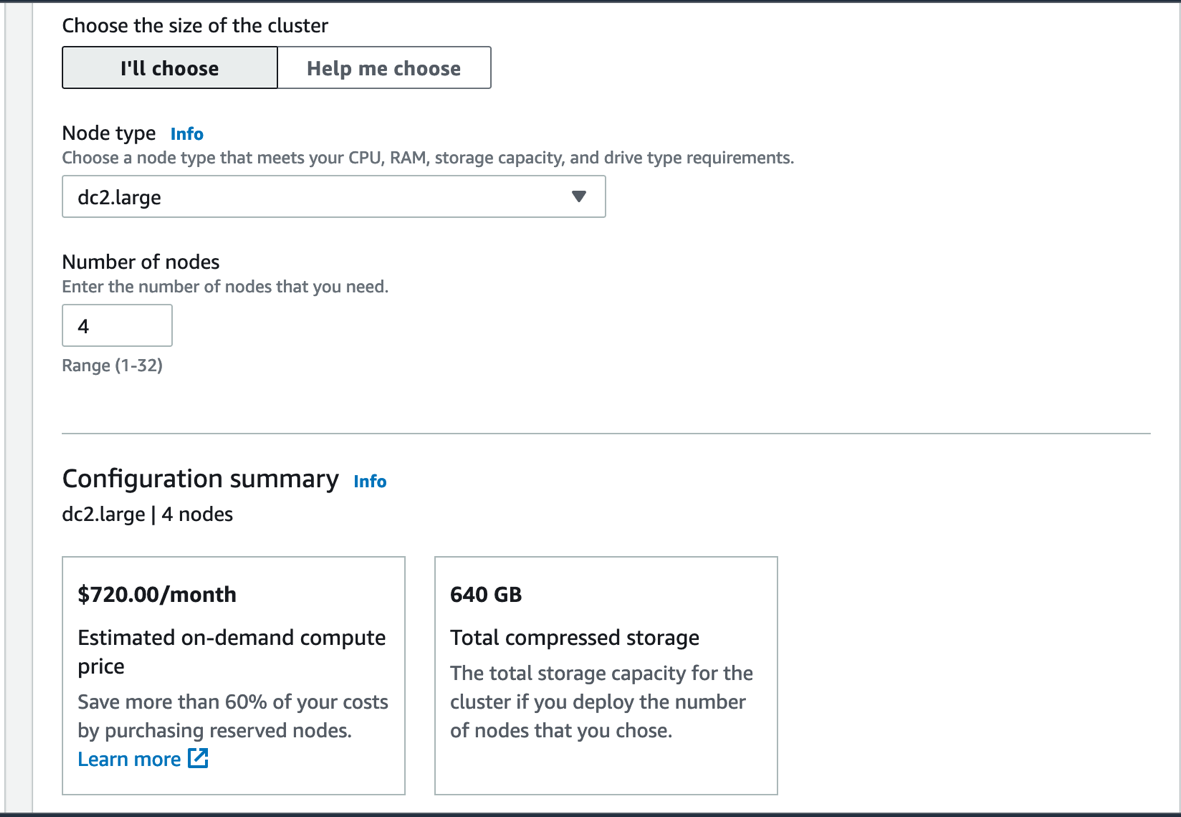
- Underneath Database configurations, enter a consumer identify and password for the cluster.
As a finest follow, change the default consumer identify to a customized consumer identify (for this submit, mydataadmin) and observe the password pointers.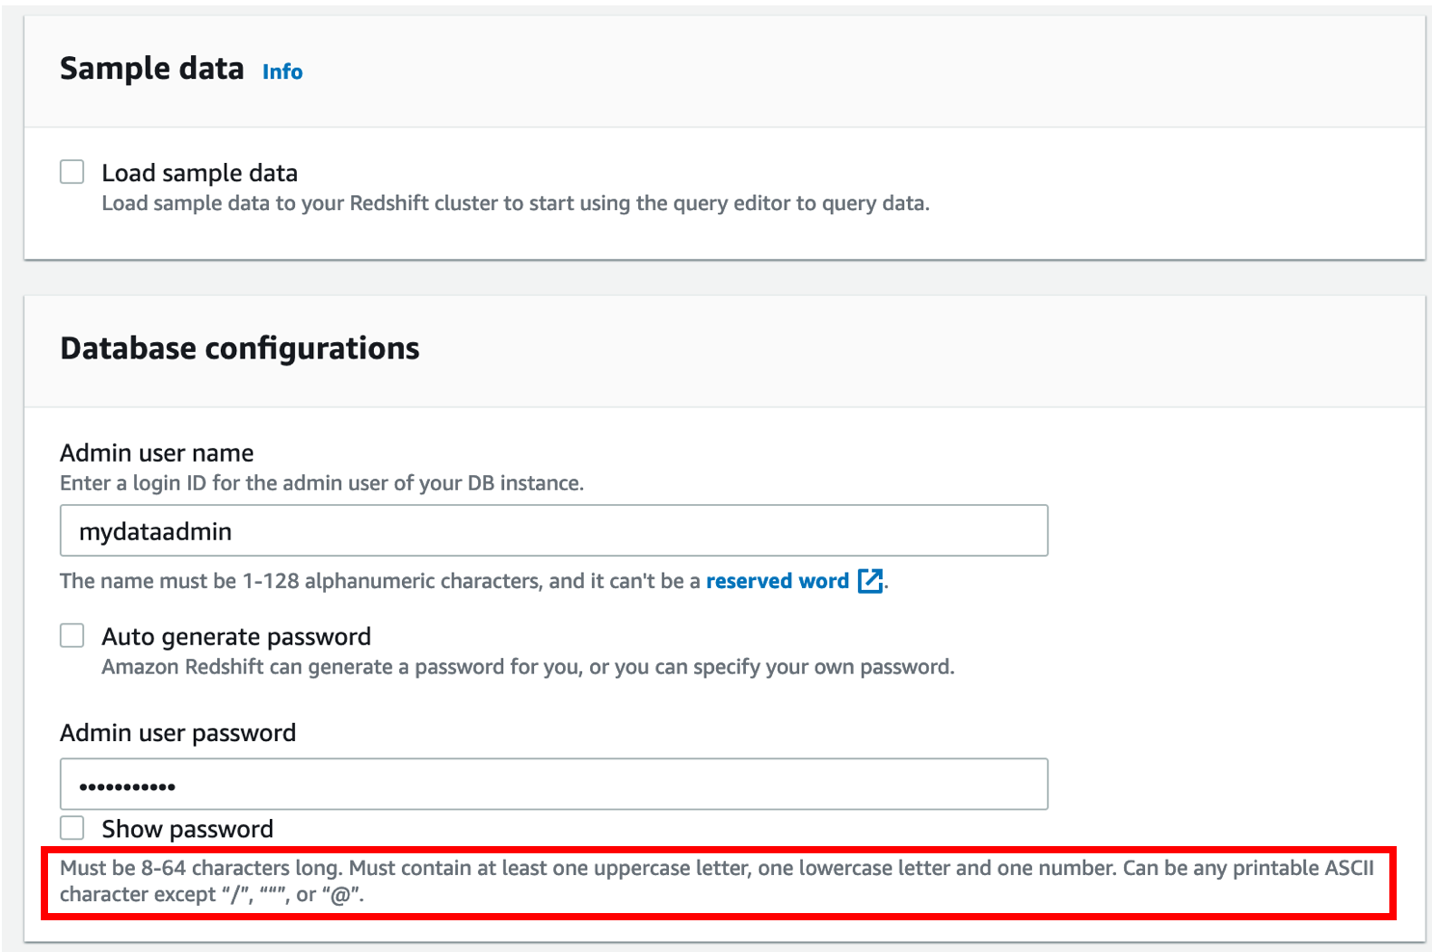
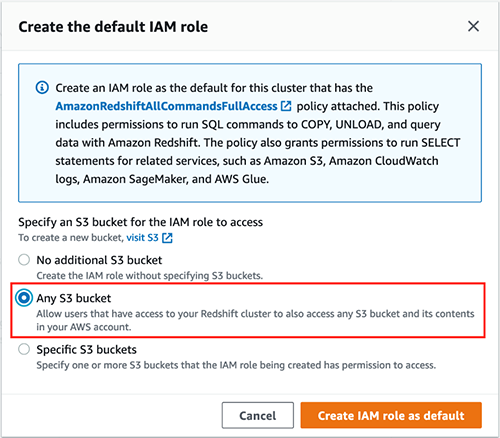
To load the pattern information from an exterior Amazon Easy Storage Service (Amazon S3) bucket to the supply cluster, you have to create an AWS Identification and Entry Administration (IAM) function.
- Underneath Cluster permissions, on the Handle IAM roles drop-down menu, select Create IAM function.
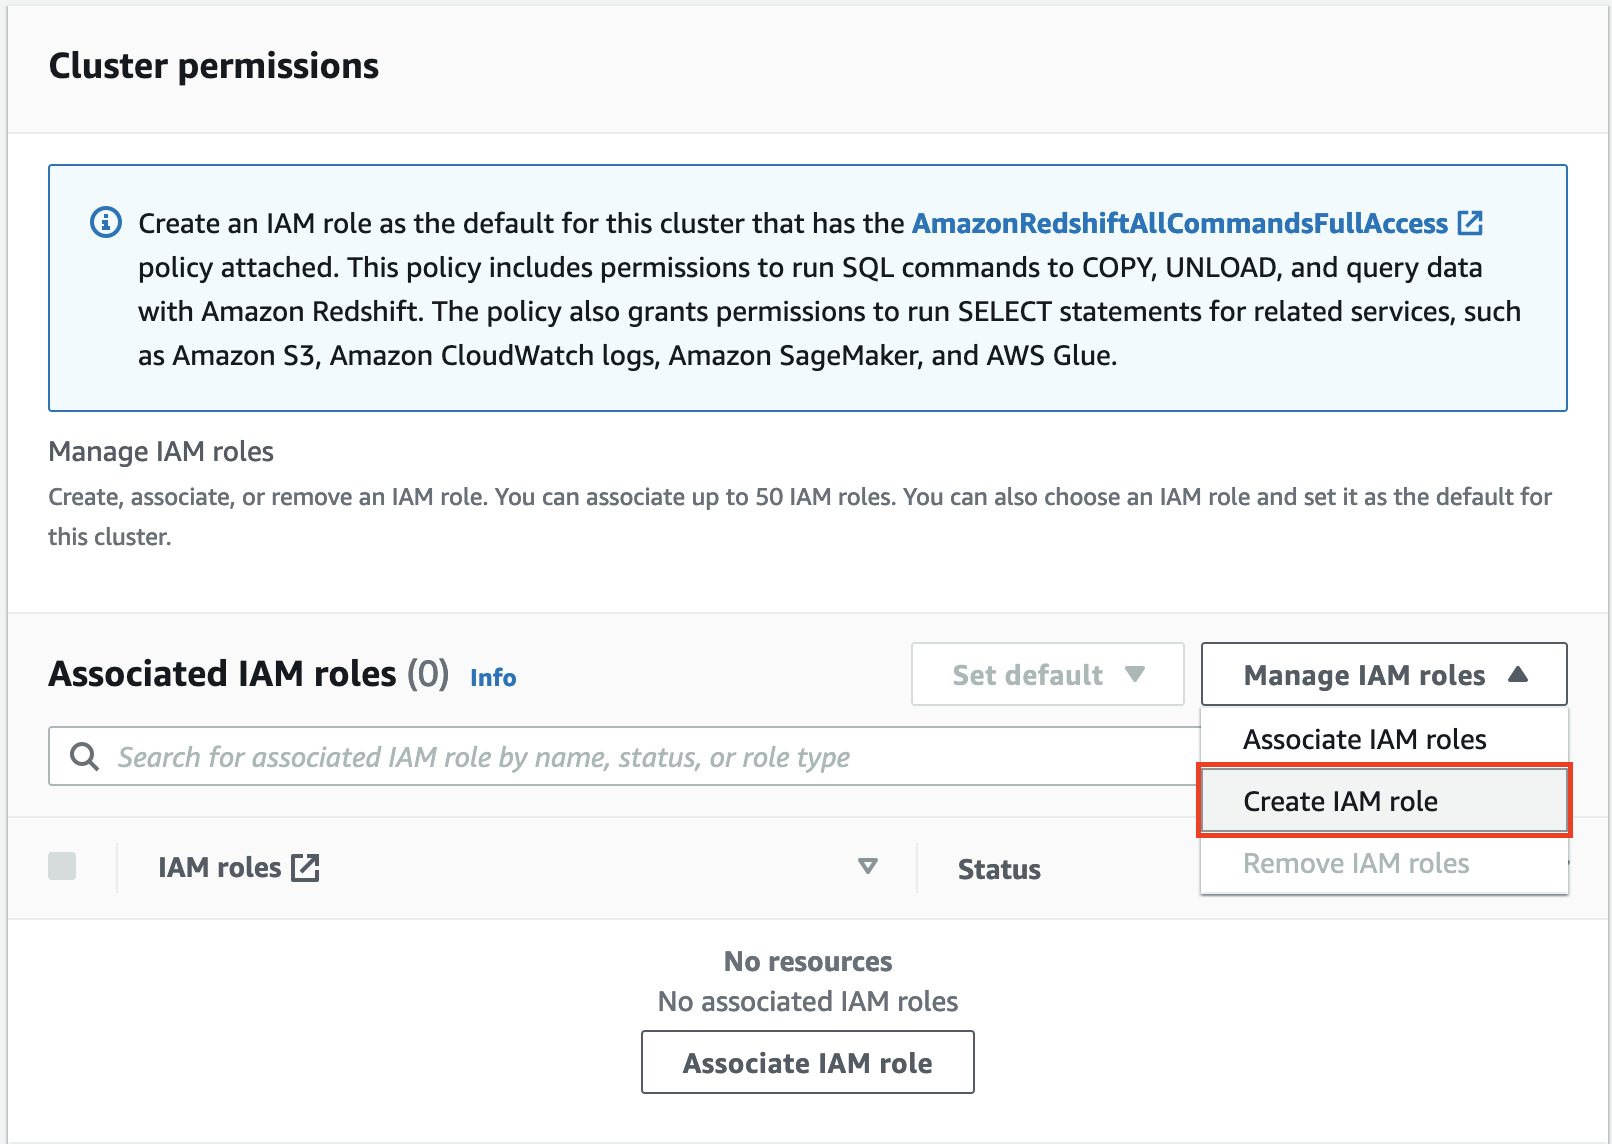
- Choose Any S3 bucket and select Create IAM function as default.
- For Extra configurations, flip Use defaults off.

- Within the Community and safety part, select a VPC and cluster subnet group.
For extra details about making a cluster, check with Making a cluster in a VPC.
- Develop Database configurations.
We advocate utilizing customized values as an alternative of the defaults.
- For Database identify, enter
stagingdb. - For Database port, enter 7839.
- For Encryption, choose Disabled.
We allow encryption in a later step.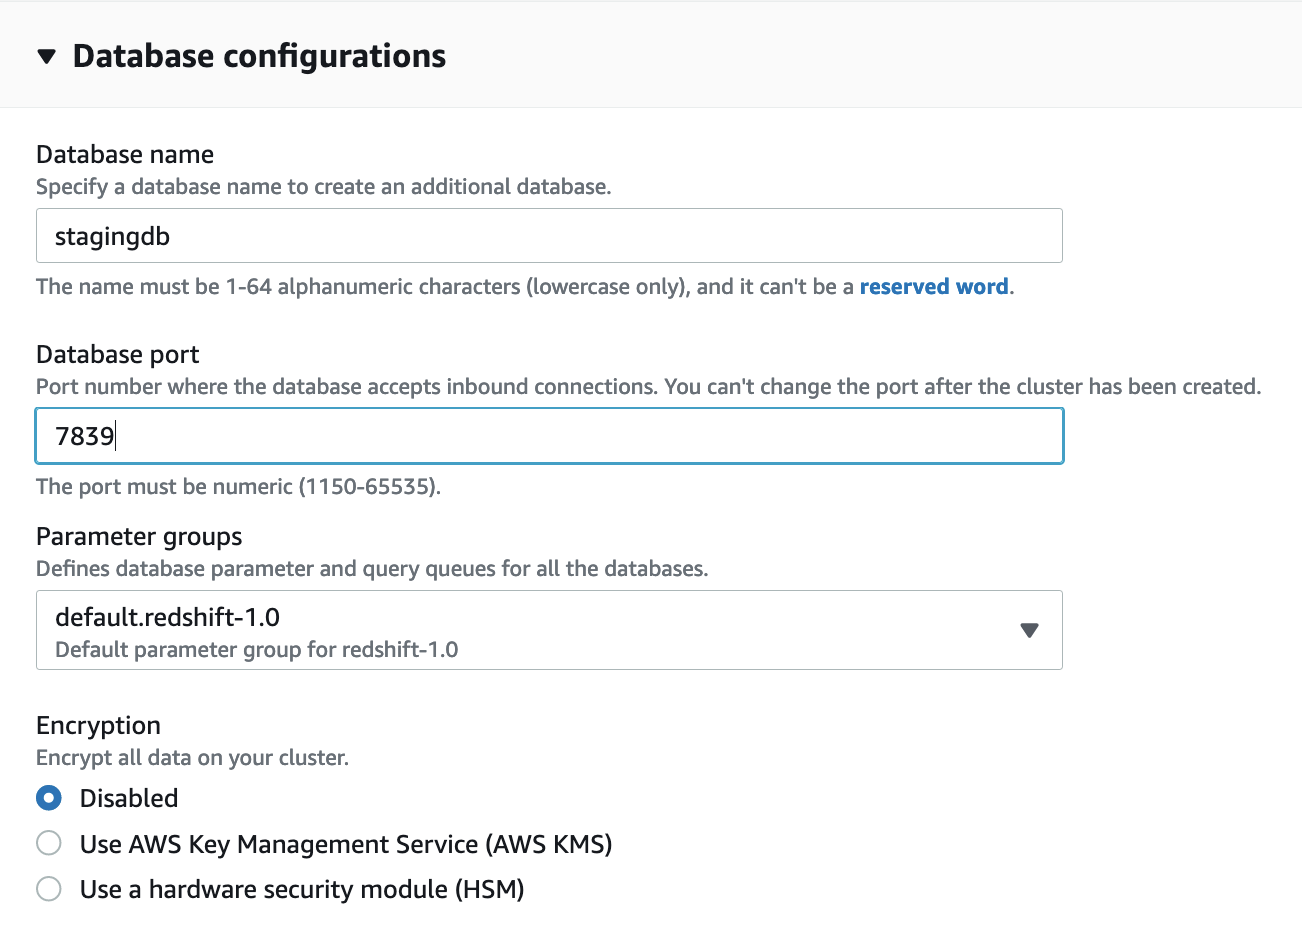
- Depart the opposite choices as default and select Create cluster.
- When the cluster is out there, allow audit logging on the cluster.
Audit logging information details about connections and consumer actions in your database. That is helpful for safety in addition to troubleshooting functions.
To fulfill safety finest practices, you additionally create a brand new Amazon Redshift parameter group.
- Select Configurations and Workload administration to create your parameter group.
- Guarantee that the parameters
require_sslandenable_user_activity_loggingare set to true. - On the Properties tab, select the Edit menu within the Database configurations part and select Edit parameter group.
- Affiliate the newly created parameter group to the Amazon Redshift cluster.
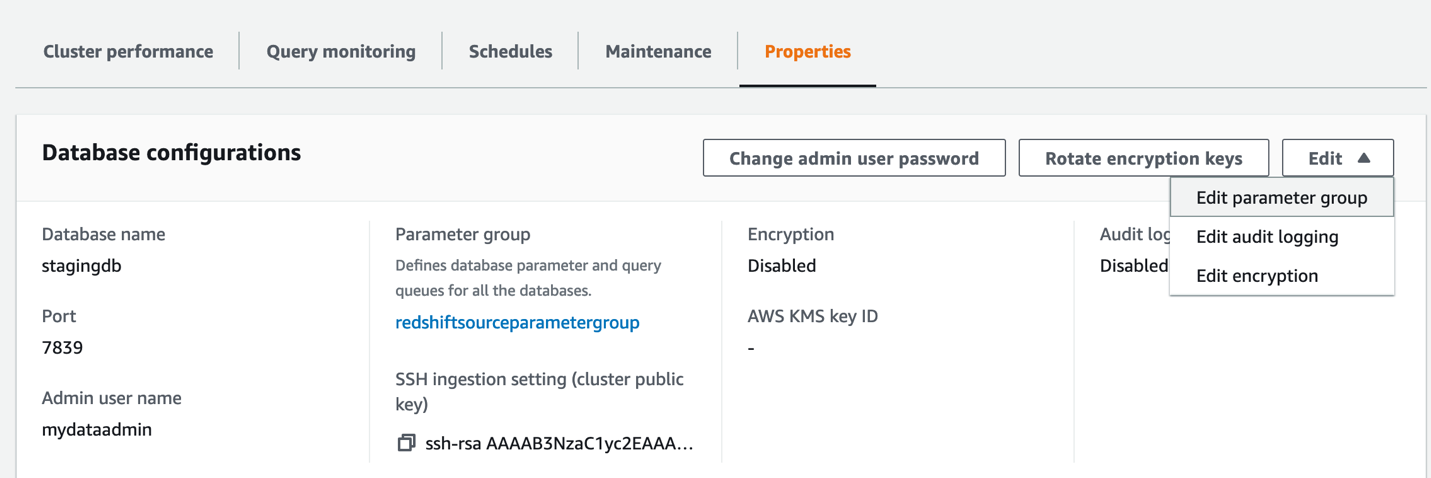
If this modification prompts you to reboot, select Reboot.
Load the pattern dataset within the supply Amazon Redshift cluster
When the cluster is prepared, it’s time to load the pattern dataset from the S3 bucket s3://redshift-immersionday-labs/information/. The next tables are a part of the dataset:
- REGION (5 rows)
- NATION (25 rows)
- CUSTOMER (15 million rows)
- ORDERS (76 million rows)
- PART (20 million rows)
- SUPPLIER (1 million rows)
- LINEITEM (600 million rows)
- PARTSUPPLIER (80 million rows)
It’s a finest follow for the Amazon Redshift cluster to entry the S3 bucket by way of VPC gateway endpoints with the intention to improve information loading efficiency, as a result of the visitors flows by way of the AWS community, avoiding the web.
Earlier than we are able to load our information into Amazon S3, we have to allow a VPC endpoint by way of Amazon Digital Non-public Cloud (Amazon VPC).
- On the Amazon VPC console, select Endpoints.
- Select Create endpoint.
- For Title tag, enter
redshift-s3-vpc-endpoint. - For Service class, choose AWS companies.
- Seek for
S3and choose the Gateway sort endpoint.
- Select the identical VPC the place your cluster is provisioned and choose the route desk.
- Depart every thing else as default and select Create endpoint.
Look forward to the Gateway endpoint standing to vary to Obtainable.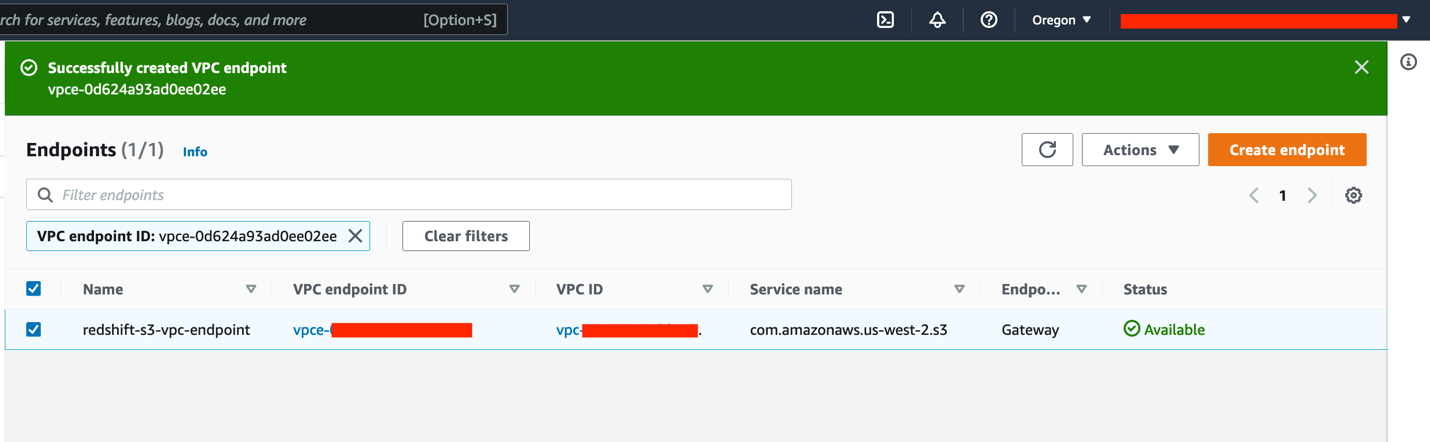
Subsequent, you allow enhanced VPC routing.
- Open the Amazon Redshift console within the supply Area.
- Select your supply cluster.
- On the Properties tab, within the Community and safety settings part, select Edit.
- For Enhanced VPC routing, choose Enabled.
- Select Save adjustments.
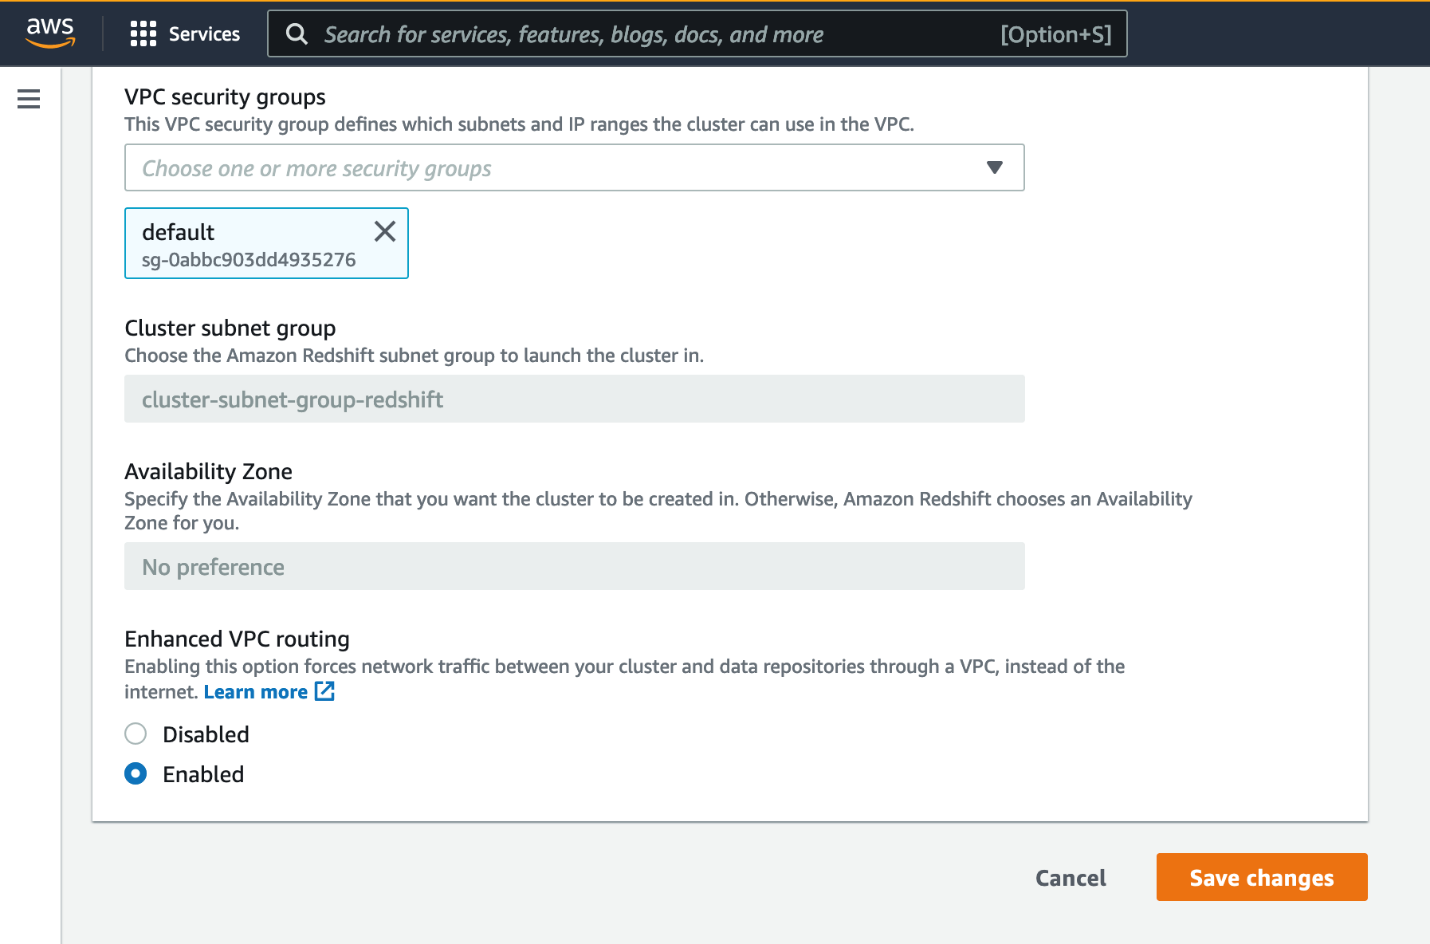
Look forward to the cluster standing to vary to Obtainable.
It’s worthwhile to create tables with the intention to load the pattern information into the cluster. We advocate utilizing the Amazon Redshift web-based question editor.
- On the Amazon Redshift console, select Editor within the navigation pane and select Question editor.
You too can use the brand new question editor V2.
- Select Hook up with database.

- Choose Create new connection.
- Enter the database identify and consumer identify.
- Select Join.

For this submit, we use the TPC information instance from the Amazon Redshift Immersion Labs.
- Navigate to the Information Loading part of the Immersion Day Labs.
- Observe the directions within the Create Tables part to create the tables in your supply cluster.
- After you create the tables, observe the directions in Loading Information part to load the information into the cluster.
Loading the information took roughly 17 minutes within the US West (Oregon) Area. This may increasingly range relying on the Area and community bandwidth at that cut-off date.
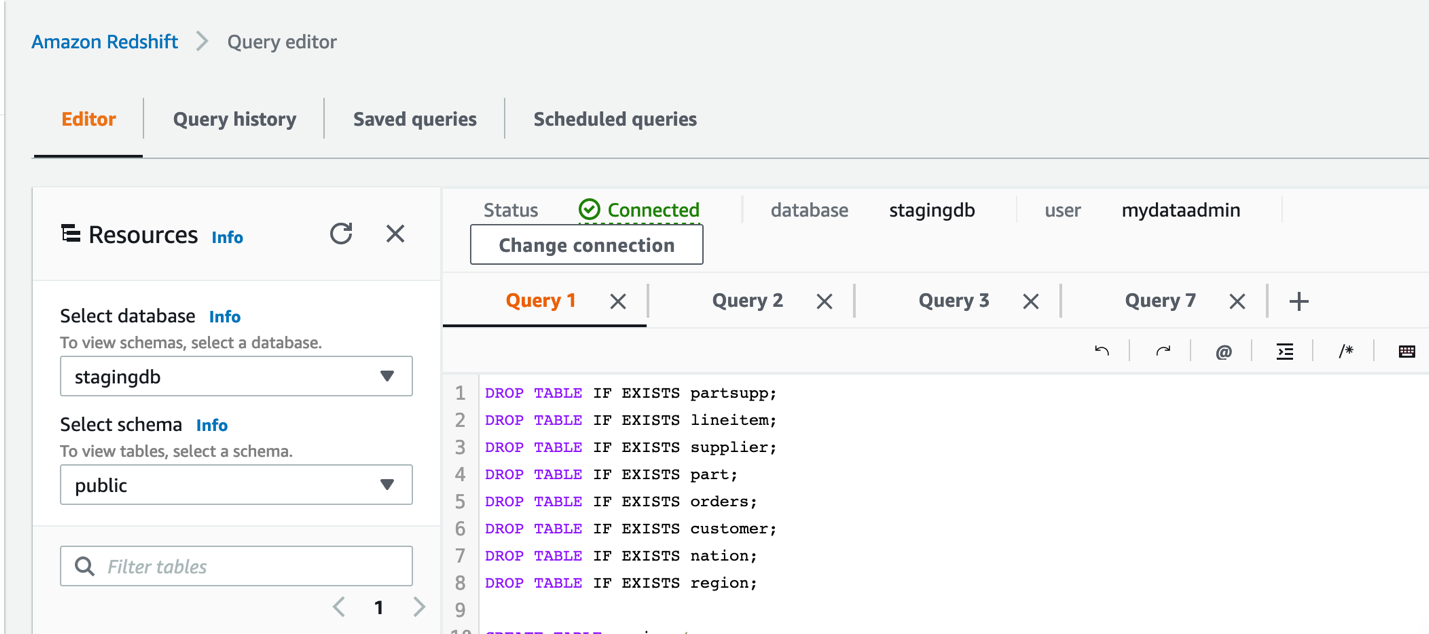
After the information is loaded efficiently into the supply cluster, you’ll be able to question it to just be sure you see the information in all of the tables.
- Select a desk (right-click) and select Preview information.
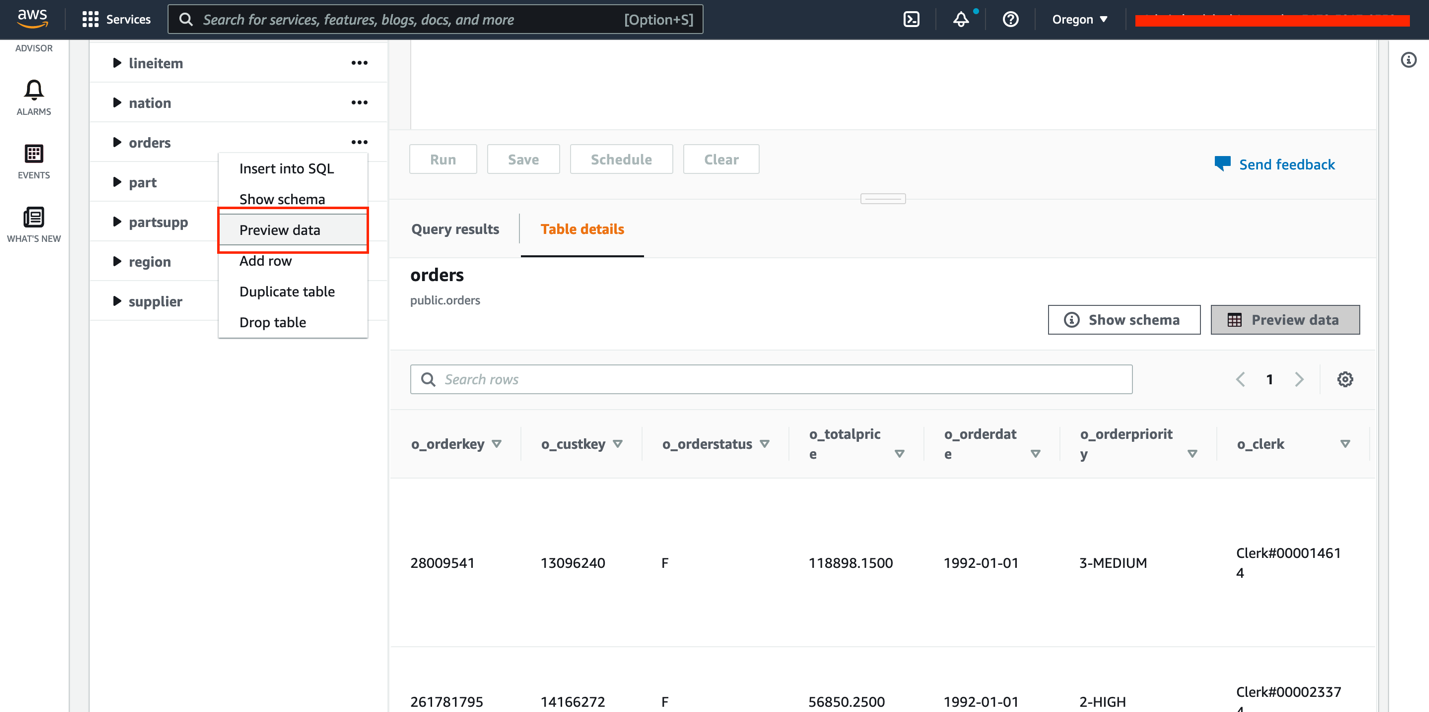
- Drop the
buyerdesk utilizing the questionDROP TABLE buyer;.
We add the desk again later to reveal incremental adjustments.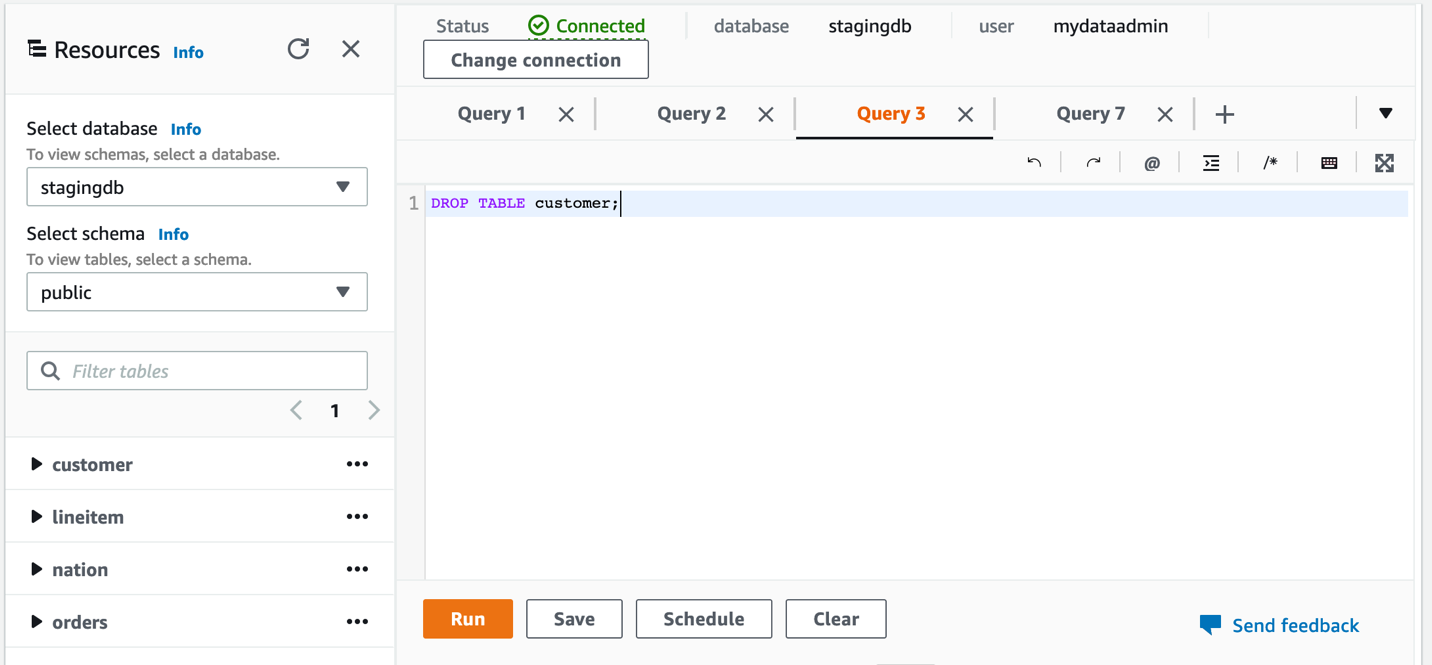
You possibly can test the storage measurement to confirm the scale of the information loaded.
- Select Clusters within the navigation pane.
- Select your supply cluster.
- Confirm the storage measurement within the Normal data part, underneath Storage used.

Your supply Amazon Redshift cluster is now loaded with a pattern dataset and is able to use.
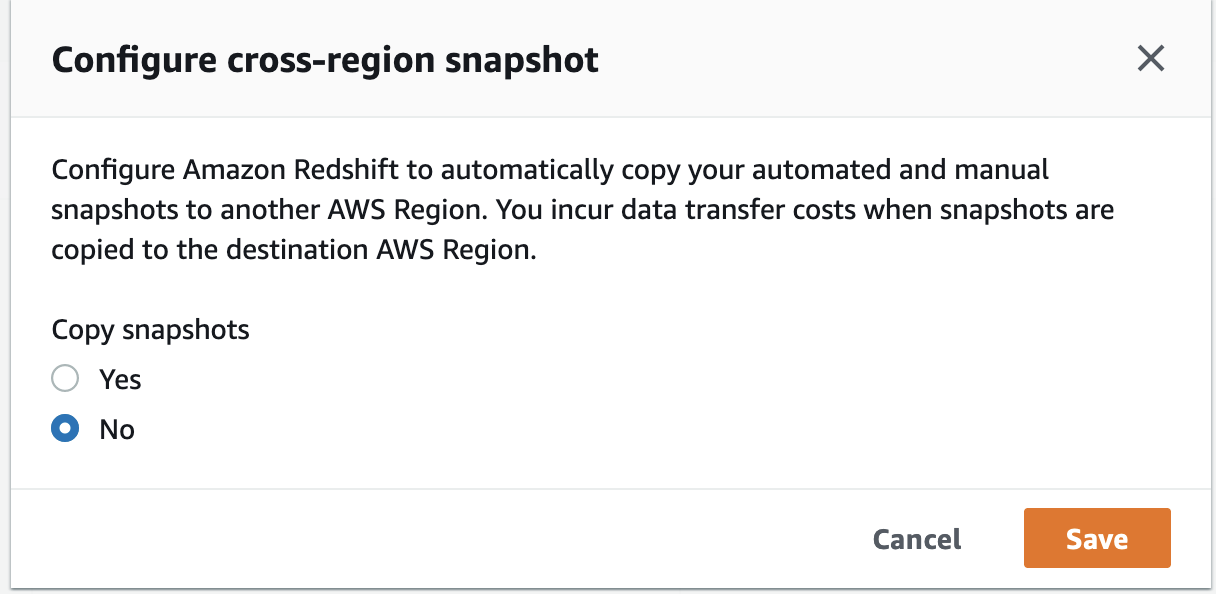
Configure cross-Area snapshots within the supply Area
To carry out inter-Area migration, step one is to configure cross-Area snapshots. The cross-Area snapshot function lets you copy over snapshots mechanically to a different Area.
- Open the Amazon Redshift console within the supply Area.
- Choose your Amazon Redshift cluster.
- On the Actions menu, select Configure cross-region snapshot.

- For Copy snapshots, choose Sure.
- For Vacation spot Area, select your goal Area (for this submit,
us-east-1). - Configure the guide snapshot retention interval in accordance with your necessities.
- Select Save.


After the cross-Area snapshot function is configured, any subsequent automated or guide snapshots are mechanically copied to the goal Area.
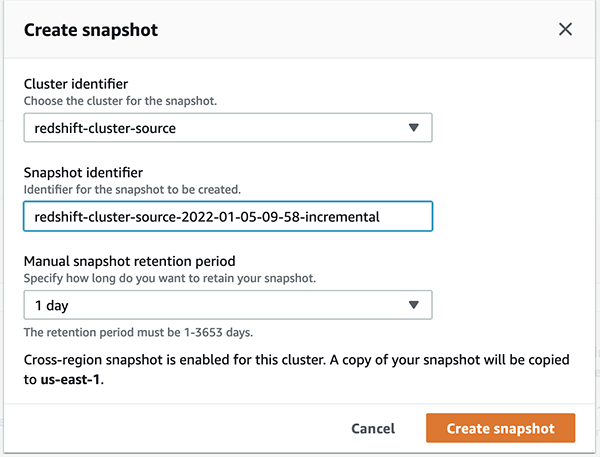
- To create a guide snapshot, select Clusters within the navigation pane and select Snapshots.

- Select Create snapshot.

- For Cluster identifier, select
redshift-cluster-source. - Modify the snapshot retention interval based mostly in your necessities.
- Select Create snapshot.


The concept is to take a number of snapshots till the cutover deadline in order to seize as a lot information as potential for minimal information loss based mostly in your RTO and RPO necessities. The primary snapshot creation took about 4 minutes for 28.9 GB of knowledge, however subsequent snapshots are incremental in nature.
This snapshot will get mechanically copied to the goal Area from the supply Area. You possibly can open the Amazon Redshift console within the goal Area to confirm the copy.
As proven within the following screenshot, the snapshot of measurement 28.9 GB took round 44 minutes to get copied to the goal Area as a result of it’s the primary snapshot containing all the information within the cluster. Relying on the Areas concerned and the quantity of knowledge to repeat, a cross-Area snapshot copy could take hours to finish.
Let’s now simulate incremental adjustments being made to the supply cluster.
- Open the Amazon Redshift console within the supply Area and open the question editor.
- Create a brand new desk referred to as
buyerwithin the cluster utilizing the next question: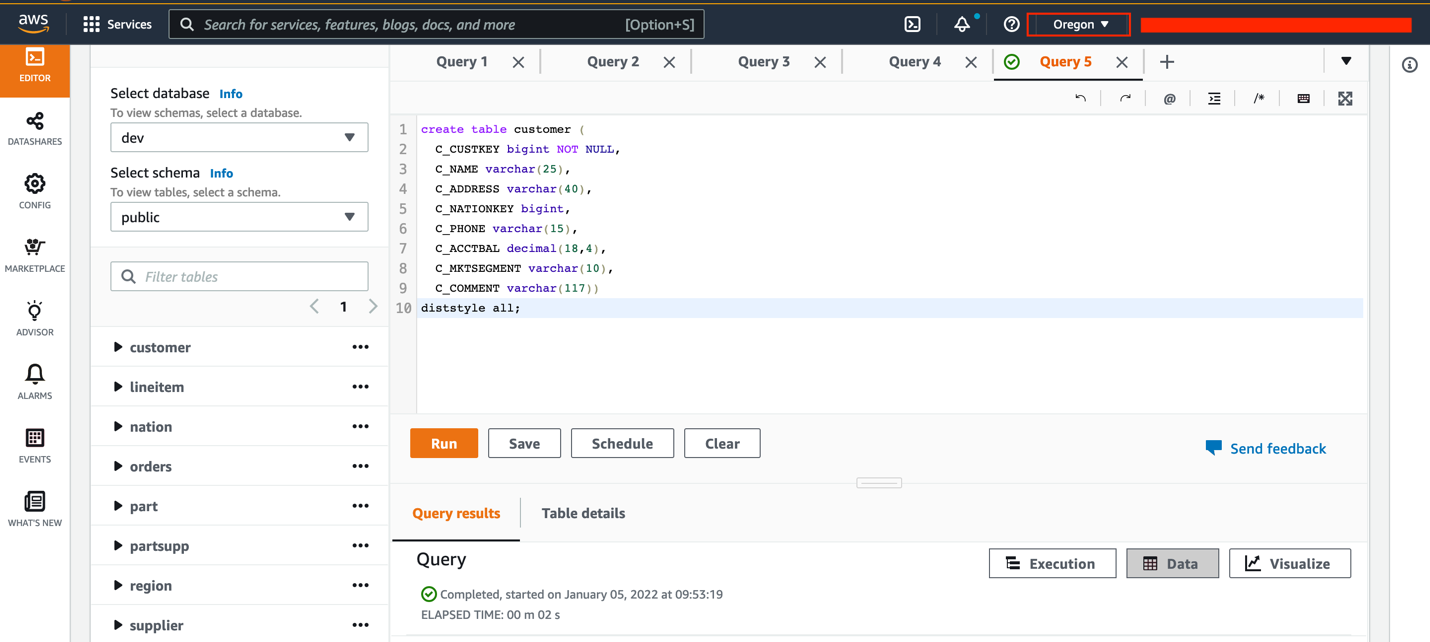
- Load information into the
buyerdesk utilizing the next command: - To create a guide snapshot containing incremental information, select Clusters within the navigation pane, then select Snapshots.
- Present the required data and select Create snapshot.

As a result of the cross-Area snapshot performance is enabled, this incremental snapshot is mechanically copied to the goal Area. Within the following instance, the snapshot took roughly 11 minutes to repeat to the goal Area from the supply Area. This time varies from Area to Area and relies on the quantity of knowledge being copied.
Restore snapshots to identical or larger occasion sorts within the goal Area
When the newest snapshot is efficiently copied to the goal Area, you’ll be able to restore the snapshot.
- Open the Amazon Redshift console within the goal Area.
- On the Snapshots web page, choose your snapshot.
- On the Restore from snapshot menu, select Restore to a provisioned cluster.

- For Cluster identifier, enter
redshift-cluster-target. - For Node sort¸ you should utilize the identical occasion sort or improve to a better occasion sort.
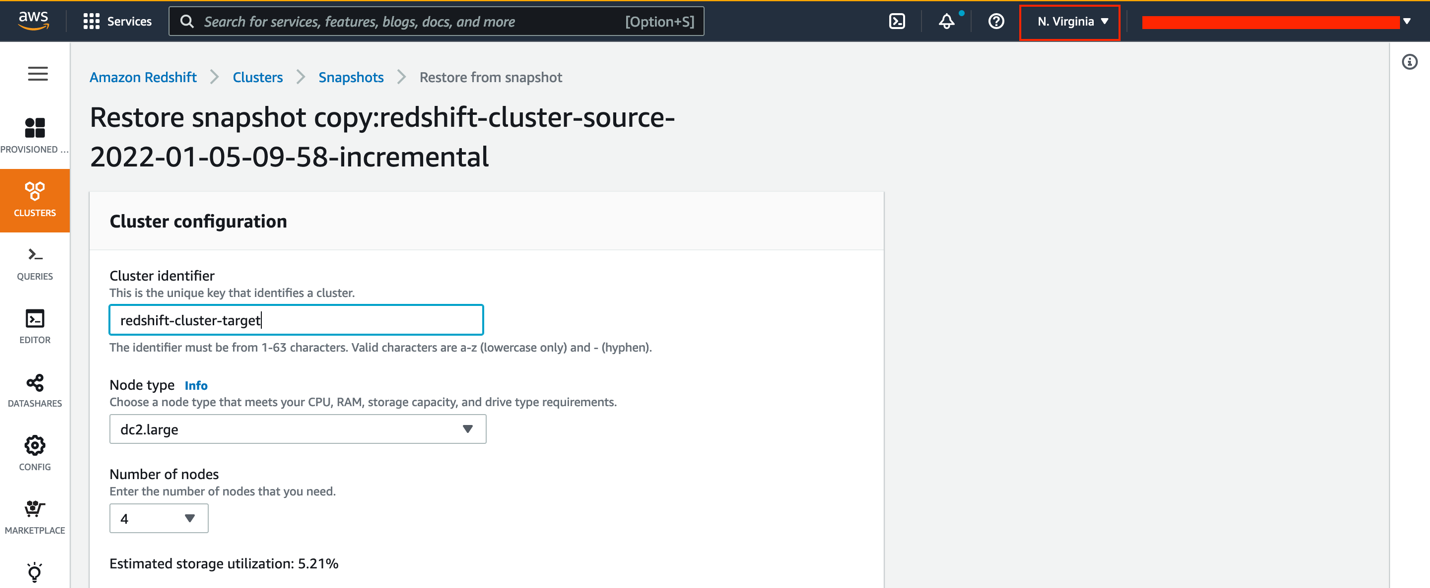
- For Variety of nodes, select the variety of nodes you want.
In case you select to improve your occasion to RA3, check with Upgrading to RA3 node sorts to find out the variety of nodes you want.
For this submit, we nonetheless use 4 nodes of the dc2.massive occasion sort.
- Underneath Database configurations, for Database identify¸ enter
stagingdb. - Depart the remainder of the settings as default (or modify them per your necessities) and select Restore cluster from snapshot.
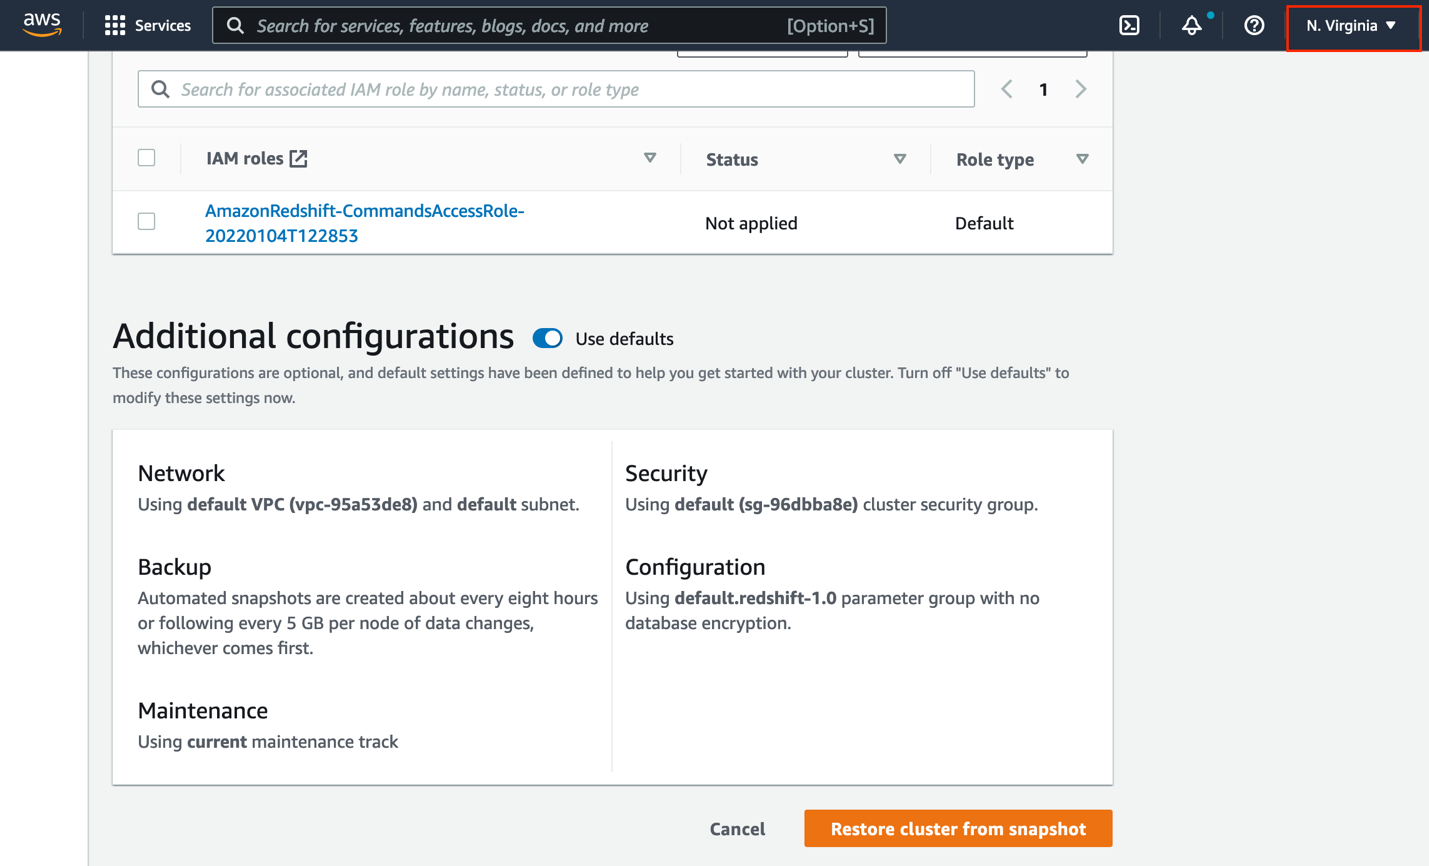
A brand new Amazon Redshift cluster will get provisioned from the snapshot within the goal Area.
Observe the identical safety finest practices that you just utilized to the supply cluster for the goal cluster.
Level your functions to the brand new Amazon Redshift cluster
When the goal cluster is out there, configure your functions to hook up with the brand new goal Amazon Redshift endpoints. New clusters have a special Area Title System (DNS) endpoint. Which means that you could replace all shoppers to check with the brand new endpoint.
Inter-Area migration steps for encrypted information
If the information in your Amazon Redshift cluster is encrypted, you have to carry out further steps in your inter-Area migration. If information encryption is already enabled, you’ll be able to skip to the steps for snapshot copy grant.
Allow information encryption within the supply Amazon Redshift cluster
To allow information encryption within the supply cluster, we use Amazon Key Administration Service (AWS KMS).
- Open the AWS KMS console within the supply Area.
- Create a KMS key referred to as
redshift-source-key. - Allow key rotation.
- On the Amazon Redshift console (nonetheless within the supply Area), choose your cluster.
- If a cross-Area snapshot is enabled, select Configure cross-region snapshot on the Actions menu.
- Choose No and select Save.
- On the Properties tab, within the Database configurations part, select the Edit menu and select Edit encryption.

- Choose Use AWS Key Administration Service (AWS KMS).
- Choose Use key from present account and select the important thing you created.
- Select Save adjustments.

The time taken to encrypt the information relies on the quantity of knowledge current within the cluster.
If the information is encrypted, any subsequent snapshots are additionally mechanically encrypted.
Snapshot copy grant
If you copy the encrypted snapshots to the goal Area, the prevailing KMS key within the supply Area doesn’t work within the goal Area as a result of KMS keys are particular to the Area the place they’re created. It’s worthwhile to create one other KMS key within the goal Area and grant it entry.
- Open the AWS KMS console within the goal Area.
- In case you don’t have already got a KMS key to make use of, create a key referred to as
redshift-target-key. - Allow key rotation.
- Open the Amazon Redshift console within the supply Area.
- Choose the cluster and on the Actions menu, select Configure cross-region snapshot.
- For Copy snapshots, choose Sure.
- For Select a snapshot copy grant, select Create new grant.
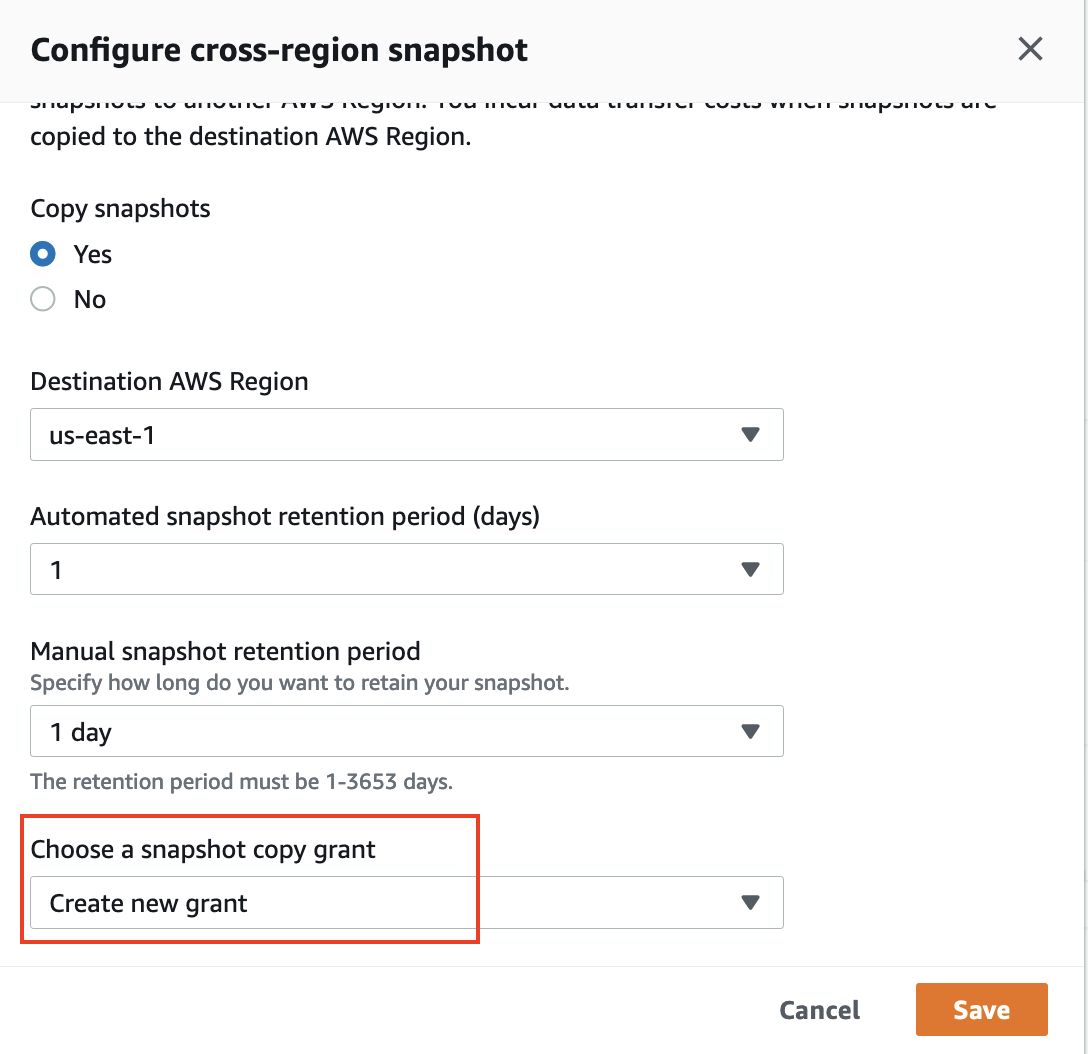
- For Snapshot copy grant identify, enter
redshift-target-grant. - For KMS key ID, select the important thing that you just created for the grant.
In case you don’t specify a key ID, the grant applies to your default key.
- Select Save.

Any subsequent snapshots copied to the goal Area at the moment are encrypted with the important thing created within the goal Area.
- After the snapshot is copied to the goal Area, restore the cluster from the encrypted snapshot, following the steps from earlier on this submit.
For extra particulars on the encryption course of, check with Copying AWS KMS–encrypted snapshots to a different AWS Area.
After you restore from the encrypted snapshot, the restored cluster is mechanically encrypted with the important thing you created within the goal Area.
Guarantee that your functions level to the brand new cluster endpoint when the cluster is out there.
Clear up
In case you created any Amazon Redshift clusters or snapshots for testing functions, you’ll be able to delete these assets to keep away from incurring any future expenses.
For directions on deleting the snapshots, check with Deleting guide snapshots.
For directions on deleting the Amazon Redshift cluster, check with Deleting a cluster.
Conclusion
This submit confirmed the right way to migrate your Amazon Redshift cluster to a different Area utilizing the cross-Area snapshot performance. Amazon Redshift migration requires some prior planning relying on the Areas concerned and the quantity of knowledge to repeat over. Snapshot creation and copying could take a big period of time. The primary snapshot incorporates all the information within the cluster and subsequently it could take longer, however subsequent snapshots include incremental adjustments and will take much less time relying on the adjustments made. It’s a good suggestion to estimate how a lot time the snapshot copy takes by performing some assessments in your staging environments with snapshots of an analogous measurement or barely bigger than those within the manufacturing surroundings so you’ll be able to plan for minimal information loss and meet RTO and RPO necessities.
For additional particulars in regards to the Amazon Redshift snapshot performance, check with Working with Snapshots.
Concerning the Writer
 Sindhura Palakodety is a Options Architect at Amazon Net Providers. She is captivated with serving to clients construct enterprise-scale Nicely-Architected options on the AWS platform and focuses on Containers and Information Analytics domains.
[ad_2]