

[ad_1]
For a few years the usual 3D printing filaments had been PLA and ABS. 3D printer customers knew that in the event that they wished one thing ornamental, print it in PLA and in the event that they wished one thing structural, print it in ABS. That each one modified as soon as PETG 3D printing filament entered the scene. Not many 3D printers had all-metal hotends that would help it, however those who did had been capable of print structural elements utilizing a a lot much less temperamental materials. These days PETG has virtually totally changed ABS because the “structural-material of selection,” with every part from end-use jigs, fixtures, and merchandise to complete 3D printers being made utilizing PETG. In an effort to 3D print with PETG 3D printing materials efficiently, there are some {hardware} necessities and suggestions you may discover useful, so let’s soar into it!
-
Desk of Contents – Bounce to PETG 3D Filament Assist Matter You Want
What’s PETG Plastic?
PETG is a particularly widespread polymers used as we speak that you just doubtless encounter with out even realizing it. Principally any clear plastic bottle goes to be product of PET (Polyethylene Terephthalate) or PETG (Polyethylene Terephthalate with a glycol modifier) and in reality many client 3D printers make the most of PETG or some by-product to make-up their 3D printed structural elements. When used as a 3D printing filament, PETG has discovered its dwelling because the extra accessible “sturdy 3D printing filament” on account of its comparatively secure 3D printing properties that make it straightforward to print and but able to being in low-heat or high-strength environments. In a way, it combines probably the most helpful traits of ABS with the convenience of printing (and coloration availability) of PLA.
You’ll usually see references to PETG in one of many following types: PET, PETG, PETT, and plenty of others. This will make it look like these are many various filaments when in actuality they’re simply slight variations within the method to create a fabric that’s extra translucent, stronger, or extra versatile. When it comes to print settings, throughout all these variants they are going to be roughly the identical, with some minor tweaks right here and there to scale back stringing or enhance layer adhesion.
For those who’re used to printing with PLA, then you definately may not have thought-about a singular attribute of PETG: that it is ductile. The place PLA might be able to face up to extra power with out breaking, when it hits the brink the place it will break it is rather sudden and with out warning. In distinction, PETG will bend a bit earlier than it breaks, so you’ll be able to see a failure earlier than it occurs. It is the completely different of printing a PETG shelf bracket that is beginning to droop and a PLA shelf bracket that dumps your books onto your desk and screens.
With PETG you can too take that ductility and use it within the design of some purposefully versatile geometry. Snap match enclosures, the place small tabs bend out of the best way and snap right into a channel as soon as a lid is absolutely pressed in place, are a lovely alternative to make the most of PETG. Or you’ll be able to design a component that should rigidly maintain one thing else with out being too tough to insert, like a bearing holder on a 3D printer half.

PETG 3D printing filament is a good materials for useful prototypes and end-use elements.
{Hardware} Necessities
Hotends
There are a lot of variations to the PETG method, which makes specifying one temperature to print at a tough declare. Some have components that carry their printing temperature considerably decrease whereas others carry the temperature considerably greater. Basically, begin with 245°C and mess around with 5°C greater or decrease to seek out the perfect print high quality for you.
Some 3D printers make the most of a PTFE (teflon) lined hotend as it’s simpler to fabricate than a hotend that’s all-metal from the heatsink to the nozzle. PETG’s printing temperature is true on the threshold of the temperature that PTFE begins to degrade, so some 3D printers may be capable of get away with lower-temperature PETG filaments which have a super temperature at 240°C or much less. For probably the most half, PETG does require an all-metal hotend to have the ability to tune your filament to its fullest, as in whereas you will have profitable prints at 240°C, you do not obtain full power till 255°C.
Normally, PETG is non-abrasive, however when you begin taking part in with components it turns into a case-by-case foundation. Sparkly filament is not abrasive regardless of having non-PETG materials in it, nevertheless it’s widespread so as to add carbon-fiber to extend the stiffness and power of the completed 3D prints, which is extraordinarily abrasive. A simple strategy to keep away from these considerations is to swap over to an Olsson Ruby nozzle or a Nozzle X once you wish to use these supplies.
Layer cooling is barely often crucial. This does depend upon the 3D fashions truly being printed, as reasonably sized fashions will be printed with out cooling and are available out fantastically, however tall and skinny fashions with brief layer instances may have some mild cooling to carry its form. 50% is the utmost you’ll need for excessive overhangs or brief layers, in any other case you might be free to depart the fan off for the very best layer adhesion potential.
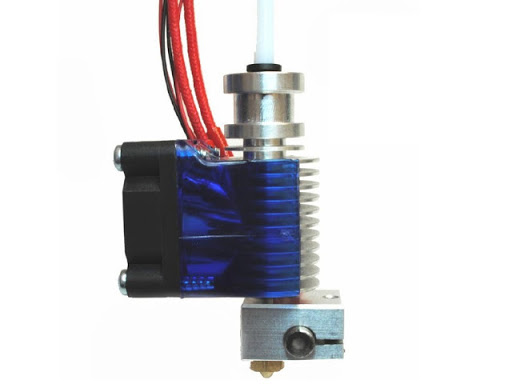
E3D v6 All-metal Hotend
Mattress Necessities
For the very best likelihood of success, it would be best to ensure you have a heated mattress set to 65°C. Some PETG is extra warp-prone than others, so greater temperatures could also be required to provide them sufficient adhesion to the mattress. For those who’re having issue, bump the temperature up by 5°C at a time till adhesion improves.
As for the mattress floor itself, you will have fairly a number of choices to work with, preserving in thoughts that it isn’t an exhaustive checklist, simply the massive gamers. Let’s check out every floor individually:
- LayerLock Powder-Coated PEI – A textured, versatile construct floor that may add a singular look to your 3D prints. Be sure to have already got a magnetic system in place for this to work correctly and preserve it clear with the very best proportion isopropyl alcohol you’ll find. Chances are you’ll have to “smoosh” the primary layer a bit greater than you are used to to get it to stay, however as soon as it’s cooled it normally pops off with out touching it.
- LayerLock Garolite – Whereas it’s the best floor for 3D printing with nylon, LayerLock Garolite remains to be fairly versatile and can be utilized to help PETG 3D printing. It would be best to use any of the adhesives listed under to get further mattress adhesion to lock down your PETG 3D prints. Just a little roughing up with some high-grit sandpaper also can refresh your garolite and provides it extra chunk in your 3D prints to carry onto.
- Glass – In order for you a shiny easy backside to your 3D prints, that is the best way to go. It would be best to use an adhesive of some kind although (verify the checklist under) as a launch agent as some customers have torn chunks of glass out of their mattress because it adheres to their clear PETG print’s first layer.
- BuildTak – An adhesive sheet you’ll be able to apply on to your 3D printer’s mattress or on high of a Flexplate. No adhesive resolution crucial, merely wait in your mattress to chill and use a BuildTak spatula or twist the Flexplate to take away your print. A phrase of warning although, as printing too near the BuildTak can completely bond the 2 collectively and tear chunks of it off your printer’s mattress.
- BuildTak PEI – An adhesive sheet you’ll be able to apply on to your 3D printer’s mattress or on high of a Flexplate. Principally magic. Sticks stable when sizzling and pops off with a delicate faucet when cool. Chances are you’ll have to bump the temperature up barely to get sufficient adhesion to stay (close to 70°C needs to be loads). A skinny smear of an adhesive is very advisable to forestall the PETG from completely bonding to the PEI.
- GeckoTek – An adhesive sheet you’ll be able to apply on to your 3D printer’s mattress or on high of a Flexplate. Obtainable in each a cold and warm variant to raised go well with the capabilities that your 3D printer has.
- Wham Bam PEX – A complete versatile mattress system adhered to the 3D printer’s mattress. A robust magnet retains the spring metal with an adhesive sheet of PEX utilized to it secured to the printer’s mattress in the course of the print, however will be simply eliminated and flexed to pop your print off.
There are at all times new and thrilling strategies for mattress adhesion being developed, so it is necessary to have grasp on what every methodology is greatest used for. You’ll be able to take a look at our 3D Printing Necessities article about mattress surfaces to totally perceive the professionals and cons of each mattress floor you may come throughout whereas 3D printing.
Along with construct floor upgrades, there are additionally all kinds of 3D printer adhesives that you could apply to your 3D printer’s mattress to get an amazing first layer. These adhesives are particularly developed for the 3D printing business, so you’ll be able to belief they’ve been examined to be tried and true 3D printer adhesives. Listed here are the very best 3D printer adhesives that you should use to get the very best first layer for PLA filament:
Most 3D printer mattress adhesives have the identical directions to be used: apply a skinny layer to the construct floor the place your actively 3D printing. Then, wait in your half to chill earlier than eradicating – ready in your 3D printed half to chill makes it a lot simpler to take away, and sure adhesives will typically even “pop” the half out of bed as soon as cooled.

Top quality PRO Collection PETG 3D printing filament is the best choice for once you want dependable printing for each challenge.
Altering Your PETG 3D Printing Filament
When switching between two PETG spools and colours:
- Whereas the extruder is chilly set the warmth to 245°C and look ahead to it to warmth up.
- If you attain 245°C, launch stress on the extruder (by both squeezing the stress launch, flipping a latch, or utterly unscrewing the adjustable tensioner), and rapidly, however persistently pull on the filament to take away it from the hotend with out breaking.
- Proceed releasing stress on the extruder and insert the brand new filament till it reaches the nozzle.
- Run the brand new coloration via the extruder till it runs clear and the brand new coloration is all that’s popping out of the extruder. If you’re switching from a darkish coloration (akin to black) to a lightweight coloration (like white or pure) run some time longer to make certain you have no darkish contamination. With out this step it is potential to be a pair layers in and have the final little bit of filament lastly purge out.
Getting the First Layer of Your PETG 3D Printed Half Proper
The primary layer is a very powerful a part of any print – it units the inspiration that the whole print builds on. You’ll be able to take a look at the in-depth article on easy methods to get an ideal first layer right here, or for a quick abstract of what to think about under are the few issues it’s good to do to get the primary layer to stay effectively.
- You want the print mattress to be stage.
- You want the nozzle to be the proper distance from the mattress in the beginning of the 3D print.
- You want base materials in your PETG to stick to.
Beneath is a video from MatterHackers’ 3D Printing Necessities sequence that may assist information you in the correct route for getting a stellar first layer. On this video, we’ll stroll you thru the steps talked about above intimately so you’ll be able to succeed when 3D printing with PETG filament.
Troublesome When Moist
There are 3D printing supplies that are hygroscopic, which suggests it would actively take up moisture from the air. This can be a issue that you could’t change within the materials, so a hygroscopic materials ignored for lengthy sufficient will attain saturation till it might probably now not take up water. Fortunately this can be a absolutely reversible course of with none materials degradation. Finest practices earlier than 3D printing with any PETG filament is to totally dry it out with a PrintDry PRO for a number of hours (or in a single day when you’ve got the time) and print with it instantly. Until you reside someplace extraordinarily humid with none temperature controls, your spool of PETG needs to be dry sufficient to be used for a number of weeks earlier than needing to be dried again out once more.
Moist 3D printing filament would not simply impression the looks of your 3D print, however breaks down the molecular chains and creates a considerably weaker 3D print, which is why it is so necessary to ensure your filament is dry. Try our in-depth article on how moisture impacts your filament, and how one can efficiently dry your 3D filament right here.

PETG 3D Printing filament is a sturdy and easy-to-print supplies making it nice for useful, end-use elements.
What to do When Issues go Improper When Utilizing PETG 3D Printing Filament – PETG Filament Troubleshooting
There are a number of key issues to verify when your prints aren’t working. However earlier than we have a look at options we have to have a quick description of your signs.
“I can not inform if my printing temperature is true “What to Search for if you’re having bother getting your PETG filament temperature proper:
- If the temperature is just too excessive
PETG tends to get stringier the upper you’re taking the temperature. Small cobweb like strings will internet between completely different elements of the 3D print till it will definitely balls up and sticks to your nozzle, heater block, or wall of your progressing 3D print. So long as you might be assured that your filament is dry and you might be nonetheless encountering stringing, decrease the temperature by 5°C and see if that improves the state of affairs. If not, chances are you’ll simply want to regulate your retraction settings for this barely extra flowy PETG. - If the temperature is just too chilly
You’ll both see that the filament is just not sticking to the earlier layer or that much less filament is being extruded than crucial. You’ll get a component that isn’t robust and will be pulled aside simply or visually has many small voids alongside its partitions the place filament could not be extruded effectively sufficient. In both case, it is best to enhance the temperature by 5°C and check out once more till you get constant extrusion and layers that absolutely adhere to one another.
“I can not get the primary layer to stay.”
- Ensure that the nozzle is on the proper top.
Try the 3D printing Necessities: Mattress Leveling for what to search for in a super first layer. PETG, opposite to virtually each different materials, truly prefers to be “laid down” onto the floor quite than smeared into it. Elevate your nozzle out of your mattress ever so barely so it isn’t as squished as traditional. - Ensure that the print mattress is stage.
Try the 3D printing Necessities: Mattress Leveling for greatest practices when leveling your mattress. If a part of the mattress is just too removed from the nozzle and the opposite a part of the mattress is just too shut, filament can drag round and create compounding issues.
“The half has unhealthy inside layers and high surfaces.”
- Test the temperatures.
Be sure to’re printing on the proper temperature and that your mattress is the correct temperature. Too chilly on both of those and there will not be sufficient adhesion between the 2 surfaces. - Test the filament stress.
Too free and the extruder gears will not have the chunk they should push the filament round, too tight and filament will be deformed and never extrude reliably. - Clear the filament drive gear (if it appears to be like clogged).
For those who had a print fail the place the job continued however no filament was being extruded, then the drive gear doubtless chewed a spot within the filament and crammed its tooth with filament, lowering its general grip.
“The surface edges of my elements have numerous little bumps on them.”
- Ensure that your printer is getting sufficient information.
If printing from a pc, be certain that the pc is just not too busy to feed the printer instructions. If the printer is pausing it’s normally as a result of printer being too busy. - Print from SD card.
You may get round this by printing from an SD card. Generally this implies you lose the flexibility to manage the printer out of your PC, however its a assured strategy to take away your PC’s {hardware} capabilities from the equation. - Supply higher PETG.
We’ve discovered that the standard of your print materials can have a big effect on the standard of your half. Getting higher PLA can assist you get higher elements. Nonetheless, do not be too fast to imagine the issue is in your PLA. With the correct settings and endurance hobbyists have succeeded in printing all types of supplies lots of which have very low viscosity and inconsistency. You need to be capable of get not less than usable elements even with some decrease high quality filament. - Your retraction settings want tuning.
In case your retractions settings aren’t set proper, your printer might be overextruding after every retraction leaving little bumps on the location the place it began extruding once more. Play with the “additional restart distance” and see if that helps. - Your filament is moist.
Many filaments can take up water from the air and PETG is likely one of the most infamous. As a result of PETG is hygroscopic, it’s good to dry your spool earlier than utilizing it, which may simply be carried out utilizing a PrintDry PRO to tug the moisture out of your filament. When not in use, you can too use silica gel packets to forestall your spool from reabsorbing water, however these packets will not pull moisture that’s already current within the filament.
“Tall sections of my prints look melted or squished collectively.”
- Print multiple half at a time.
By including extra elements to the construct plate you might be growing the general cross sectional space of every layer, giving extra time for the separate objects to chill than in the event that they had been printed on their very own. Since you’ll be able to’t use an excessive amount of layer cooling with out dropping layer adhesion, including extra elements to the construct plate is an acceptable resolution.
“My printer won’t put out any materials.”
- Ensure that your sizzling finish is getting sizzling.
Test that the new finish is heating in any respect. If it’s not it’s good to have your printer serviced. It’s doubtless that you’ve got a free connection or your electronics have been fried (assuming the printer remains to be related and responding to your host software program :). - Clear the drive gear and modify stress.
The very first thing we’re going to do is clear the filament touching drive gear and be certain that we’ve correct stress towards the filament. Often improper stress or a clogged drive gear will make the print look extra like the image we’ve for low temperature filament, nevertheless it typically does stop extrusion all collectively. Clear the pinch wheel with a wire brush, and ensure your stress is nice and stable (an excessive amount of also can stop extrusion and is extra widespread with direct drives [the motor is directly connected to the drive gear] however much less widespread with geared drives). - Take away the present filament.
It might be that you’ve got a small particle in your extruder tip jamming the plastic. Use the change filament method described above to tug out any particles which might be within the extruder tip. - Test for and take away jams between the extruder and sizzling finish.
That is probably the most excessive sort of downside as a result of now it’s time to take issues aside. Generally warmth can creep up the filament within the extruder and trigger a bulge that then cools and prevents any additional extrusion. That is normally on the junction between the extruder and sizzling finish. Take off the extruder and take away all of the PLA you’ll be able to (chances are you’ll want the new finish sizzling (80c-100c) to get all the fabric out. If you cannot get out all of the filament by pulling it out chances are you’ll have to try to drive it down via the new finish. We normally use a small allen wrench. If this fails you’ll be able to try to drill out the extruder or sizzling finish however chances are you’ll want to interchange elements. Remember to take precautions towards being shocked or burned. If you’re not certified to do that work discover somebody who’s, quite than threat damage.
Thanks for studying How To Succeed When Printing In PETG.
Pleased Printing! – MatterHackers
P.S. Try our Filament Comparability Information to get the news on all the newest and best filaments! Or browse the MatterHackers Retailer for all of your filament wants.
[ad_2]