
[ad_1]
Amazon Redshift is the main cloud knowledge warehouse that delivers as much as 3x higher worth efficiency in comparison with different cloud knowledge warehouses by utilizing massively parallel question execution, columnar storage on high-performance disks, and outcomes caching. You possibly can confidently run mission-critical workloads, even in extremely regulated industries, as a result of Amazon Redshift comes with out-of-the-box safety and compliance.
You should use your company id suppliers (IdPs), for instance Azure AD, Lively Listing Federation Companies, Okta, or Ping Federate, with Amazon Redshift to supply single sign-on (SSO) to your customers to allow them to use their IdP accounts to log in and entry Amazon Redshift. With federation, you’ll be able to centralize administration and governance of authentication and permissions. For extra details about the federation workflow utilizing AWS Identification and Entry Administration (IAM) and an IdP, see Federate Database Person Authentication Simply with IAM and Amazon Redshift.
This publish reveals you the right way to use the Amazon Redshift browser-based plugin with SecureAuth to allow federated SSO into Amazon Redshift.
Resolution overview
To implement this resolution, you full the next high-level steps:
- Configure your SecureAuth IdP v20.06 or later, together with customers, teams, and SAML software.
- Configure your AWS service supplier, together with IdP, IAM coverage, and IAM position.
- Arrange your SQL Workbench/J shopper and check SSO.
The method move for federated authentication consists of the next steps:
- The consumer logs in from SQL Workbench/J.
- The IdP authenticates utilizing the company consumer title and password, and returns a SAML assertion.
- The shopper makes use of the AWS SDK to name AWS Safety Token Service (AWS STS) to imagine a job with SAML.
- AWS STS returns momentary AWS credentials.
- The shopper makes use of the momentary AWS credentials to attach Amazon Redshift.
The next diagram illustrates this course of move.

Conditions
Earlier than beginning this walkthrough, you should have the next:
- An Amazon Redshift cluster
- A SecureAuth account
- A database consumer with superuser permissions
- Amazon Redshift DB teams pre-created and obligatory privileges assigned to them
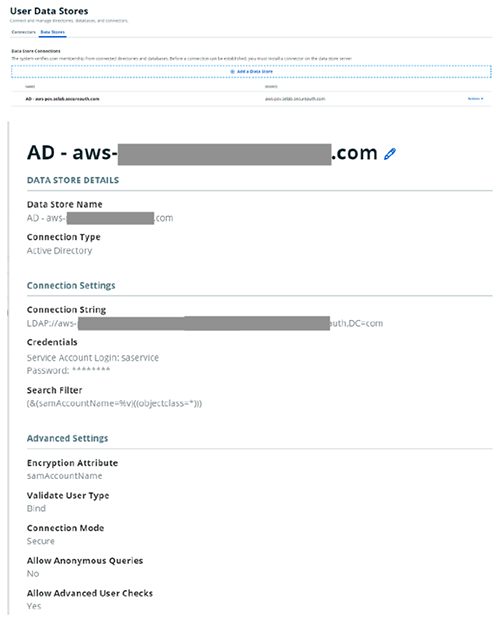
Arrange a consumer knowledge retailer at your IdP (SecureAuth)
For directions on establishing your consumer knowledge retailer integration with SecureAuth, see Add a Person Knowledge Retailer. The next screenshot reveals a pattern setup.
Configure your IdP (SecureAuth)
The following step is to create a brand new realm in your IdP.
- On the SecureAuth portal, on the Create Realms menu, select Create New From Template.

- Choose the appliance (for this publish, Amazon Net Companies) from the listing to ascertain the goal useful resource for the brand new realm.
- For Web page Title/Header, enter the title to look on the internet admin and end-user login pages (for this publish, we enter
Amazon Redshift). - For Knowledge supply, select the kind of Lively Listing integration to make use of together with your realm (the consumer knowledge supply we created earlier).

- For Begin Location, select At Identification Supplier to specify the supplier the end-user makes use of to provoke the login course of.
- For World Aux Fields, set World Aux ID 1 to true.
- For SAML Client URL, enter
http://localhost:7890/redshift/. - Configure the SAML attributes in line with the next desk.
| Attribute Quantity | SAML Attributes | Worth |
| Attribute 1 | https://aws.amazon.com/SAML/Attributes/Function | Full Group DN Record |
| Attribute 2 | https://aws.amazon.com/SAML/Attributes/RoleSessionName | Authenticated Person ID |
| Attribute 3 | https://redshift.amazon.com/SAML/Attributes/AutoCreate | World Aux ID 1 |
| Attribute 4 | https://redshift.amazon.com/SAML/Attributes/DbUser | Authenticated Person ID |
The worth of Attribute 1 should be dynamically populated with the AWS roles related to the consumer that you just use to entry the Amazon Redshift cluster. This is usually a multi-valued SAML attribute to accommodate conditions the place a consumer belongs to a number of AD teams or AWS roles with entry to the Amazon Redshift cluster. The format of contents inside Attribute 1 seem like arn:aws:iam::AWS-ACCOUNT-NUMBER:position/AWS-ROLE-NAME, arn:aws:iam::AWS-ACCOUNT-NUMBER:saml-provider/SAML-PROVIDER-NAME after it’s dynamically framed utilizing the next steps.
The dynamic inhabitants of Attribute 1 (https://aws.amazon.com/SAML/Attributes/Function) might be executed utilizing SecureAuth’s transformation engine.
- Allow the transformation engine and use a change script.
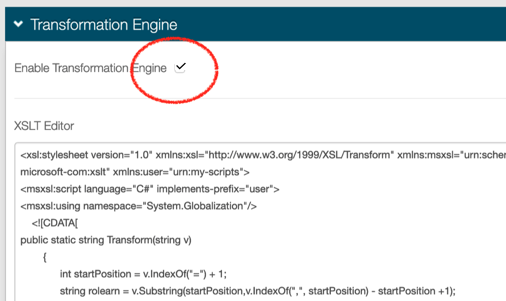
- Use the next pattern XSLT rework script as a part of the SecureAuth’s transformation engine to take the AD group names a consumer belongs to and generate the IAM roles’ data by modifying the AD group names with ARN particulars.
We’re assuming that the AD group title and IAM position title would be the identical. That is key for the transformation to work.
It’s a must to substitute the next within the script:
- AWS-ACCOUNT-NUMBER – A 12-digit AWS account quantity the place you configure the Amazon Redshift entry IAM roles.
- SAML-PROVIDER-NAME – The title of SAML supplier that you just create on the AWS facet inside IAM utilizing the SAML supplier metadata file from SecureAuth. Since you haven’t created the SAML supplier but in IAM, make a remark of the title that you just’re offering right here and reuse that title when you find yourself doing the AWS facet of the configuration.
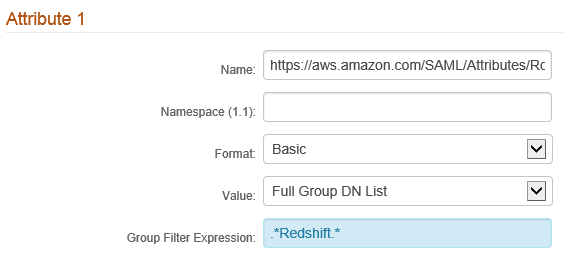
- If you wish to filter down the variety of AD teams to those which are related to Amazon Redshift entry, you’ll be able to apply a bunch filter expression for Attribute 1. For instance, within the following screenshot, we’re assuming that every one AD teams related to Amazon Redshift entry comprise the phrase “Redshift”. That is represented as a daily expression.
- Set the worth of World Aux ID 1 to
true.
When the setup is full, your SecureAuth facet settings ought to look one thing much like the next screenshots.


- When the configuration is full, obtain the SAML supplier metadata XML file from SecureAuth.
Configure your service supplier (AWS)
The following step is to arrange the service supplier.
Create an IdP in IAM
To create an IdP in IAM, full the next steps:
- On the IAM console, select Identification suppliers within the navigation pane.

- Select Create Supplier.

- Within the Configure Supplier part, select the supplier sort as SAML, enter the supplier title as the identical one as you talked about throughout SecureAuth configuration, and add the metadata doc that you just received earlier out of your IdP.

- On the following web page, select Create to finish the IdP creation inside IAM.
You must see a web page much like the next after the IdP creation is full.

Create a SAML 2.0 federation IAM position and corresponding coverage
For every Amazon Redshift DB group of customers, we have to create an IAM position and the corresponding IAM coverage. Repeat the steps on this part for every DB group.
- On the IAM console, select Roles within the navigation pane.
- Select Create position.

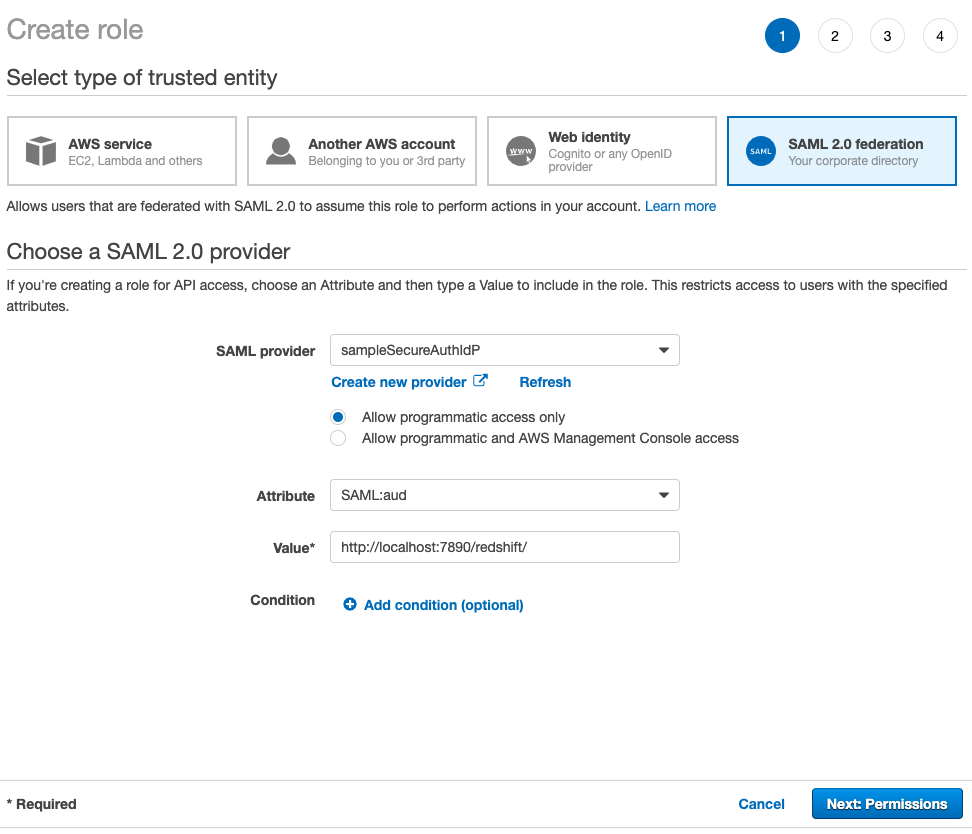
- For Choose sort of trusted entity, select SAML 2.0 federation.
- For SAML supplier, select the IdP you created earlier.
- Choose Permit programmatic entry solely.
- For Attribute¸ select SAML:aud.
- For Worth, enter
http://localhost:7890/redshift/. - Select Subsequent: Permissions.
- Underneath Connect permissions insurance policies, select Create coverage.

- Select the JSON tab on the Create coverage web page.
- Enter the next pattern IAM coverage, with the next data:
- REGION – The Area the place your Amazon Redshift cluster exists. For instance,
us-east-1. - AWS-ACCOUNT-NUMBER – The 12-digit account quantity during which your Amazon Redshift cluster exists.
- REDSHIFT-CLUSTER-IDENTIFIER – Your Amazon Redshift cluster identifier that you just gathered earlier.
- DATABASE – Your Amazon Redshift cluster database title.
- UNIQUE-ROLE-IDENTIFIER – For now, depart it as is; it’s important to come again to the coverage and alter it after the position is created.
- REDSHIFT-DB-GROUP – The database group title inside Amazon Redshift.
- REGION – The Area the place your Amazon Redshift cluster exists. For instance,
- On the Overview coverage web page, enter a reputation and outline.
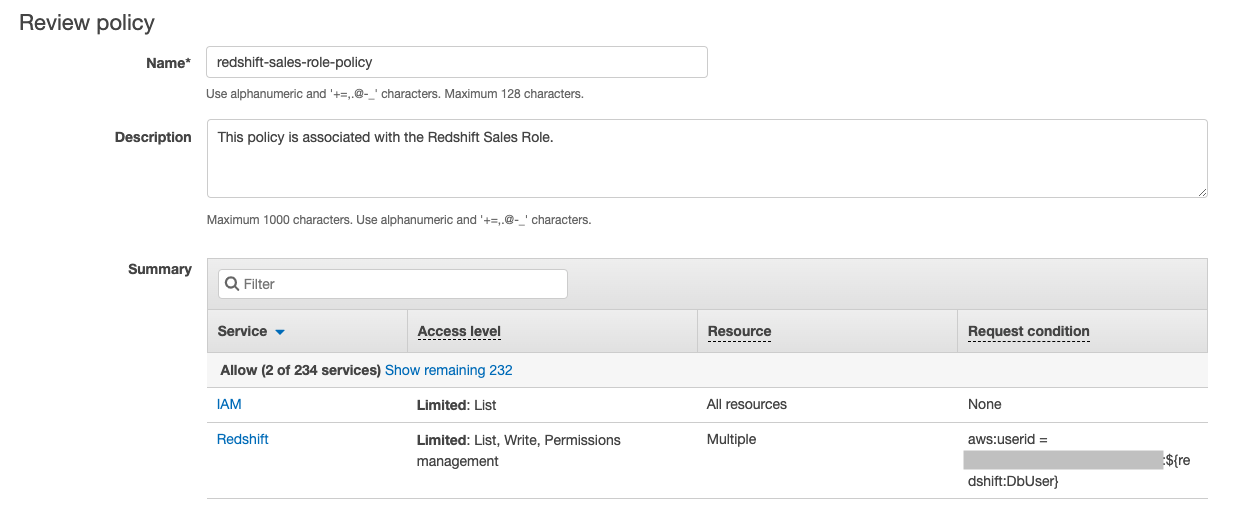
- Select Create coverage.
- When the coverage creation is full, return to the Create position web page, select the refresh icon, and seek for the newly created coverage.


- Select the coverage and select Subsequent: Tags.
- Add any tags that you really want after which Subsequent: Overview.
- Within the Overview part, present a job title and select Create position.
Be sure that your IAM position title matches with the AD teams that you just’re creating to assist Amazon Redshift entry. The transformation script that we mentioned within the SecureAuth part is assuming that the AD group title and the Amazon Redshift entry IAM position title are the identical.

We use the AWS Command Line Interface (AWS CLI) to fetch the distinctive position identifier for the position you simply created.
- Configure the AWS CLI with the required entry token and secret entry key previous to working the next command:
Exchange <worth> with the role-name that you just simply created. So, on this instance, the command is:
- From the output JSON, word the worth of
RoleId.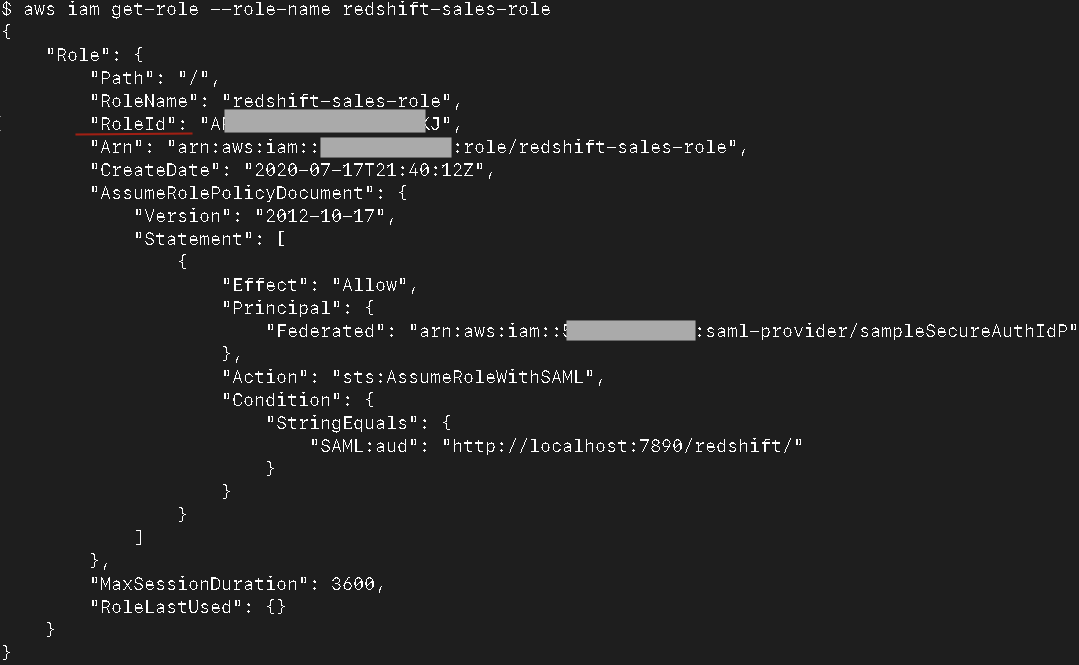
- On the IAM console, open the coverage you created earlier.
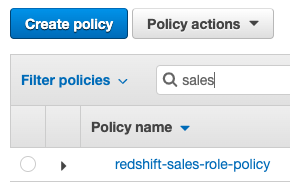
- Select Edit coverage.

- Select the JSON tab.

- Exchange UNIQUE-ROLE-IDENTIFIER with the
RoleIdfetched earlier. - Select Overview coverage and Save modifications.
You’ve now created an IAM position and coverage equivalent to the DB group for which you’re attempting to allow IAM-based entry.
Log in to Amazon Redshift utilizing IdP-based credentials
To log in to Amazon Redshift utilizing your IdP-based credentials, full the next steps:
- Obtain the most recent Amazon Redshift JDBC driver with the AWS SDK for Java.
- Launch the SQL Workbench/J app.
- Underneath Handle Drivers, add the Amazon Redshift JDBC driver.

- Create a brand new connection profile for the Amazon Redshift connection.
- Select com.amazon.redshift.jdbc.Driver as the driving force.

- For URL, enter
jdbc:redshift:iam://REDSHIFT-CLUSTER-ENDPOINT:PORT#/DATABASE.
For instance, jdbc:redshift:iam://sample-redshift-cluster-1.cxqXXXXXXXXX.us-east-1.redshift.amazonaws.com:5439/dev.
- Go away the Username and Password fields empty.
- Choose Autocommit.

- Select Prolonged Properties and supply the next values:
- plugin_name –
com.amazon.redshift.plugin.BrowserSamlCredentialsProvider - login_url – The login URL out of your IdP once you did the setup in your IdP facet. For instance,
https://XYZ.id.secureauth.com/SecureAuth2/. - dbgroups – The DB group that you just use for login (it is a required parameter). This DB group should exist in Amazon Redshift. For instance,
finance. - preferred_role – The popular IAM position that you just wish to use. If just one IAM position is populated within the SAML token offered by IdP, this isn’t required.
- plugin_name –
- Select Take a look at to test if the configuration is working.
You have to be redirected to your IdP in a browser window for authentication.

You’ll see the multi-factor authentication display if it has been arrange inside SecureAuth.

You must see the profitable login within the browser in addition to within the SQL Workbench/J app.


- Connect with Amazon Redshift and run a pattern question akin to
choose current_user, which ought to present the presently logged-in consumer.
Abstract
Amazon Redshift helps stringent compliance and safety necessities with no further price, which makes it ideally suited for extremely regulated industries. With federation, you’ll be able to centralize administration and governance of authentication and permissions by managing customers and teams throughout the enterprise IdP and use them to authenticate to Amazon Redshift. SSO allows customers to have a seamless consumer expertise whereas accessing varied functions within the group.
On this publish, we walked you thru a step-by-step information to configure and use SecureAuth as your IdP and enabled federated SSO to an Amazon Redshift cluster. You possibly can observe these steps to arrange federated SSO to your group and handle entry privileges based mostly on learn/write privileges or by enterprise operate and passing group membership outlined in your SecureAuth IdP to your Amazon Redshift cluster.
If in case you have any questions or strategies, please depart a remark.
In regards to the Authors
 Srikanth Sopirala is a Principal Analytics Specialist Options Architect at AWS. He’s a seasoned chief who’s enthusiastic about serving to clients construct scalable knowledge and analytics options to achieve well timed insights and make crucial enterprise selections. In his spare time, he enjoys studying, spending time together with his household, and street biking.
 Sandeep Veldi is a Sr. Options Architect at AWS. He helps AWS clients with prescriptive architectural steerage based mostly on their use instances and navigating their cloud journey. In his spare time, he likes to spend time together with his household.
 BP Yau is a Sr Analytics Specialist Options Architect at AWS. His position is to assist clients architect large knowledge options to course of knowledge at scale. Earlier than AWS, he helped Amazon.com Provide Chain Optimization Applied sciences migrate the Oracle Knowledge Warehouse to Amazon Redshift and constructed the following technology large knowledge analytics platform utilizing AWS applied sciences.
 Jamey Munroe is Head of Database Gross sales, World Verticals and Strategic Accounts. He joined AWS as one in all its first Database and Analytics Gross sales Specialists, and he’s enthusiastic about serving to clients drive bottom-line enterprise worth all through the total lifecycle of information. In his spare time, he enjoys fixing house enchancment DIY undertaking challenges, fishing, and aggressive biking.
[ad_2]