
[ad_1]
Final Up to date on December 29, 2021
Working your Python scripts is a vital step within the improvement course of, as a result of it’s on this method that you just’ll get to search out out in case your code works as you meant it to. It’s, additionally, usually the case that we would want to move info to the Python script for it to perform.
On this tutorial, you’ll uncover numerous methods of working and passing info to a Python script.
After finishing this tutorial, you’ll know:
- Learn how to run a Python script utilizing the command-line interface, the Jupyter Pocket book or an Built-in Growth Atmosphere (IDE).
- Learn how to move info to a Python script utilizing the
sys.argv command, by hard-coding the enter variables in Jupyter Pocket book, or by way of the interactive use of the
enter() perform.
Let’s get began.

Working and Passing Info to a Python Script
Photograph by Andrea Leopardi, some rights reserved.
Tutorial Overview
This tutorial is split into two elements; they’re:
- Working a Python Script
- Utilizing a Command-Line Interface
- Utilizing Jupyter Pocket book
- Utilizing an Built-in Growth Atmosphere (IDE)
- Python Enter
Working a Python Script:
Utilizing a Command-Line Interface
The command-line interface is used extensively for working Python code.
Let’s check just a few instructions by first opening up a Command Immediate or Terminal window, relying on the working system that you’re engaged on.
Typing the
python command in your command-line interface will provoke a Python interactive session. You will notice {that a} message seems informing you of the Python model that you’re utilizing.
|
Python 3.7.4 (default, Aug 13 2019, 15:17:50) [Clang 4.0.1 (tags/RELEASE_401/final)] :: Anaconda, Inc. on darwin Sort “assist”, “copyright”, “credit” or “license” for extra info. |
Any statements that you just write in your command-line interface throughout an interactive session will likely be executed instantly. For instance, typing out 2 + 3 returns a worth of 5:
Utilizing an interactive session on this method has its benefits, as a result of you’ll be able to check out strains of Python code simply and rapidly. Nevertheless, it’s not the best possibility if we’re extra desirous about writing lengthier packages, as could be the case if we’re growing a machine studying algorithm. The code additionally disappears as soon as the interactive session is terminated.
Another possibility could be to run a Python script. Let’s begin with a easy instance, first.
In a textual content editor (equivalent to, Notepad++, Visible Studio Code or Elegant Textual content), kind the assertion
print(“Hi there World!”) and save the file to test_script.py, or some other title of your alternative so long as you embrace a .py extension.
Now head again to your command-line interface and sort the
python command, adopted by the title of your script file. Earlier than you accomplish that, you may want to alter the trail to level to the listing that comprises the script file. Working the script file ought to then produce the next output:
Let’s now write a script file that hundreds a pre-trained Keras mannequin and outputs a prediction for this picture of a canine. It’s usually the case that we might additionally have to move info to the Python script within the type of command-line arguments. For this function, we will likely be utilizing the
sys.argv command to move to the script the picture path and the variety of top-guesses to return. We might have as many enter arguments because the code requires, during which case we might carry on studying the inputs from the argument checklist.
The script file that we are going to be working now comprises the next code:
|
1 2 3 4 5 6 7 8 9 10 11 12 13 14 15 16 17 18 19 20 21 22 23 24 25 26 27 28 29 30 |
import sys import numpy as np from tensorflow.keras.purposes import vgg16 from tensorflow.keras.purposes.vgg16 import preprocess_input, decode_predictions from tensorflow.keras.preprocessing import picture
# Load the VGG16 mannequin pre-trained on the ImageNet dataset vgg16_model = vgg16.VGG16(weights=‘imagenet’)
# Learn the command-line argument handed to the interpreter when invoking the script image_path = sys.argv[1] top_guesses = sys.argv[2]
# Load the picture, resized based on the mannequin goal dimension img_resized = picture.load_img(image_path, target_size=(224, 224))
# Convert the picture into an array img = picture.img_to_array(img_resized)
# Add in a dimension img = np.expand_dims(img, axis=0)
# Scale the pixel depth values img = preprocess_input(img)
# Generate a prediction for the check picture pred_vgg = vgg16_model.predict(img)
# Decode and print the highest 3 predictions print(‘Prediction:’, decode_predictions(pred_vgg, high=int(top_guesses))) |
Within the above code, we learn the command line arguments utilizing sys.argv[1] and sys.argv[2] for the primary two arguments. We will run the script by making use of the python command adopted by the title of the script file, and additional passing it as arguments the picture path (after the picture been saved to disk) and the variety of high guesses that we want to predict:
|
python pretrained_model.py canine.jpg 3 |
The place pretrained_model.py is the title of the script file, and the canine.jpg picture has been saved into the identical listing that additionally comprises the Python script.
The generated high three guesses are the next:
|
Prediction: [[(‘n02088364’, ‘beagle’, 0.6751468), (‘n02089867’, ‘Walker_hound’, 0.1394801), (‘n02089973’, ‘English_foxhound’, 0.057901423)]] |
However there could be extra in command line. For instance, the next command line will run the script in “optimized” mode, which the debugging variable __debug__ is about to False and assert statements are skipped:
and the next is to launch the script with a Python module, such because the debugger:
|
python –m pdb test_script.py |
We may have one other submit about using the debugger and profilers.
Utilizing Jupyter Pocket book
Working a Python script from the command-line interface is a simple possibility in case your code generates a string output and never a lot else.
Nevertheless, after we are working with photographs, it’s usually fascinating to generate a visible output too: we may be checking the correctness of any pre-processing that’s utilized to the enter picture earlier than feeding it right into a neural community, or visualising the consequence that the neural community produces. The Jupyter Pocket book affords an interactive computing surroundings that may assist us obtain this.
A method of working a Python script by way of the Jupyter Pocket book interface is to easily add the code to a “cell” within the pocket book. However this implies your code stays contained in the Jupyter pocket book and can’t be accessed elsewhere, equivalent to utilizing the command line as above. One other means is to make use of the
run magic command, prefixed by the
% character. Strive typing the next code right into a cell in Jupyter Pocket book:
|
%run pretrained_model.py canine.jpg 3 |
Right here, we’re once more specifying the title of the Python script file, as pretrained_model.py, adopted by the picture path and the variety of high guesses because the enter arguments. You will notice that the highest three predictions are printed beneath the cell that produced this consequence.
Now, let’s say that we want to show the enter picture as a way to verify that it has been loaded based on the mannequin goal dimension. For this function, we’ll modify the code barely as follows and save into a brand new Python script, pretrained_model_image.py:
|
1 2 3 4 5 6 7 8 9 10 11 12 13 14 15 16 17 18 19 20 21 22 23 24 25 26 27 28 29 30 31 32 33 34 |
import sys import numpy as np import matplotlib.pyplot as plt from tensorflow.keras.purposes import vgg16 from tensorflow.keras.purposes.vgg16 import preprocess_input, decode_predictions from tensorflow.keras.preprocessing import picture
# Load the VGG16 mannequin pre-trained on the ImageNet dataset vgg16_model = vgg16.VGG16(weights=‘imagenet’)
# Learn the arguments handed to the interpreter when invoking the script image_path = sys.argv[1] top_guesses = sys.argv[2]
# Load the picture, resized based on the mannequin goal dimension img_resized = picture.load_img(image_path, target_size=(224, 224))
# Convert the picture into an array img = picture.img_to_array(img_resized)
# Show the picture to verify that it has been appropriately resized plt.imshow(img.astype(np.uint8))
# Add in a dimension img = np.expand_dims(img, axis=0)
# Scale the pixel depth values img = preprocess_input(img)
# Generate a prediction for the check picture pred_vgg = vgg16_model.predict(img)
# Decode and print the highest 3 predictions print(‘Prediction:’, decode_predictions(pred_vgg, high=int(top_guesses))) |
Working the newly saved Python script by way of the Jupyter Pocket book interface now shows the resized $224 occasions 224$ pixel picture, along with printing the highest three predictions:
|
%run pretrained_model_image.py canine.jpg 3 |

Working a Python Script in Jupyter Pocket book
Alternatively, we will trim down the code to the next (and reserve it to yet one more Python script, pretrained_model_inputs.py):
|
1 2 3 4 5 6 7 8 9 10 11 12 13 14 15 16 17 18 19 20 21 22 23 |
# Load the VGG16 mannequin pre-trained on the ImageNet dataset vgg16_model = vgg16.VGG16(weights=‘imagenet’)
# Load the picture, resized based on the mannequin goal dimension img_resized = picture.load_img(image_path, target_size=(224, 224))
# Convert the picture into an array img = picture.img_to_array(img_resized)
# Show the picture to verify that it has been appropriately resized plt.imshow(img.astype(np.uint8))
# Add in a dimension img = np.expand_dims(img, axis=0)
# Scale the pixel depth values img = preprocess_input(img)
# Generate a prediction for the check picture pred_vgg = vgg16_model.predict(img)
# Decode and print the highest 3 predictions print(‘Prediction:’, decode_predictions(pred_vgg, high=top_guesses)) |
And outline the enter variables in one of many cells of the Jupyter Pocket book itself. Working the Python script on this method would require that we additionally make use of the
–i possibility after the
%run magic:
|
%run –i pretrained_model_inputs.py |
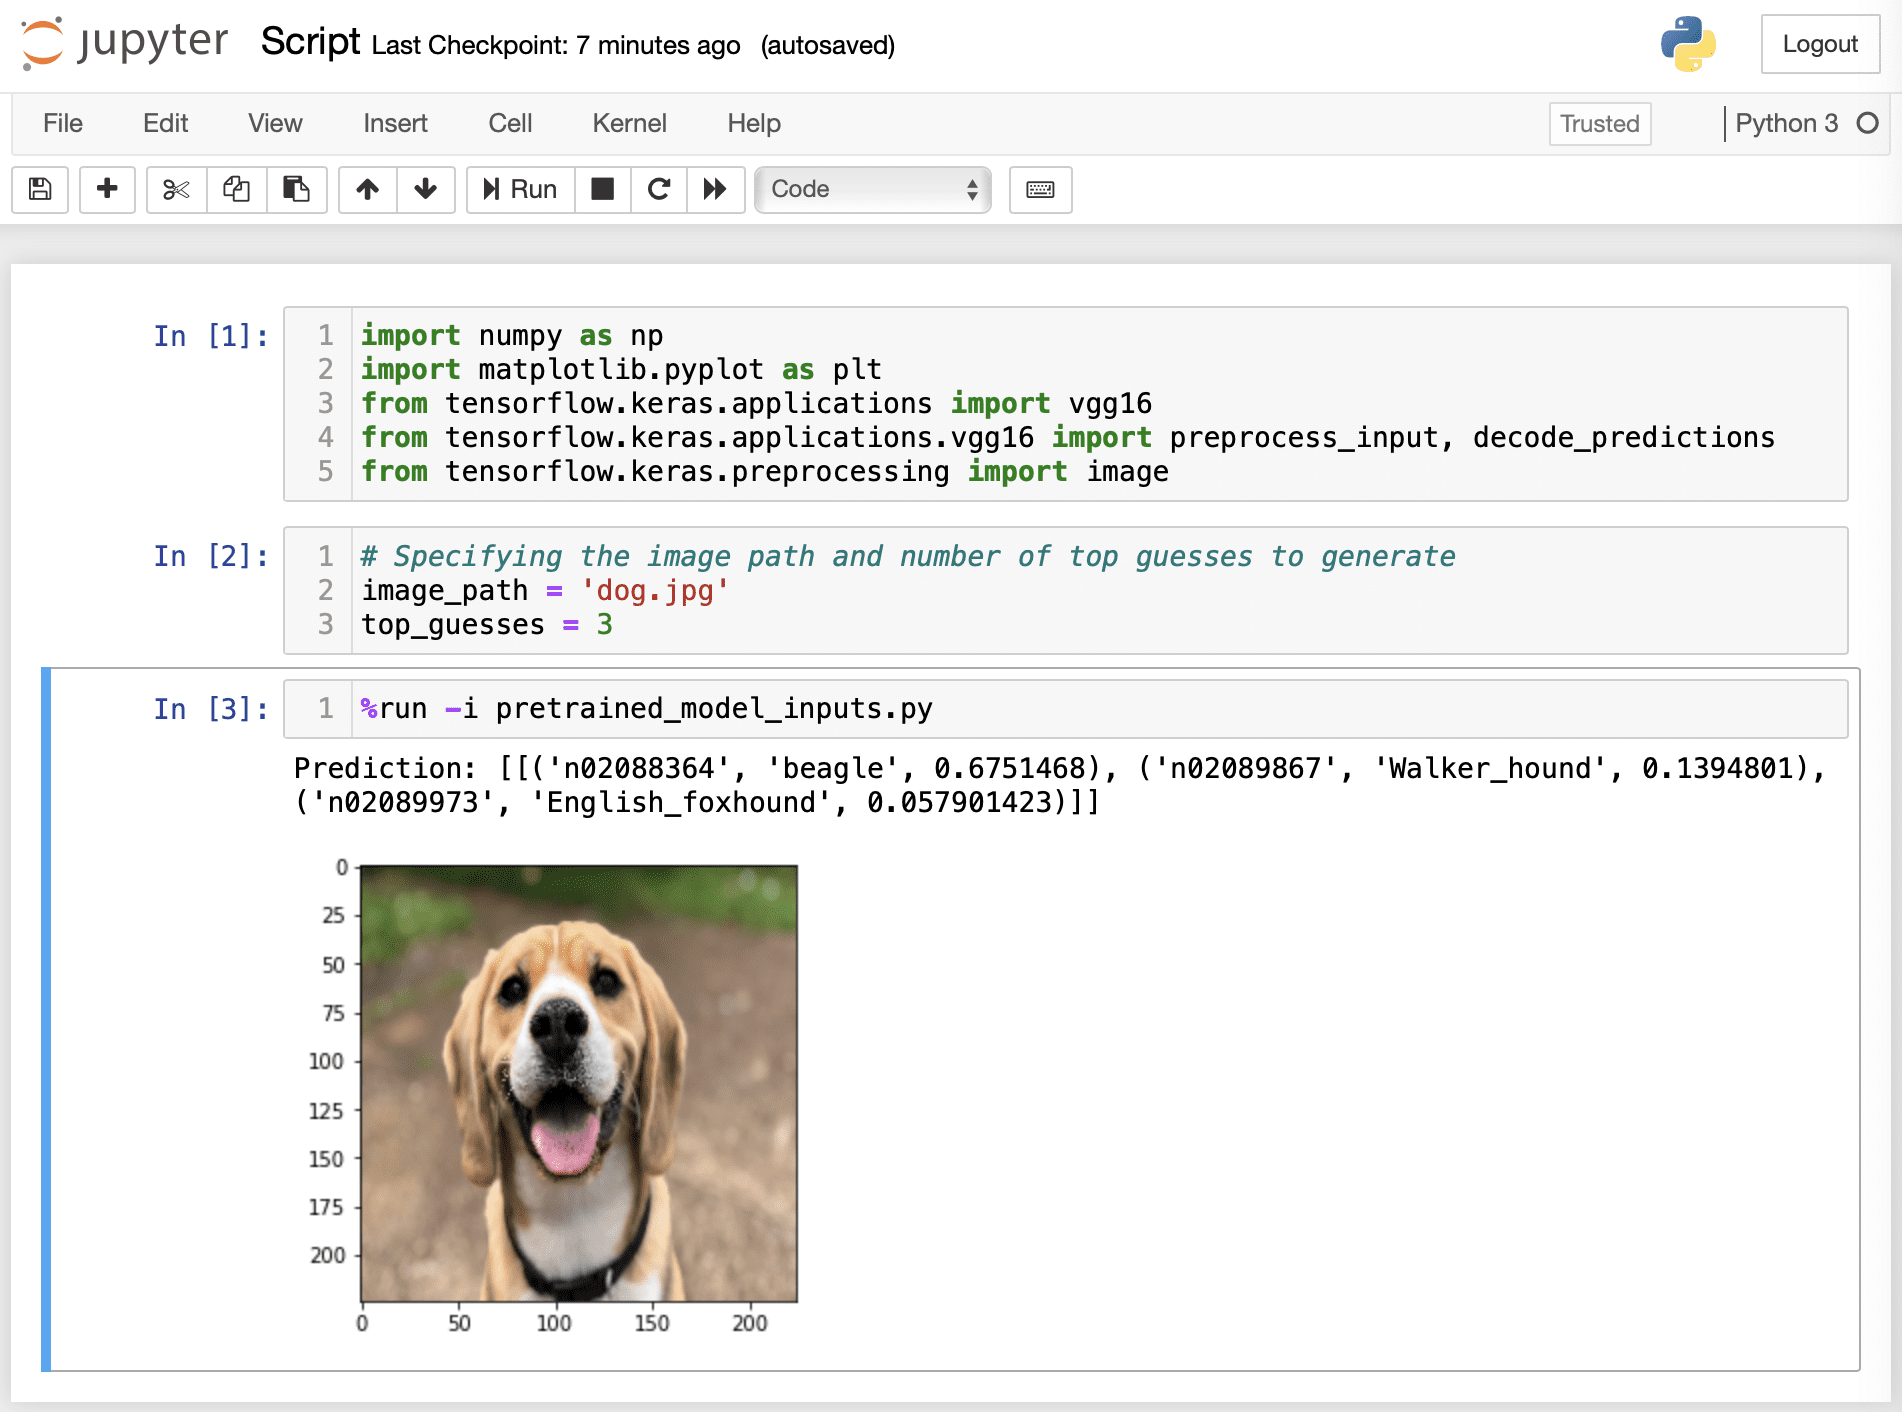
Working a Python Script in Jupyter Pocket book
The benefit in doing so is to achieve simpler entry to variables contained in the Python script that may be outlined interactively.
As your code grows, combining using a textual content editor with Jupyter Pocket book might present for a handy means ahead: the textual content editor can be utilized to create Python scripts, which retailer code that may be reused, whereas the Jupyter Pocket book supplies an interactive computing surroundings for simpler information exploration.
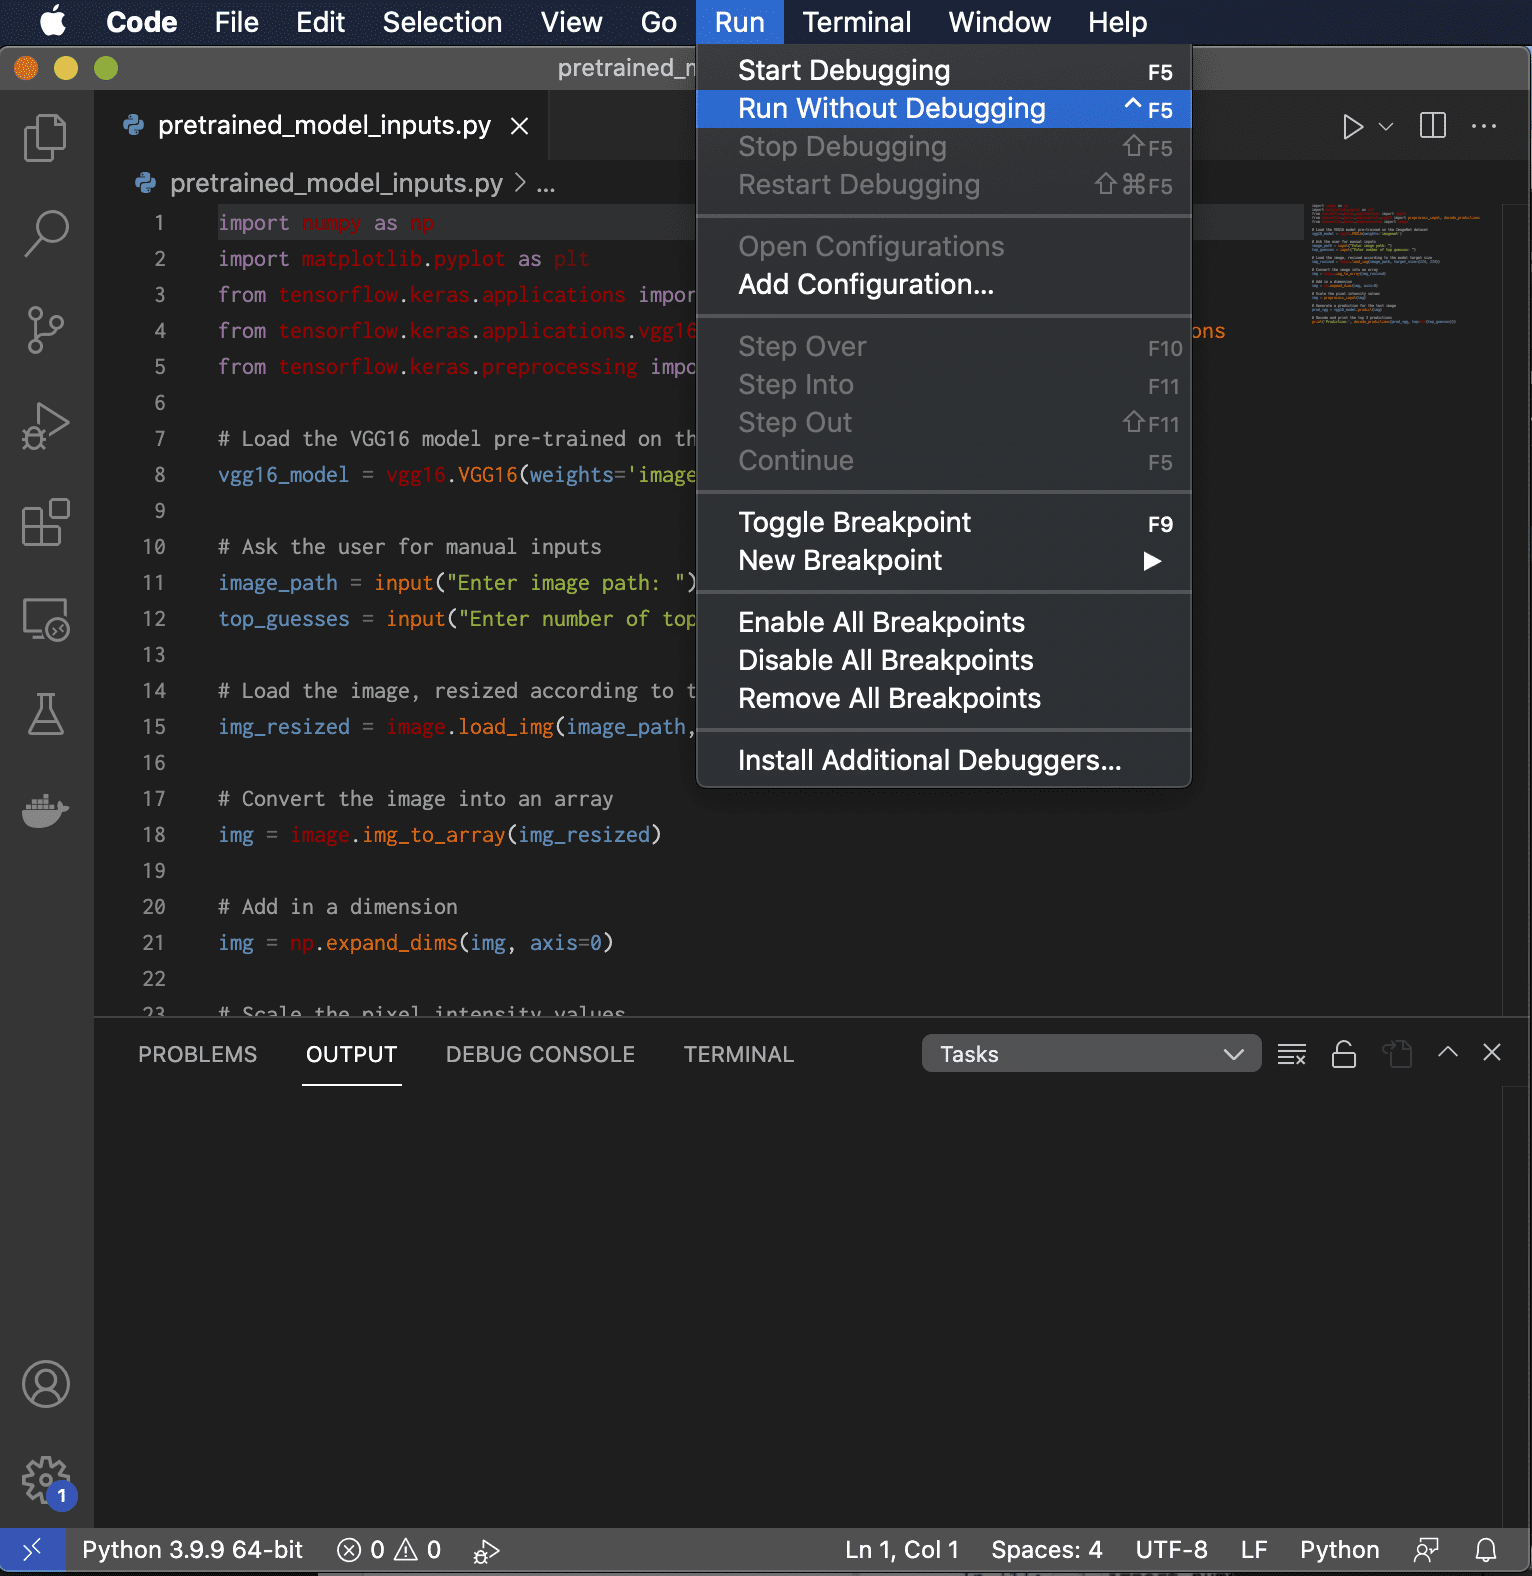
Utilizing an Built-in Growth Atmosphere (IDE)
An alternative choice is to run the Python script from an IDE. This requires {that a} challenge is created first and the Python script with a .py extension is added to it.
If we needed to think about PyCharm or Visible Studio Code because the IDE of alternative, this is able to require that we create a brand new challenge, and subsequently select the model of Python interpreter that we want to work with. After including the Python script to the newly created challenge, this may be run to generate an output. The next is a screenshot of working Visible Studio Code on macOS. Relies on the IDE, there needs to be an choice to run the code with or with out the debugger.
Python Enter
We’ve, thus far, thought-about the choices of passing info to the Python script by the use of the
sys.argv command, or by hard-coding the enter variables in Jupyter Pocket book earlier than working the script.
An alternative choice is to take an enter from the consumer by way of the
enter() perform.
Contemplate the next code:
|
1 2 3 4 5 6 7 8 9 10 11 12 13 14 15 16 17 18 19 20 21 22 23 24 25 26 27 28 29 30 |
import numpy as np import matplotlib.pyplot as plt from tensorflow.keras.purposes import vgg16 from tensorflow.keras.purposes.vgg16 import preprocess_input, decode_predictions from tensorflow.keras.preprocessing import picture
# Load the VGG16 mannequin pre-trained on the ImageNet dataset vgg16_model = vgg16.VGG16(weights=‘imagenet’)
# Ask the consumer for guide inputs image_path = enter(“Enter picture path: “) top_guesses = enter(“Enter variety of high guesses: “)
# Load the picture, resized based on the mannequin goal dimension img_resized = picture.load_img(image_path, target_size=(224, 224))
# Convert the picture into an array img = picture.img_to_array(img_resized)
# Add in a dimension img = np.expand_dims(img, axis=0)
# Scale the pixel depth values img = preprocess_input(img)
# Generate a prediction for the check picture pred_vgg = vgg16_model.predict(img)
# Decode and print the highest 3 predictions print(‘Prediction:’, decode_predictions(pred_vgg, high=int(top_guesses))) |
Right here, the consumer is prompted to manually enter the picture path (the picture has been saved into the identical listing that additionally comprises the Python script and, therefore, specifying the picture title is enough), and the variety of high guesses to generate. Each enter values are of kind string, nevertheless the variety of high guesses is later casted to an integer when that is used.
Regardless of if this code is run within the command-line interface, in Jupyter Pocket book or a Python IDE, it would immediate the consumer for the required inputs, and subsequently generate the variety of predictions that the consumer asks for.
Additional Studying
This part supplies extra assets on the subject if you’re trying to go deeper.
Books
Abstract
On this tutorial, you found numerous methods of working and passing info to a Python script.
Particularly, you discovered:
- Learn how to run a Python script utilizing the command-line interface, the Jupyter Pocket book or an Built-in Growth Atmosphere (IDE).
- Learn how to move info to a Python script utilizing the
sys.argv command, by hard-coding the enter variables in Jupyter Pocket book, or by way of the interactive use of the
enter() perform.
Do you’ve gotten any questions?
Ask your questions within the feedback under and I’ll do my finest to reply.
[ad_2]