

[ad_1]
By utilizing a mix of SwiftUI and WidgetKit, you possibly can improve the visibility of your app’s content material and improve the consumer expertise by putting a number of “widgets” on the consumer’s iOS House display screen, macOS Notification Heart, and/or iOS As we speak View.
Widgets ought to show your app’s most related content material, permitting customers to get necessary info with a look. When a consumer faucets/clicks a widget, they go straight to your app and will land on a web page that offers them extra particulars about what they simply glanced at. Check out your iPhone’s As we speak View proper now. There are widgets for climate, battery energy, maps, inventory exchanges — with many extra accessible. For instance, you may get an almost-instant learn on the present atmospheric situations by glancing at one among a number of accessible climate widgets. This time of 12 months, earlier than I depart the home, I look on the climate widget to find out if I would like a coat and hat earlier than going outdoors. If I wish to get the forecast for later within the day, I simply faucet on that climate widget to open the respective climate app.
Since widgets show content material with SwiftUI views, they’re typically straightforward to create and transportable throughout Apple’s units, like iPhones and Macs. Every of your apps can present a number of widgets, a number of situations of the identical or completely different widgets, and three completely different sizes of the identical widgets.
Let’s speak about at an instance of design issues for constructing a widget, from my pattern mission. You must click on that hyperlink and obtain my mission to observe together with this text. I used Xcode 13.1 to jot down this pattern app and iOS 15.0 on the Simulator and on an iPhone 12 to check.
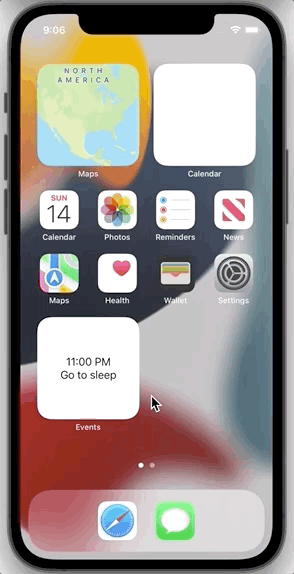
My “Occasions” app has a widget that reveals the necessary occasions that happen throughout a workday together with the occasions at which they happen. Have a look at the next two photos. The primary highlights my widget displaying the occasions of the day in quick movement, as a result of we wouldn’t wish to wait to look at the widget over a 15-hour interval. The widget merely reveals the nearest-occurring occasion and its time; info that may be seen at a look. The second picture reveals what occurs whenever you faucet on the widget: the app opens displaying all of the occasions of the day together with the one which was being proven within the widget on the time of the faucet. Do not forget that this app is a proof of idea highlighting WidgetKit and SwiftUI, and isn’t fully-functional.
It needs to be obvious to you by now that, due to a widget’s restricted quantity of area, it ought to solely show info that customers see as Most worthy in your app. Don’t muddle issues up. Design for simplicity, ease of use, and magnificence.
As a result of widgets are transportable between iOS and macOS, are fairly small, and will convey concise, glanceable info, SwiftUI is the proper software to make use of for constructing their consumer interfaces. Certainly, WidgetKit requires that you just use SwiftUI views to design and render widgets’ content material.
A phrase about my pattern app
The pattern app that we’ll stroll by way of on this article could be very easy and never totally useful on objective. I need you to get a fundamental understanding of SwiftUI and WidgetKit with out getting slowed down in a bunch of implementation particulars about how a every day to-do record app could be written. My app implements simply sufficient of a to-do record to introduce you to SwiftUI and WidgetKit; the remainder is a facade.
So, if totally useful, my app would enable a consumer to outline 5 to six important life occasions in a day, assign occasions to these occasions, and, at any time, look on the widget to see the closest approaching occasion, primarily based on some kind of timing algorithm. If the app was accomplished, tapping on the widget would take a consumer to a element display screen for the closest occasion the place one might, say, make some notes, set a reminder or alarm, add contacts, add instructions, then return to the primary abstract display screen displaying a listing of all of the day’s occasions and occasions, and edit one other occasion. Since my app remains to be a prototype, when the consumer faucets on the widget (or opens the app itself), she or he is distributed on to a display screen to see a read-only record of occasions and occasions.
Creating the bottom app
Let’s stroll by way of the steps I went by way of to develop my pattern “Occasions” app. I made it a SwiftUI-based app. Open Xcode 13.x and go to:
- New > Undertaking…
- On the Select a template on your new mission: display screen, choose iOS and App, then click on Subsequent.
- On the Select choices on your new mission: display screen, fill in Product Title: with “Occasions,” choose your individual Group:, set your individual Group Identifier:, set the Interface: to “SwiftUI,” set the “Language:” to “Swift,” then click on Subsequent.
- Choose the brand new mission location and click on Create.
The brand new app can have two code information, “EventsApp.swift” and “ContentView.swift.” We’ll depart “EventsApp.swift” alone. It’s customized App protocol conformer, EventsApp, supplies the entry level into the app and can render the easy consumer interface outlined in “ContentView.swift.”
Check out “ContentView.swift.” I wrote a easy declarative SwiftUI consumer interface (UI) utilizing the struct named ContentView. The app’s whole UI is within the physique member of the ContentView:
|
1 2 3 4 5 6 7 8 9 10 11 12 13 14 15 16 17 18 19 20 21 22 |
import SwiftUI
let occasions = [“Wake up”, “Breakfast”, “Go to work”, “Lunch”, “Come home”, “Go to sleep”] let eventTimes = [“7:00 AM”, “8:00 AM”, “8:30 AM”, “12:00 PM”, “5:00 PM”, “11:00 PM”]
struct ContentView: View {
var physique: some View {
// Display title Textual content(“Day by day Occasions”).daring().italic().padding()
// Record of every day occasions with occasions Kind { ForEach(0..<occasions.depend) { occasion in Textual content(“- (occasions[event]) [ (eventTimes[event]) ]”) } }.padding().border(Coloration.blue)
} // finish physique
} // finish ContentView |
First, I used a Textual content view to offer my record of occasions a title, utilizing some view modifiers to focus on that title (.daring().italic().padding()). Then I used a Kind view as the primary container for the app’s record of occasions as a result of, in actual life, I’d enable enhancing of my occasions right here. Proper now, the app solely shows the occasions and their occasions read-only, however at all times assume forward. The ForEach writes out the occasions and their respective occasions as Textual content views, one per line, for all to-do record gadgets that I’ve saved in arrays. The Kind has a coloured border and a few padding round it. There’s a cause I used 2 arrays and it has to do with widgets auto-updating, however that’s past the scope of this text.
Working the “Occasions” app now reveals this display screen:
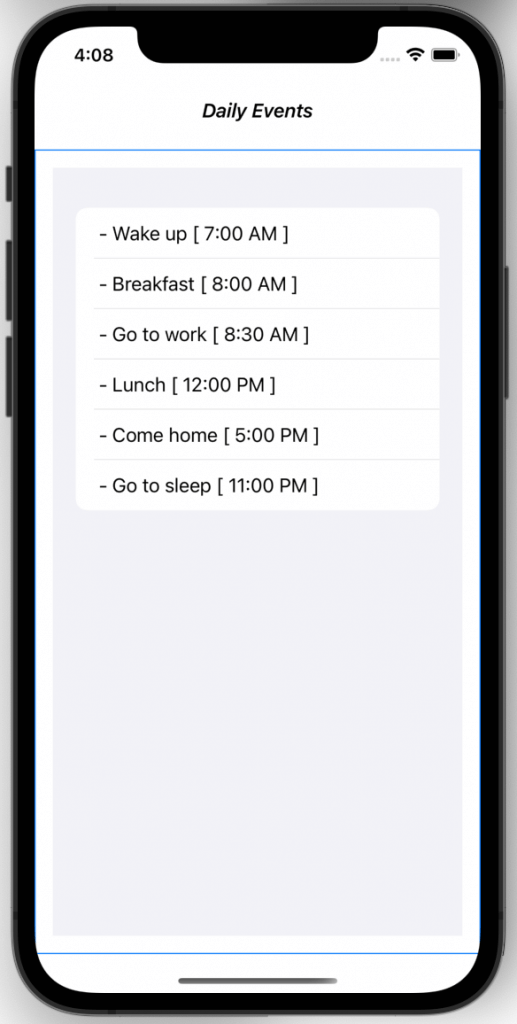
For these of you following alongside, take a look at your “Occasions” app and ensure it appears to be like just like the earlier image.
Including the WidgetKit extension
Widget performance could be added to the SwiftUI “Occasions” app I began up above. All’s I’ve to do is so as to add a brand new goal — a WidgetKit extension — to my present app. Head again to Xcode 13 and go to:
- File > New > Goal…
- On the Select a template on your new goal: display screen, choose iOS and Widget Extension, then click on Subsequent.

- On the Select choices on your new goal: display screen, fill in Product Title: with “EventTimes,” choose your individual Group:, set your individual Group Identifier: (identical as “Occasions” app), don’t set the Embrace Configuration Intent, guarantee that “Undertaking:” and “Embed in Utility:” are each set to “Occasions,” after which click on End.

- You’ll be prompted to activate your new “EventTimesExtension” scheme; ensure you press the “Activate” button now.
A couple of gadgets have been added to your “Occasions” app mission, most notably, the “EventTimes.swift” WidgetKit code and the WidgetKit.framework. We’ll spend many of the remainder of the article discussing “EventTimes.swift.”
Information sharing between the app and widget?
Discover that I’ve outlined the identical information mannequin (2 arrays) on the high of the extension’s “EventTimes.swift” that I already outlined within the containing app’s “ContentView.swift”:
|
let occasions = [“Wake up”, “Breakfast”, “Go to work”, “Lunch”, “Come home”, “Go to sleep”] let eventTimes = [“7:00 AM”, “8:00 AM”, “8:30 AM”, “12:00 PM”, “5:00 PM”, “11:00 PM”] |
Do not forget that “Regardless that an app extension bundle is nested inside its containing app’s bundle, the operating app extension and containing app don’t have any direct entry to one another’s containers.” In different phrases, the two arrays outlined in simply the containing app aren’t accessible to the extension and vice versa. One answer could be to outline an app group to which each the “Occasions” app and “EventTimesExtension” extension belong. They might then share the identical information mannequin. However that’s method past the scope of this text — and I already wrote a tutorial on app teams for AppCoda which I urge you to learn: “Utilizing App Teams for communication between macOS/iOS apps from the Similar Vendor”.
How WidgetKit works
Widgets are pushed by, like many different points of our actuality, time. With my “Occasions” app and widget, we now have a comparatively fastened record of occasions that happen all through the day. What drives the updating of the widget to indicate the subsequent nearest coming-up occasion is that occasion’s time. Consider the iPhone climate widget. It is also pushed by time, in all probability polling a server each 30 seconds so it could actually replace the present situations, the present temperature, and the day’s present excessive and low.
Let’s undergo the code within the WidgetKit extension’s “EventTimes.swift” file from high to backside, despite the fact that which may not stands out as the most sensible order. But when I bounce round, you’re prone to get confused — plus I urge you to match my model of the file to the template model as first generated whenever you created the WidgetKit extension.
Let’s begin on the high of the file:
|
import WidgetKit import SwiftUI
let occasions = [“Wake up”, “Breakfast”, “Go to work”, “Lunch”, “Come home”, “Go to sleep”] let eventTimes = [“7:00 AM”, “8:00 AM”, “8:30 AM”, “12:00 PM”, “5:00 PM”, “11:00 PM”] var currentEvent = 0
struct Supplier: TimelineProvider { func placeholder(in context: Context) –> SimpleEntry { SimpleEntry(date: Date(), eventName: “Day by day occasion”, eventTime: “N/A”) }
. . . |
From the primary struct we encounter, of kind TimelineProvider, you possibly can see why I mentioned that widgets are pushed by time. The placeholder operate “shows a generic illustration of your widget, giving the consumer a common concept of what the widget reveals”. It’s known as in case your widget is displayed however no actual information is able to be displayed, maybe as a result of the containing app hasn’t been configured or established community connections but. SimpleEntry is the struct that holds situations of knowledge which are proven separately in your widget. To be particular, this SimpleEntry reference is the struct constructor that returns an occasion.
|
. . .
func getSnapshot(in context: Context, completion: @escaping (SimpleEntry) –> ()) { let entry = SimpleEntry(date: Date(), eventName: occasions[currentEvent], eventTime: eventTimes[currentEvent]) completion(entry) }
. . . |
The getSnapshot operate supplies an app timeline entry for the present time (and maybe state) of the widget. For my “Occasions” app, this might be the closest occasion in time in your every day schedule about to happen.
|
1 2 3 4 5 6 7 8 9 10 11 12 13 14 15 16 17 18 19 20 21 22 23 24 |
. . .
func getTimeline(in context: Context, completion: @escaping (Timeline<Entry>) –> ()) { var entries: [SimpleEntry] = []
// Generate a timeline consisting of six entries an second aside, ranging from the present time. let currentDate = Date()
for timeOffset in 0 ..< occasions.depend { let entryDate = Calendar.present.date(byAdding: .second, worth: timeOffset, to: currentDate)! let entry = SimpleEntry(date: entryDate, eventName: occasions[timeOffset], eventTime: eventTimes[timeOffset]) entries.append(entry) } currentEvent = 0
let timeline = Timeline(entries: entries, coverage: .atEnd) completion(timeline) } // finish getTimeline
. . . |
For a static prototype like my pattern “Occasions” app, the getTimeline operate can construct the complete timeline to be displayed in my widget. Due to the coverage: .atEnd, the timeline is created again and again. I already defined why a actual model of my “Occasions” app would want a extra refined algorithm to calculate a timeline of the “subsequent, nearest” occasion relative to the present time limit. For a climate app, some kind of polling algorithm could possibly be used to make community requests to get the present situations for the present occasions all through the day.
|
struct SimpleEntry: TimelineEntry { let date: Date let eventName: String let eventTime: String } |
As I discussed above, the SimpleEntry is the struct that holds situations of knowledge which are proven separately in your widget. Notice that the date is important to a timeline.
|
struct EventTimesEntryView : View { var entry: Supplier.Entry
var physique: some View { VStack { Textual content(entry.eventTime) Textual content(entry.eventName) } } } // finish EventTimesEntryView |
That is the SwiftUI I used to show the widget. Do I even want to clarify what I’m drawing right here? Simply take a look at my widget. It simply amazes me how I can write such quick, easy, and chic code to get a UI. The declarative UI is right here!
|
@important struct EventTimes: Widget { let sort: String = “EventTimes”
var physique: some WidgetConfiguration { StaticConfiguration(sort: sort, supplier: Supplier()) { entry in EventTimesEntryView(entry: entry) } .configurationDisplayName(“My Day by day Occasions”) .description(“Reveals my typical workday schedule.”) } } // finish EventTimes |
The @important attribute specifies the only entry level to my Widget extension. My widget is given a string tag for system identification functions. I’m specifying the SwiftUI that my widget makes use of and I present template textual content that individuals will see after they search for my widget to allow them to add it to my iPhone House or As we speak View screens, as described within the subsequent part.
Including widgets after the app is put in
As soon as you put in my pattern app on an iPhone, you wish to set up a number of situations of its widget in a number of of the three accessible sizes. This ani-GIF reveals you learn how to set up a widget on the House display screen:
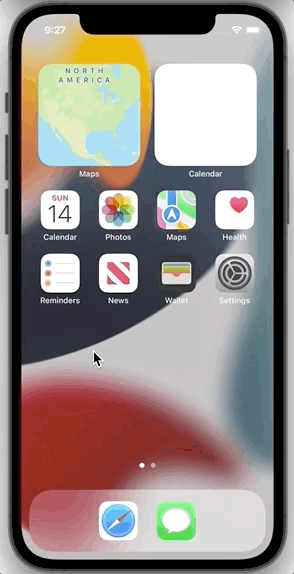
Notice that I began the method by long-pressing on empty House display screen area. You’ll be able to observe the identical course of on the As we speak View or, as a substitute of beginning by long-pressing, you possibly can scroll right down to the underside of the web page and faucet the “Edit” button.
Static versus user-configurable widgets
Primarily as a result of my “Occasions” app and widget are proofs of idea, they’re static. Whereas I’ve talked about prospects for enhancing the occasions and occasions, these values are at the moment fastened. However you can also make your widget user-configurable. When the nice people who have been writing the iPhone climate app added their widget extension, they ticked the Embrace Configuration Intent checkbox — that’s the checkbox we didn’t tick.
To make a protracted story quick, you possibly can configure the climate widget by long-tapping it till the context menu seems and deciding on the “Edit Widget” merchandise. The widget “flips over” to current an interface that enables you choose from a listing of nationwide places that the widget will then present climate snapshots for.
Conclusion
Including a widget to your app can add an entire lot of worth to your app. You can also make it a lot extra helpful by permitting one look to offer customers the gist of the primary objective of your app. Consider methods to make your apps indispensable to customers — an important a part of their lives. Widgets are the most effective methods I’ve seen in recent times to perform this lofty purpose.
[ad_2]