

[ad_1]
Occupancy monitoring in buildings is a useful device throughout totally different industries. From healthcare to industrial, and from leisure to retail, prospects are searching for trendy and scalable IoT options to make sensible enterprise choices. For instance, many exhibitions in public artwork museums make use of an open-ended method, the place there is no such thing as a clear beginning or ending level to the exhibition. The structure of an exhibition must take into accounts the best way through which the viewers discover their approach via the exhibition contributes to the viewers’ engagement with the art work. Nevertheless, museums can differ the location of the gallery based mostly on the recognition and variety of guests. They will analyse occupancy knowledge in close to real-time and resolve the actual gallery must be on the entrance of the constructing to realize extra views or it’s already widespread and might be moved and grouped with different exhibitions.
This weblog describes a easy resolution that makes use of constructing occupancy knowledge to watch how house is being utilised. It reveals how busy every sub-area of the constructing will get throughout totally different occasions of the day based mostly on a movement sensor’s location. We place the bodily machine which consists of a Raspberry Pi with Passive InfraRed (PIR) sensor on the entrance. The PIR sensor permits one to sense the movement in direct proximity, (i.e., whether or not a human has moved in or out of the sensors vary) and can generate the info which then will likely be related to cloud native providers for knowledge storage, evaluation and visualisation in close to real-time.
Answer Overview
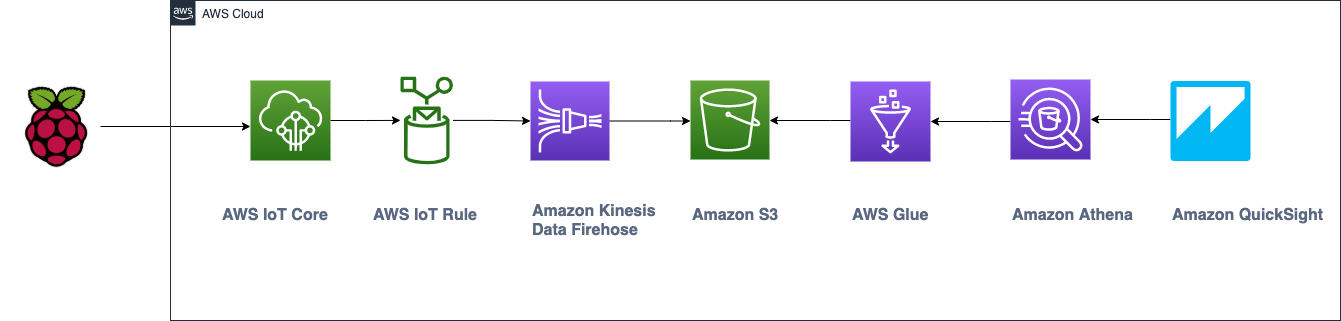
The diagram reveals a excessive stage structure overview. The information is generated regionally on the Raspberry Pi and printed in JSON format to AWS IoT Core that simply and securely connects gadgets via the MQTT and HTTPS protocols. Guidelines Engine, a characteristic of AWS IoT Core, repeatedly processes incoming messages, enabling your gadgets to work together with different AWS providers and streams IoT knowledge into Amazon Kinesis Information Firehose. Kinesis Information Firehose means that you can seize and mechanically load streaming knowledge into Amazon S3. AWS Glue creates a knowledge catalog with a desk for Amazon Athena to question this knowledge from Amazon S3 bucket. Amazon QuickSight, the cloud-powered enterprise intelligence device, connects to Amazon Athena to create a visualisation dashboard for additional evaluation.
Conditions
Minimal necessities:
- An AWS account.
- Raspberry Pi 4 Mannequin B with a pre-installed Working System SD card and an influence cable.
- Passive InfraRed (PIR) sensor.
- Breadboard with feminine to feminine(F2F) and male to male (M2M) jumper wires, LED mild and resistor.
Throughout the course of I exploit the headless connection sort with third social gathering software program suppliers to entry the Raspberry Pi, moreover you possibly can entry through SSH.
Step-by-step Implementation
Word: I exploit a inventory Raspberry Pi 4 Mannequin B. Determine 1 reveals the Raspberry Pi mounted on a Black Case Field package. This Field package neatly packages the Pi and prevents harm, however is just not needed.
Determine 1 reveals a Raspberry Pi with marked colors the place the same-coloured wires will likely be related with the sensor and a breadboard. I exploit the next pinout in Raspberry Pi:
- 5V energy – marked as crimson
- GROUND – purple
- GPIO 4 (GPCLK0) – orange
- GPIO 17 – inexperienced
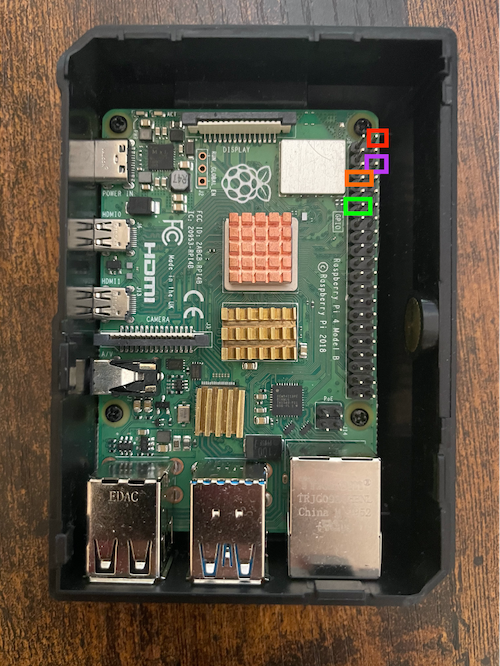 Determine 1: Raspberry Pi.
Determine 2 reveals needed elements resembling a breadboard, PIR sensor, a resistor, crimson LED mild, 5 male-to-female and 1 female-to-female jumper wire cables.
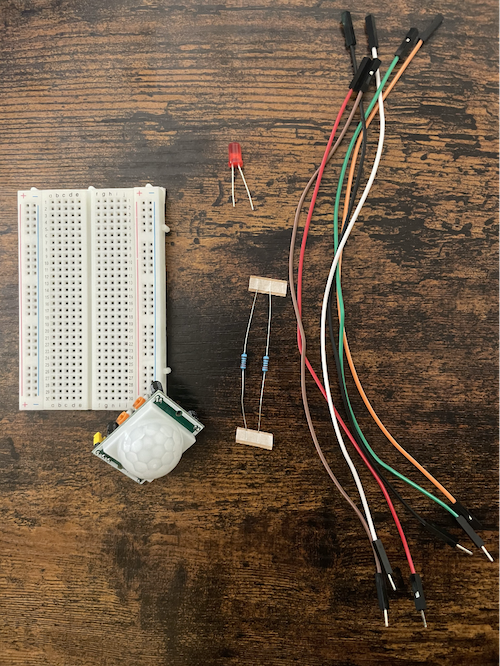
Determine 2: Crucial elements.
Determine 3 demonstrates the breadboard marked with colors the place the identical colored wires belong. Let’s take a look at them in additional element:
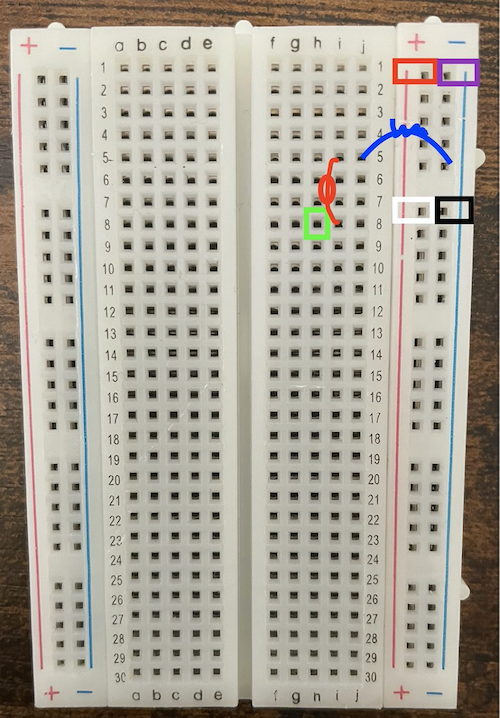
Determine 3: Breadboard with the wires, resistor and LED mild diagram
- The blue curve signifies the resistor and the same-coloured jumper wire will likely be inserted into ‘5-’ and ‘5J’.
- The crimson LED mild is proven as a crimson line with a circle on prime. When you take a look at the LED mild, you will note that it has two totally different tip lengths, the quick half will likely be inserted into ‘I5’ and the lengthy one into ‘I8’.
- The inexperienced sq. marked in ‘H8’ is used for the LED mild to speak with Raspberry Pi and LED mild.
- The white and black squared ‘7+’ and ‘7-’ wires are related with the PIR sensor, particularly to the GND and VCC pinout of the sensor.
- The crimson and purple squared ‘1+’ and ‘1-’ wires are related with the colored pins in Raspberry Pi, particularly to the 5V energy and GROUND pinouts.
Determine 4 reveals the Passive InfraRed (PIR) sensor with VCC, GND and OUT pinouts, the place black, white and orange colored jumper wires will likely be related.
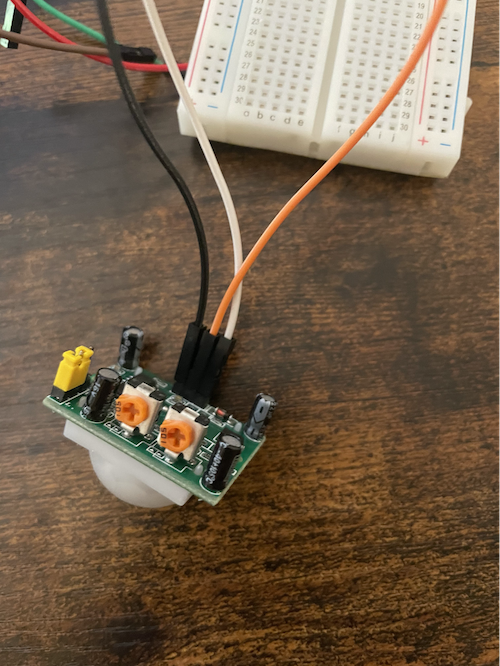
Determine 4: PIR sensor related with the Raspberry Pi and the breadboard.
- The white and black wires on the PIR sensor are related with the identical color marked pins within the breadboard, as seen in Determine 3.
- The orange wire is related to the Raspberry Pi GPIO 4 (GPCLK0) pinout or as marked in orange color, as seen in Determine 1.
Now, it’s time to attach the PIR sensor, the breadboard with the crimson LED mild and the resistor, and Raspberry Pi with one another. If all the pieces is related appropriately, the crimson LED mild will activate if any movement detected as seen in Determine 5, the code for which we are going to write up in later steps.
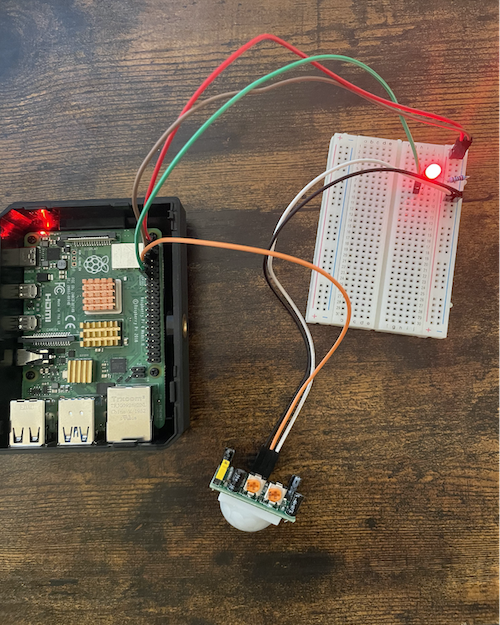
Determine 5: Mounting all the pieces collectively on Raspberry Pi.
As soon as the bodily development is full, we’re able to look into particulars on the right way to join and ship JSON movement detection knowledge to AWS and reserve it securely.
The remainder of the weblog particulars 5 steps for publishing IoT knowledge to the cloud and growing close to real-time dashboards. The steps are briefly summarised after which described in additional particulars beneath.
- Easy methods to join a Raspberry Pi to AWS IoT Core
- Easy methods to stream JSON knowledge to Amazon Kinesis Information Firehose and save to Amazon S3
- Create AWS Glue Information Catalog
- Configure Amazon Athena
- Visualise object motion with Amazon QuickSight dashboard in close to real-time
Step 1. Easy methods to join a Raspberry Pi to AWS IoT Core
On this part, I describe the right way to arrange the PIR sensor that when movement is detected the crimson LED mild activates and we see a message “Movement Detected” on the Raspberry Pi. Subsequent, we might want to join our Raspberry Pi with AWS by registering it as a “factor”, making a coverage and certificates. In the long run, we are going to see the movement messages transmitted to the cloud and saved securely for additional evaluation.
1.1 Begin making a coverage in AWS IoT Core and we are going to connect this coverage to our factor within the subsequent step.
- Navigate to the AWS IoT Core console. Within the navigation pane, select Safe, Insurance policies, Create a coverage.
- For the Title give your coverage a reputation.
- For Add statements select Superior mode and add the coverage assertion along with your AWS area, account quantity and matter title as seen beneath. Please verify this supply for extra coverage examples.
- Choose Create.
1.2 Create and obtain the AWS IoT Core machine certificates
The Raspberry Pi requires an AWS IoT root CA (fetched by the set up script), certificates, and a non-public key to authenticate with AWS IoT Core. Create a brand new certificates and connect the IoT coverage deployed by the serverless software.
- Navigate to the AWS IoT Core console. Within the navigation pane, select Handle, Issues, Register a Factor, Create a single factor.
- For the Title give your factor a reputation.
- For the remaining depart it as default
- Choose Subsequent and Add a certificates on your factor
- Create a certificates with One-click certificates creation (beneficial)
When you adopted the steps above and initiated the ‘one-click certificates creation’, you will note a message that the certificates is generated efficiently, as seen beneath. Now, the certificates can be found for obtain. Save these certificates securely as you’ll not have a second likelihood to obtain the identical certificates.
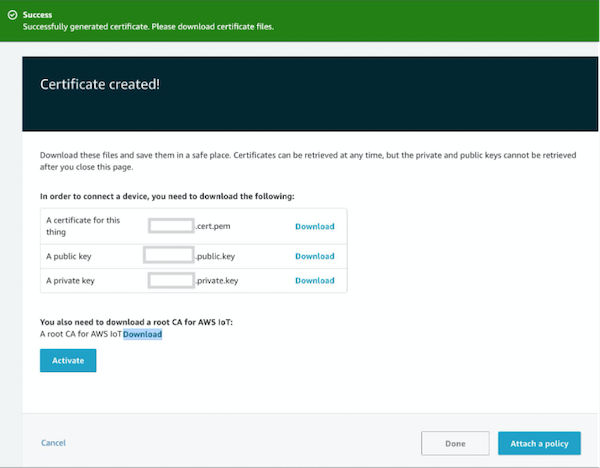
Having created a certificates, you have to do the next:
- Choose Obtain “a certificates for this factor” and “a non-public key”. (Save these securely, as that is the one time you possibly can obtain this certificates.)
- You additionally must obtain a root CA for AWS IoT (proper click on on obtain and choose on RSA 2048 bit key Amazon Root CA1, save as a file)
- Activate the Root CA for AWS IoT.
- Select Connect a coverage (that we created on step 1.1).
1.3 Obtain certificates and securely reserve it to your pc.
Now, we have to copy these certificates to Raspberry Pi, in order that it understands the place to attach and ship the generated knowledge. There are a number of choices to attach with Raspberry Pi and replica over the recordsdata. I exploit the SFTP route and save the certificates in a secure folder in my Raspberry Pi from the place I can reference in my code later.
1.4 Set up AWS IoT Python SDK within the Pi and create a motion_detected.py file to jot down our python code
1. Open the terminal within the Raspberry Pi and set up AWS IoT Python SDK:
2. Create a motion_detected.py file within the Raspberry Pi to jot down our Python script that may establish whether or not movement has been detected by the PIR sensor.
3. Copy and paste the python script beneath to motion_detected.py file:
Let’s look at the code above:
1. We import some directories from the Python library (LED, movement sensor, date and time, MQTTClient which was put in from AWSIoTPythonSDK)
2. We join our Raspberry Pi to AWS IoT Core by organising a reputation for MQTT shopper, resembling “ClientID’” in my case it’s myMQTTClient = AWSIoTMQTTClient(“ClientID”)
3. We create a loop to show the LED mild on/off upon motion detection.
1.5 Copy your endpoint title from the AWS IoT Core console.
We’d like the endpoint to configure our Raspberry Pi for MQTTClient.
1. Within the AWS IoT console, navigate to IoT Core, Handle, Issues, choose in your created factor title, on the left aspect choose Work together.
2. Copy HTTPS endpoint.
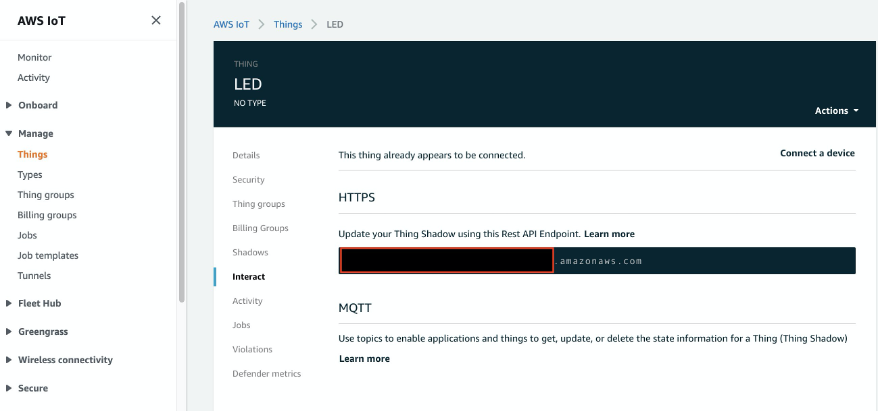
3. When you copied the Relaxation API endpoint, you have to paste it into your motion_detected.py file to attach with AWS endpoint:
4. Now, configure your credentials (with the certificates that we downloaded earlier within the step 1.2) with the code beneath:
Word: I renamed the downloaded certificates for the comfort as follows: root-CA.pem – which is the ‘root-CA’ certificates that we activated, LED-private.pem.key – ‘a non-public key’, LED.pem.crt – ‘a certificates for this factor’. as we talked about in 1.3.
5. As soon as we set the variable for our MQTTClient and set the endpoint, hook up with that endpoint with:
6. Since we wish our movement to be detected with date and timeframe, set the date variable within the code:
8. Now, its time to create a loop based mostly on the movement detection as following:
When you adopted the steps above within the motion_detected.py doc, don’t forget to reserve it after which run the code. If all the pieces is ready up appropriately, upon the motion detection inside a 1–2-meter radius from the PIR sensor, you will note a message “Movement Detected” and the crimson LED mild in your breadboard will activate (as seen in Determine 5). Alternatively, if there’s no movement it should present “No Movement” and the LED mild will flip off.
Step 2. Easy methods to stream JSON knowledge to Amazon Kinesis Information Firehose and save into Amazon S3
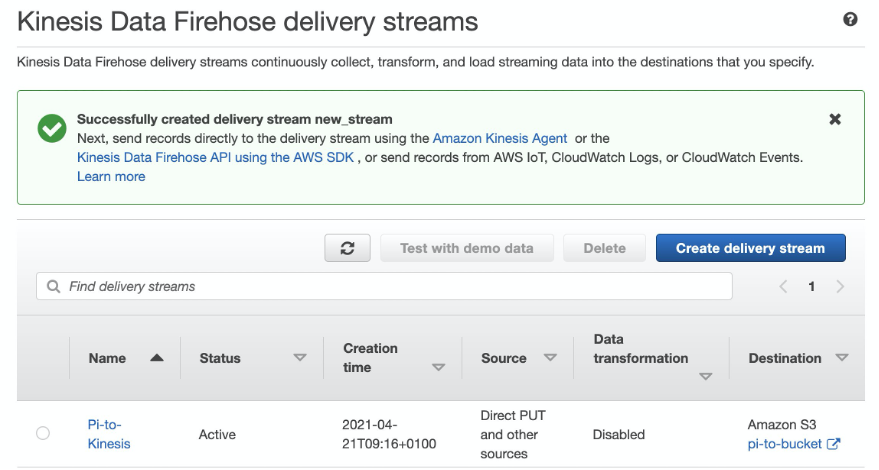
2.1. Create a supply stream with Amazon Kinesis Information Firehose.
As soon as we related our Raspberry Pi with AWS IoT Core, we have to create an Amazon Kinesis Information Firehose Supply Stream utilizing the next subject values:
| Title | Pi-to-Kinesis |
| S3 Bucket | <Create one> |
| S3 Prefix | s3://pi-to-bucket/2021/ |
A efficiently created supply stream with the title Pi-to-Kinesis seems to be like this:
2.2. Configure the AWS IoT rule
After creating the Amazon Kinesis Information Firehose Stream with the outlined storage location in Amazon S3, we have to set the principles for AWS IoT Core to take all the info from the subject, stream it to Amazon Kinesis Information Firehose, and save this knowledge into the Amazon S3 bucket.
1. Within the AWS IoT console, navigate to AWS IoT Core, Act, Guidelines, Create a rule.
Create a brand new AWS IoT rule with the next subject values:
| Title | ‘RaspberryPiRule’ |
| Question Assertion | * |
| Subject Filter | ‘matter/pi’ |
| Add Motion | Ship messages to Amazon Kinesis Information Firehose |
| Stream title | ‘Pi-to-Kinesis’ |
| Choose Separator | ‘n (newline)’ |
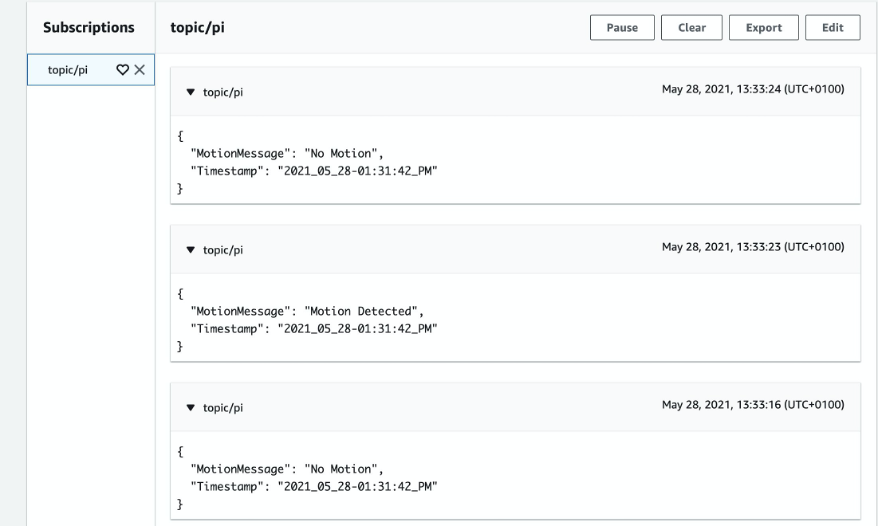
2. Let’s take a look at if we’re getting movement messages with timestamps on AWS IoT Core.
3. Navigate to AWS IoT Core, MQTT take a look at shopper, subscribe to a subject, “matter/pi” (the subject title that you simply set in your python script), Subscribe.
4. If all the pieces is ready up appropriately you will note the movement messages despatched from the Pi as beneath:
2.3. Examine the streamed knowledge saved in Amazon S3
1. Navigate to Amazon S3 to see the bucket that you’ve created in step 2.1 whereas organising an Amazon Kinesis stream. You will note the created S3 bucket, in my case its referred to as ‘pi-to-bucket’.
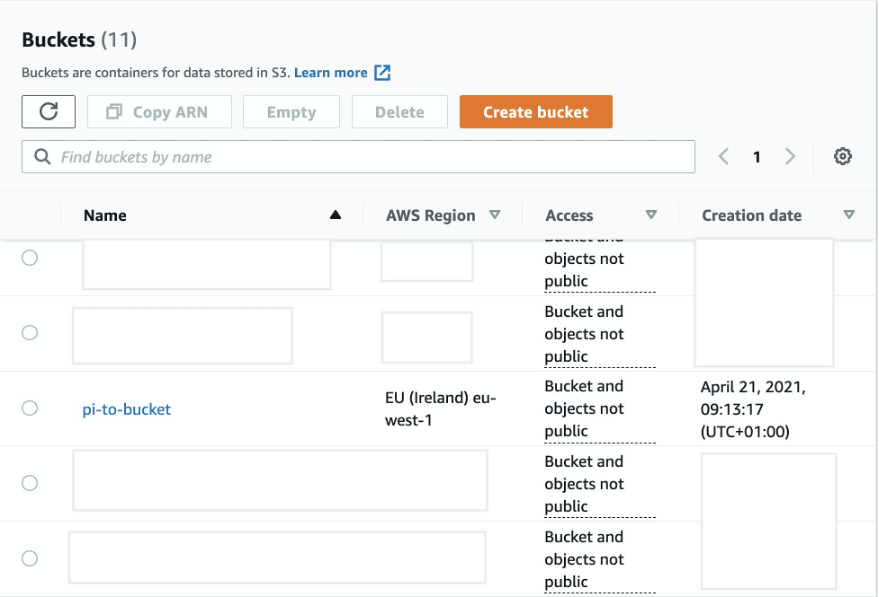
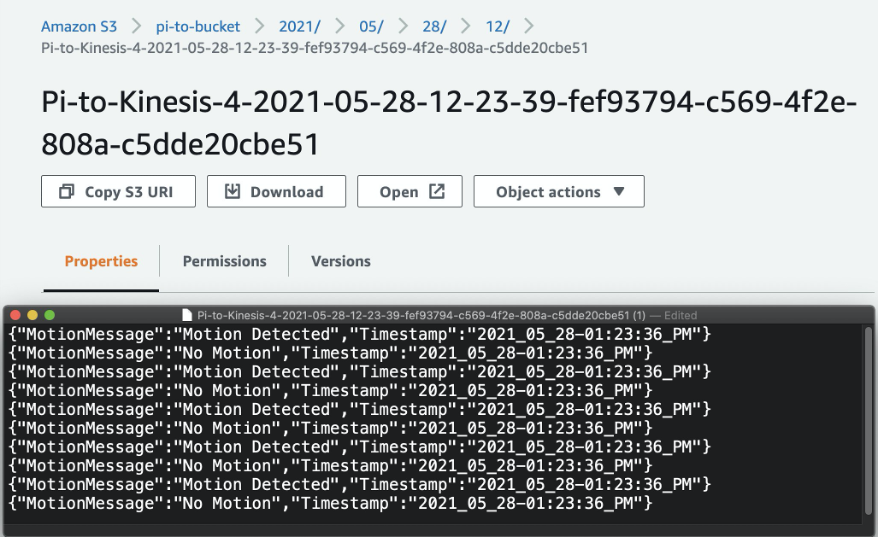
2. Choose the ‘pi-to-bucket’ and verify if the generated JSON knowledge efficiently saved. You will note objects in your bucket as beneath:
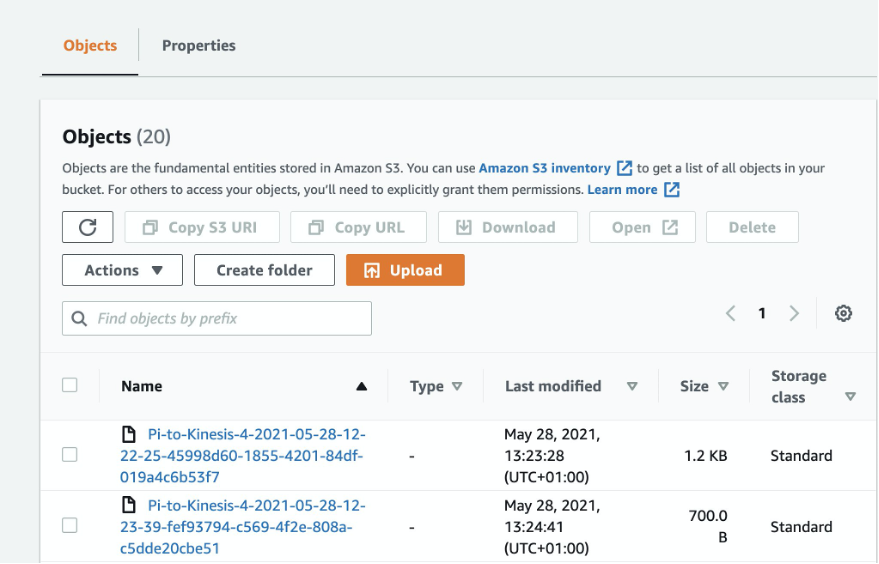
3. Choose a type of objects and select Obtain or Open. If all the pieces is ready appropriately you will note your knowledge as proven within the screenshot beneath:
Step 3. Create AWS Glue Information Catalog
Our knowledge lake is efficiently created and all the info saved securely in Amazon S3 bucket. Now, it’s time to use AWS Glue to create a knowledge catalog with a desk for Amazon Athena to question this knowledge utilizing Easy Question Language (SQL).
Please comply with the directions right here to create a desk within the AWS Glue console. You will want to create a desk with column title “motionmessage” and “timestamp” with knowledge sort – string. Your desk will seem like this:

Step 4. Configure Amazon Athena
Within the earlier steps, we noticed that our Raspberry Pi is efficiently related with AWS IoT Core and shows the movement messages dwell. We additionally confirmed that the saved JSON knowledge is saved in our created Amazon S3 bucket – ‘pi-to-bucket’. Now, we wish to simply analyse the saved knowledge with an interactive question service referred to as Amazon Athena.
Amazon Athena will play an instrumental function for the reference to the info visualisation device Amazon QuickSight which we talk about in later steps.
* Word: for extra detailed data on the right way to create the desk please comply with this instruction.
4.1. Create a easy desk in Amazon Athena that may question our Amazon S3 bucket that we created earlier.
1. Log in to the Athena Console. Within the Question Editor, create a desk utilizing the next question:
2. As soon as the desk is created you possibly can run the question beneath to see your knowledge:
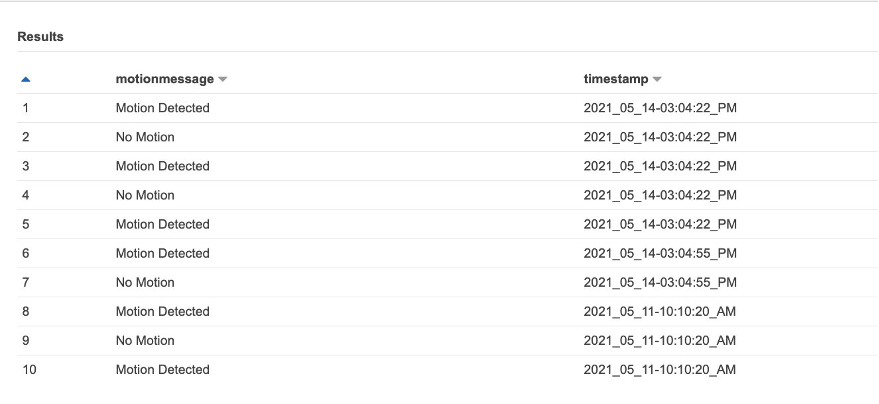
To sum up the above steps, we created a easy desk with two columns: the movement message and the timestamp, then we queried the info from the Amazon S3 bucket the place our PIR sensor-generated JSON knowledge is saved.
Step 5. Visualise object motion with the Amazon QuickSight dashboard in close to real-time
Now, we’re able to analyse the info within the cloud-native and absolutely managed enterprise intelligence device Amazon QuickSight.
Word: You could have to give Amazon QuickSight specific permissions to view your Amazon Athena desk.
To visualise knowledge with Amazon QuickSight, comply with these steps:
1. Open the Amazon QuickSight console.
2. Choose New evaluation, New dataset.
3. Select Athena as a brand new knowledge supply.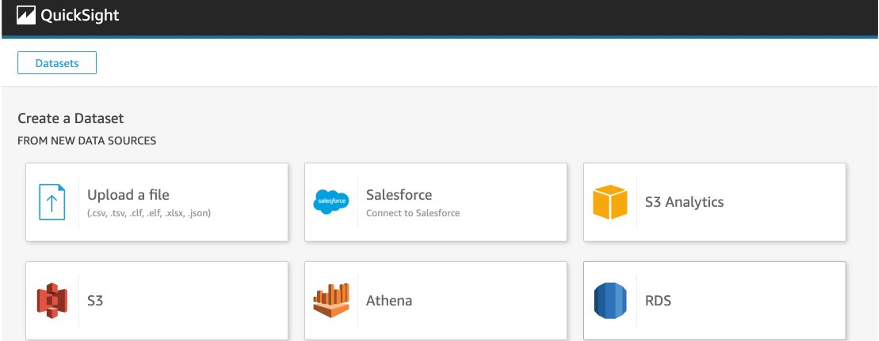
4. Set the knowledge supply title (it’s a catalog title in Amazon Athena).
5. Choose Create knowledge supply.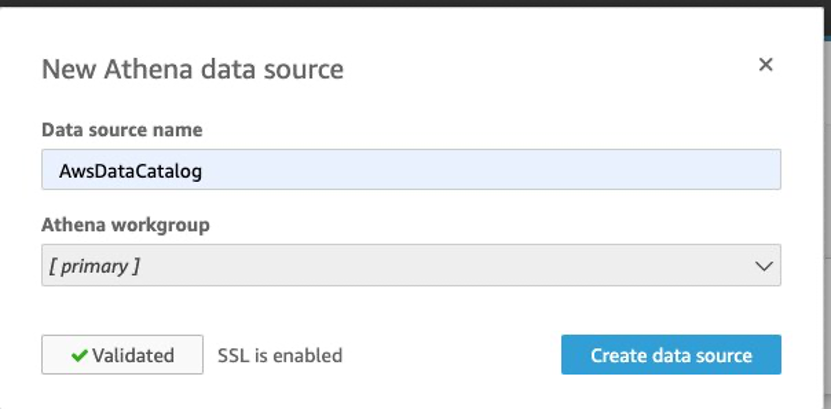
6. As soon as the info supply is created, you have to select a database that accommodates a set of tables and choose the particular desk which you wish to visualise. Select Choose:

7. Within the screenshot beneath you see an outlined desk, knowledge supply and an choice to decide on the way you wish to question your knowledge. Choose ‘Instantly question your knowledge’ and choose Visualise.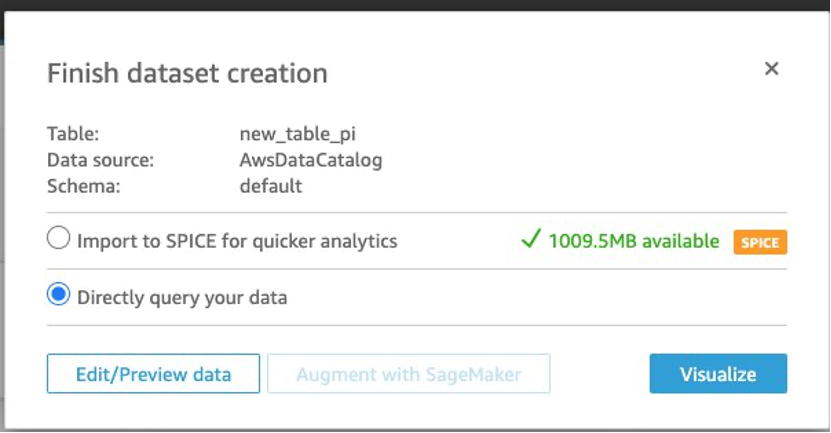
8. Design the Amazon QuickSight visualisations within the drag and drop editor. You may select any choice from visible sorts which are listed on the left aspect. I chosen a vertical bar chart and a donut chart which you see within the two screenshots beneath.
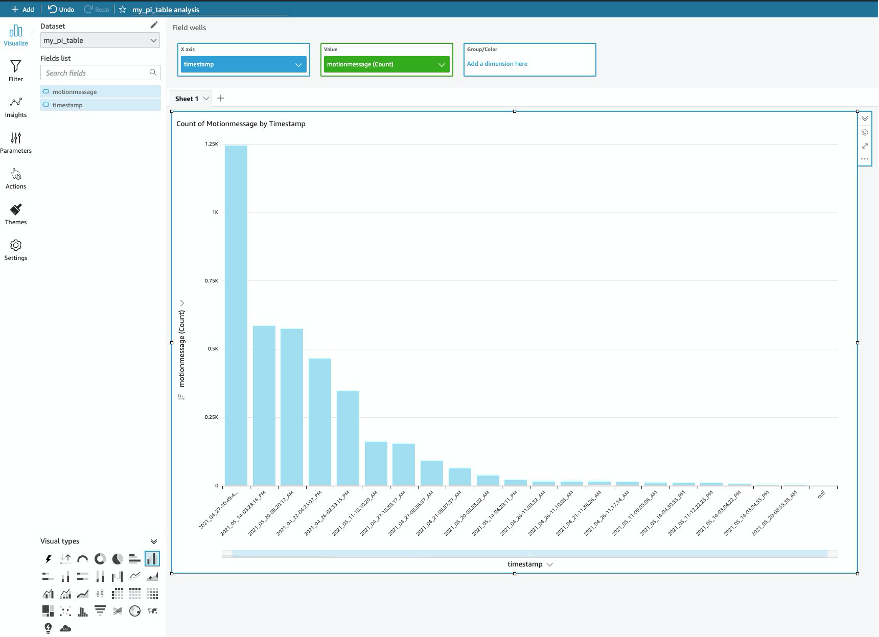
9. From the Fields record on the left pane you will note column names that we created earlier in Amazon Athena. Drag a ‘timestamp’ subject to the X-axis and ‘motionmessage’ to the Worth subject wells.
The bar chart beneath reveals the variety of motions detected for hourly intervals over a particular time frame. For instance, the very best variety of motions (1.25K) within the venue was detected at 10:49 AM on April 27,2021.
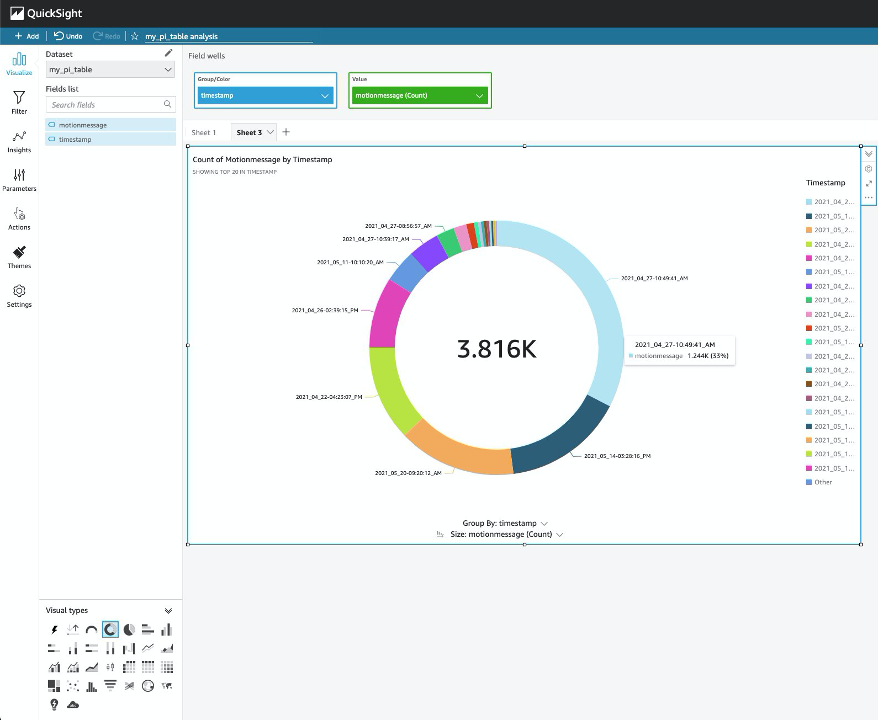
Chances are you’ll wish to analyse the occupancy knowledge via a unique visible format. Merely select a ‘donut chart’ in visible sorts and you will note the full variety of motions divided throughout totally different intervals. As seen on the screenshot beneath, 3.816K motions in whole has been detected within the constructing throughout totally different dates and time. Specifically, 33% of whole motion has been famous at 10:49 AM on April 27,2021.
Conclusion
On this weblog publish I confirmed the right way to monitor, monitor, and visualise the occupancy of a constructing utilizing Raspberry Pi and AWS serverless and managed providers structure. This can be a scalable resolution which makes use of cloud native providers with movement sensors to get occupancy knowledge into the cloud. You may handle and analyse the info to start out constructing an area planning software. For instance, insurance coverage corporations can assess the hearth danger by understanding the capability of the constructing and the way usually the constructing will get busy throughout totally different occasions, then construct an agile software with out managing any servers or provisioning the capability.
This weblog publish demonstrated the right way to visualise knowledge from a securely related distant IoT machine. The answer is achieved by first connecting the Raspberry Pi to AWS IoT Core utilizing MQTT adopted by forwarding messages from the subject stream utilizing AWS IoT Guidelines and placing information on an Amazon Kinesis Information Firehose supply stream. The latter, in flip, shops the info in an Amazon S3 bucket to create a knowledge lake. AWS Glue created a knowledge catalog with a desk which is queried utilizing Amazon Athena, after which the info is visualised utilizing Amazon QuickSight to derive the insights on a weekly, every day or hourly foundation.
To be taught extra, take a look at this blogpost on the right way to use Amazon QuickSight and AWS IoT Core for various use instances.
In regards to the creator

Jamila Jamilova is a Options Architect within the UK Public Sector. She enjoys serving to prospects to unravel complicated technical issues. Her space of curiosity consists of Web of Issues (IoT) and Machine Studying (ML). In her spare time, she is operating, enjoying piano and studying the right way to play chess.
[ad_2]