

[ad_1]
Introduction
AWS launched Configurable Endpoints with Customized Domains for AWS IoT Core, a brand new functionality that enables clients to customise the habits of their AWS IoT Core knowledge endpoints with customized domains. Customized Domains allow clients to register their authentic customized domains and related server certificates to their AWS IoT Core endpoints.
This new functionality helps AWS clients adjust to their inside or exterior safety and compliance necessities, makes it less complicated emigrate IoT units to AWS IoT, helps them implement a failover technique for the aim of catastrophe restoration, and makes it straightforward to architect utilization eventualities with a number of AWS Areas.
On this weblog put up, we display how you should utilize Configurable Endpoints to simplify and expedite migration of IoT units to AWS IoT from an present IoT resolution.
Challenges of migrating IoT Units
Migrating your related units fleet to AWS IoT Core is a essential process of your IoT migration journey. Your units are a central useful resource in your IoT worth chain, as a lot as your customers and your knowledge, and their migration must be simply as dependable and quick. Migrating units to AWS IoT incessantly includes updating the firmware and software program configurations, corresponding to which IoT endpoint and authentication methodology to make use of for connections. Nonetheless, performing a mass replace of a big machine fleet (hundreds and even hundreds of thousands of units), distributed throughout completely different geographical areas, may pose a few of the following challenges:
1. Your IoT units will not be allowed to hook up with *amazonaws.com
Your group’s strategic choices for safety and compliance could require you to make use of your personal firm owned domains and/or server certificates and handle your personal Personal Key Infrastructure (PKI) and Certification Authority. Because of this your IoT utility may very well be exposing an endpoint in your firm’ personal personal or public area, corresponding to iot.yourcompany.instance.com the place your units are anticipated to attach. This state of affairs prevents you from utilizing the usual *.amazonaws.com domains with out performing a software program improve in your units.
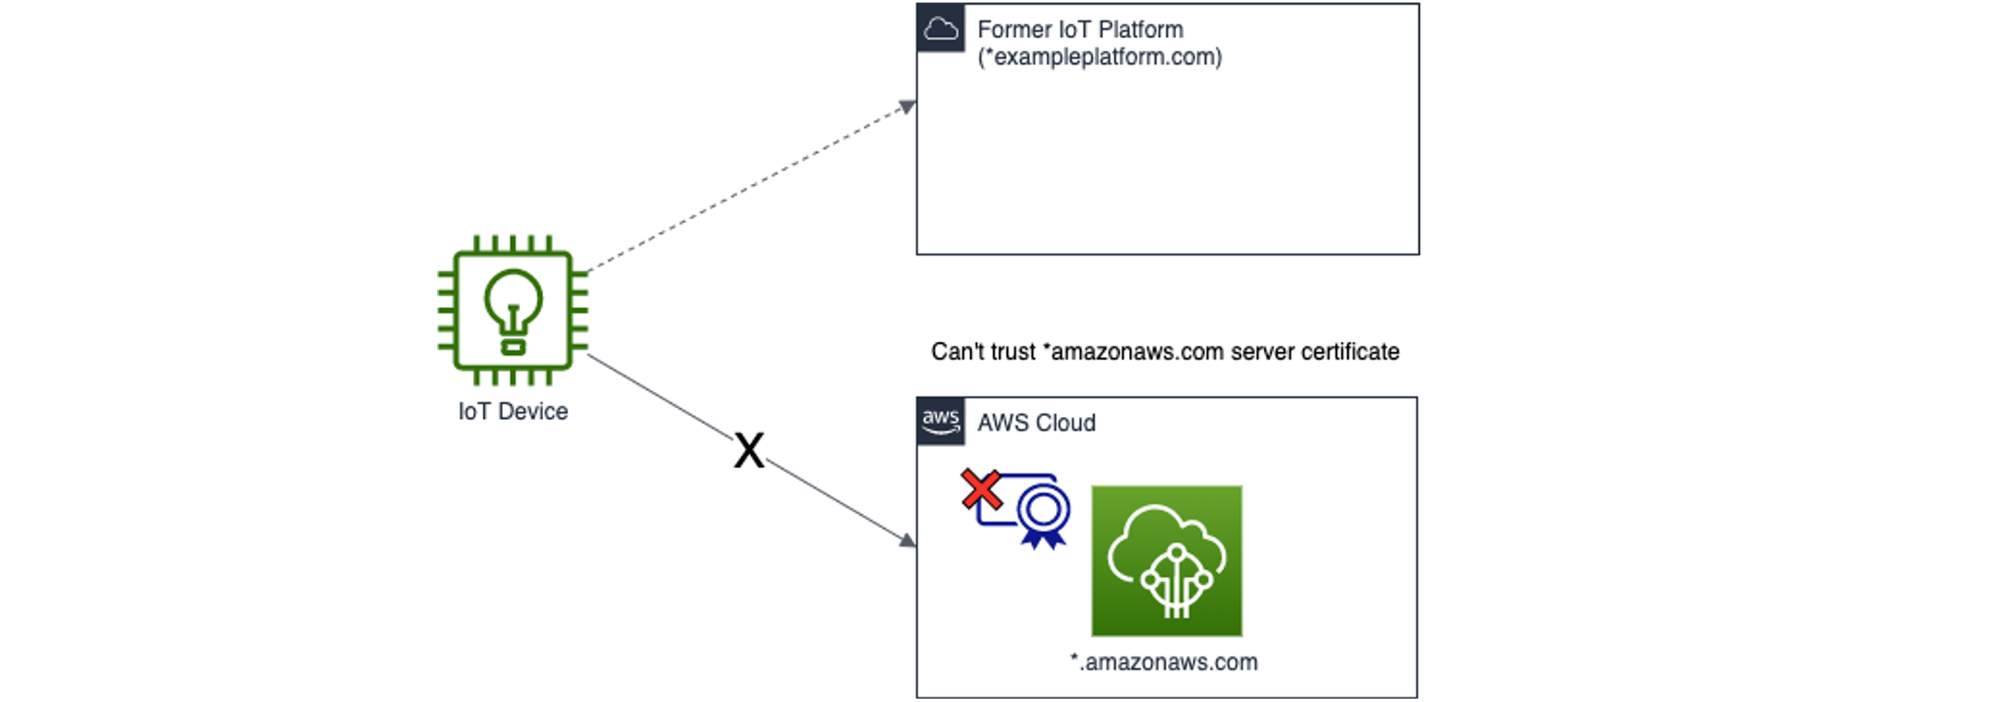
Instance 1: IoT machine can’t migrate to AWS because of organisation cybersecurity coverage
2. You could wish to keep away from intensive over-the-air upgrades (OTA)
There are conditions the place you possibly can’t simply carry out an intensive over the air improve (OTA) to reconfigure your machine settings. This may be as a result of lengthy timeline for firmware improvement and validation, or because of the truth that a distant machine improve will not be dependable because of restricted connectivity in sure geographic areas of your fleet.
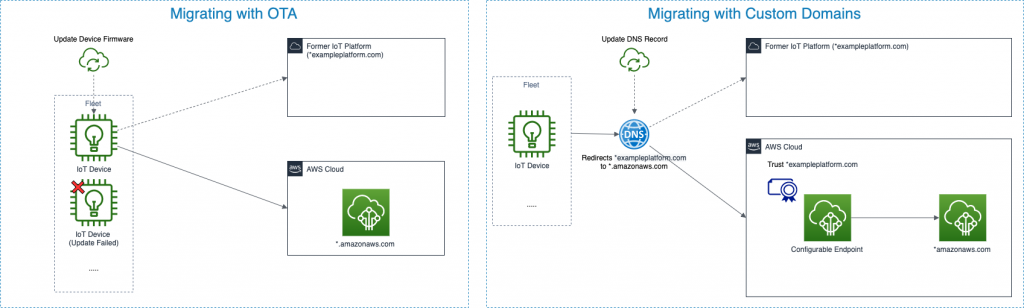
Instance 2: Migrating via over-the-air-upgrade (left) versus migrating via DNS file change (proper).
Utilizing a customized area identify within the machine firmware helps simplify migration operations as a result of as an alternative of performing an OTA improve, you possibly can merely replace a Canonical Title (CNAME) file within the Area Title System (DNS; single level modify). This helps you profit from different benefits of DNS corresponding to weighted routing to carry out incremental migrations.
3. You might have completely different machine households to handle
Your fleet may need completely different machine architectures, each requiring a distinct trusted endpoint and/or authorisation mechanism. A number of configurable endpoints are required for every household to allow legacy machine assist.
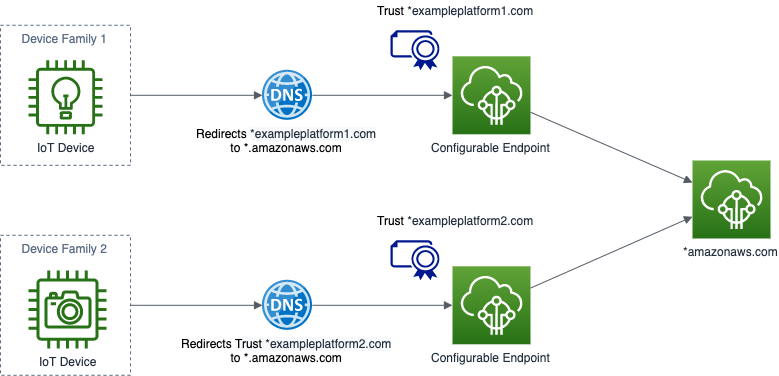
Instance 3: A number of machine households converging to the identical AWS IoT Core endpoint
Resolution overview: migrating IoT units with customized domains for AWS IoT Core
The next diagram reveals how you should utilize customized domains in AWS IoT Core for an IoT machine migration.
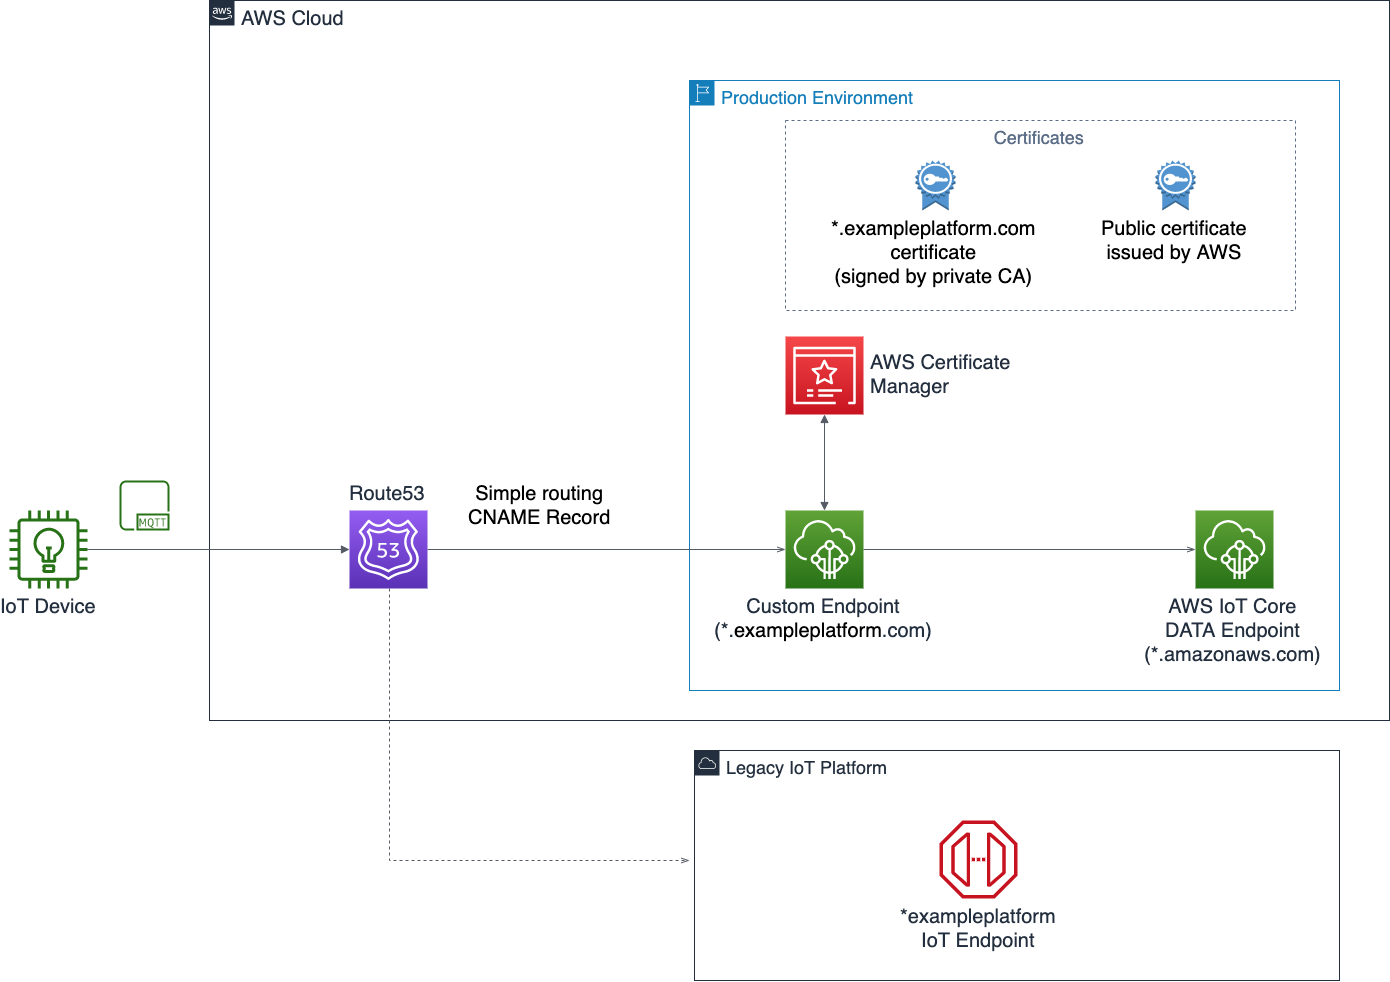
Reference structure of a migration utilizing customized domains for AWS IoT Core
This resolution leverages the next companies:
- Route 53 as Area Title Service (DNS). On this instance, we’re going to set a easy routing coverage to route site visitors from the prevailing IoT Utility to AWS.
- AWS Certificates Supervisor (ACM) as the principle server certificates retailer. On this instance we’re going to use ACM for storing our server certificates issued by a non-public Certification Authority (CA) and our public server certificates, used to validate the possession of our area.
- AWS IoT Core because the goal IoT endpoint of our migration. On this instance, we’re going to onboard an IoT machine in AWS IoT Core, and arrange a customized endpoint configuration with an instance area identify.
Conditions
For the walkthrough, you must have following conditions:
- An AWS account.
- AWS Command Line Interface (CLI) See AWS CLI Documentation for directions on find out how to set up and configure AWS CLI.
- An AWS IAM consumer with the credentials to create AWS sources via CLI.
- A site identify that you just use to arrange the customized endpoint. You need to use Route 53 for the domains you registered with Route 53 or additionally with domains that you’ve registered with different DNS suppliers.
- A tool that you just wish to migrate to AWS that satisfies the necessities to hook up with AWS IoT Core.
- An MQTT shopper to finish exams. On this walkthrough we use Eclipse Mosquitto MQTT Consumer.
- (Optionally available) A server certificates issued by your CA, and its personal key to validate possession of your area. When you don’t personal a server certificates or a non-public CA, you possibly can request one via AWS. The walkthrough covers each eventualities.
Be aware on machine certificates: in our walkthrough we generate new machine certificates to check the habits of the Customized Area characteristic. If you have already got your personal machine certificates you possibly can import it to carry out the check.
Implementing the answer in your AWS account
On this instance, we simulate a supply IoT endpoint for the migration, utilizing AWS IoT Core and Configurable Endpoints, in a distinct Area of the identical AWS account. This put up will clarify the next steps for implementing this resolution:
- Step 1: Configure a hosted zone in Route 53 with the registered area identify.
- Step 2: Configure the goal IoT endpoint for migration within the chosen AWS Area.
In our instance we configure our endpoint within the Eire (eu-west-1) Area. This includes –- Registering a certificates chain in AWS Certificates Supervisor (ACM).
- Configuring a customized area in AWS IoT Core utilizing your server certificates.
- Creating machine certificates, and an IoT Coverage in AWS IoT Core, or importing your personal.
- Step 3: Arrange CNAME file in Route 53 to route the site visitors and carry out exams with an MQTT shopper.
Step 1: Configure a hosted zone in Route 53
On this instance, we create a hosted zone in Route 53 to handle our registered area identify instance.com.
- Open the command line terminal window.
- When you register the area utilizing Route 53, the hosted zone is created routinely. If the area is registered elsewhere, run the next command to create a hosted zone in Route 53:
aws route53 create-hosted-zone --name instance.com --caller-reference 2021-05-04-18:30 - As output of the command, you obtain the ID that Route 53 assigned to the hosted zone. You can too question the ID of the hosted zone utilizing the next command:
aws route53 list-hosted-zones - Run the next command to get Title Servers related to the hosted zone:
aws route53 get-hosted-zone --id <Hosted_Zone_ID>
Response (JSON):... "DelegationSet": { "NameServers": [ "ns-1769.awsdns-29.co.uk", "ns-955.awsdns-55.net", "ns-113.awsdns-14.com", "ns-1256.awsdns-29.org" ] } ... - If you’re utilizing a site supplier apart from Route 53, configure the Title Servers of your hosted zone within the administration console of your area vendor. This lets you use Route 53 to handle your area.
Step 2a: Configure the Goal IoT endpoint for the migration – Register a certificates chain in ACM
When you don’t personal a server certificates to your customized IoT area, you possibly can request one via ACM. When you personal your personal server certificates, examine whether or not your root CA certificates used to signal the certificates is included in Mozilla‘s trusted ca-bundle. Whether it is included, you possibly can import the certificates chain in ACM. If it’s not included, import the certificates chain in ACM and likewise request a public certificates via ACM.
The next walkthrough supplies instance for each eventualities:
State of affairs i) You don’t personal a server certificates to your customized IoT area
- Run the next command to subject the request:
aws acm request-certificate –-domain-name iot.instance.com –-validation-method DNS --region <AWS_Region>
Be aware down the server certificates ARN from the response:{ "CertificateArn": "arn:aws:acm:eu-west-1:XXXXXXXXXXXXXXXXX:certificates/<certificate_id>" } - Following this, you possibly can describe the certificates area validation parameters to retrieve the DNS configuration parameters (in daring):
aws acm describe-certificate --certificate-arn arn:aws:acm:eu-west-1:XXXXXXXXXXXXXXXXX:certificates/<certificate_id> --region eu-west-1
Pattern response:{ "Certificates": { "CertificateArn": "arn:aws:acm:eu-west-1:<account_id>:certificates/<ceritficate_id>", …… "ValidationStatus": "PENDING_VALIDATION", "ResourceRecord": { "Title": "_XXXXXXXXXXXXXXXXXXXXX.iot.instance.com.", "Kind": "CNAME", "Worth": "_XXXXXXXXXXXXXXXXXXXXX.XXXXXXXXXXX.acm-validations.aws." }, … } - Inside half-hour, the standing adjustments to SUCCESS from PENDING_VALIDATION. As soon as the standing adjustments, create a file named data.json with the next syntax, utilizing the retrieved parameters:
{ "Remark": "Create ACM Validation File", "Modifications": [ { "Action": "UPSERT", "ResourceRecordSet": { "Name": "_XXXXXXXXXXXXXXXXXXXXX.iot.example.com.", "Type":"CNAME", "TTL": 300, "ResourceRecords": [ { "Value": "_XXXXXXXXXXXXXXXXXXXXX.XXXXXXXXXXX.acm-validations.aws." } ] } } ] } - Now run the next command so as to add the file to your hosted zone in Route 53:
aws route53 change-resource-record-sets --hosted-zone-id <your_hosted_zone_id> --change-batch file://data.json
You see the server certificates seem with validation standing “success” in ACM in your AWS Administration Console.
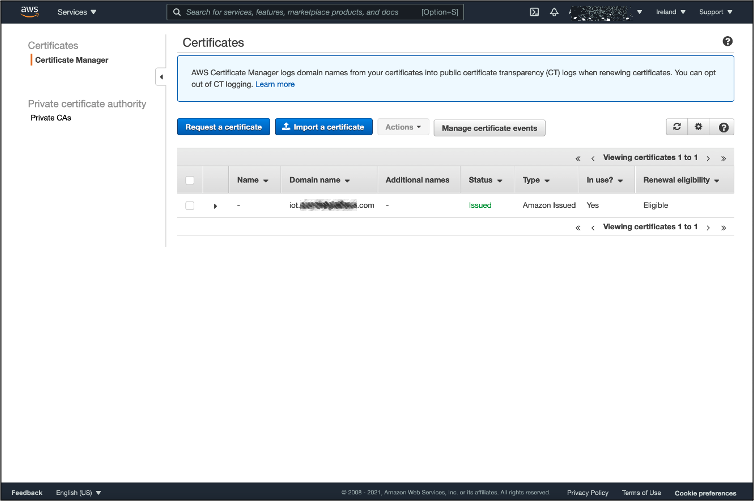
Your public server certificates reporting validated standing in ACM
You see additionally the beforehand added CNAME file seem in Route 53 in your AWS Administration Console at Route 53 > Hosted Zones > <your_hosted_zone_name>
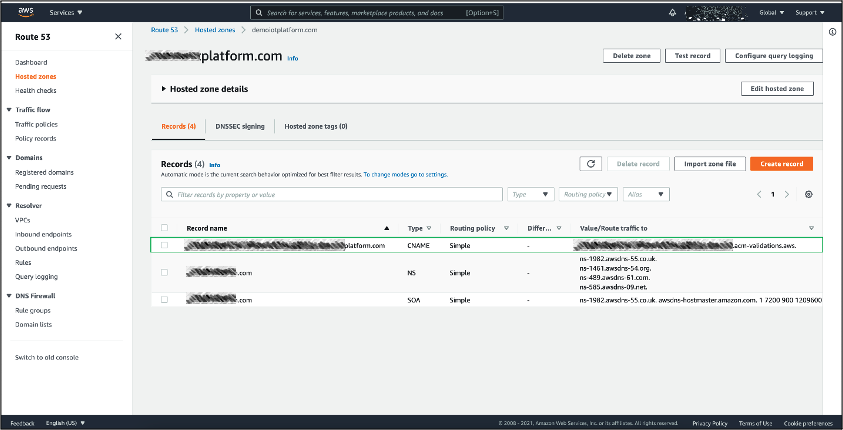
File for DNS validation in your Route 53 hosted zone
State of affairs ii) You personal a server certificates to your customized IoT area which is signed by a Certification Authority included in Mozilla’s ca-bundle
To carry out this operation, you want the next sources:
- The PEM-encoded server certificates that’s saved in a file named Certificates.pem.
- The PEM-encoded certificates chain that’s saved in a file named CertificateChain.pem.
- The PEM-encoded, personal secret’s saved in a file named PrivateKey.pem.
To configure the server certificates chain:
- Open a command line terminal window.
- Run the next command to import your server certificates:
aws acm import-certificate –-certificate fileb://Certificates.pem –-certificate-chain fileb://CertificateChain.pem –-private-key fileb://PrivateKey.pem --region <AWS_Region>
Step 2b: Configure the goal IoT endpoint for the migration – Configure a customized area in AWS IoT Core utilizing your registered server certificates
To carry out this operation, you require the registered server certificates ARN and your area identify:
- Open a terminal window.
- Run the next command to question your registered server certificates in ACM and word their “CertificateArn” values:
aws acm list-certificates –area <your_AWS_Region>
Response:{ "CertificateSummaryList": [ { "CertificateArn": "arn:aws:acm:eu-west-1:XXXXXXXXXXXXXXXXX:certificate/<certificate_id>", "DomainName": "iot.example.com" } ] } - Run the next command to register your customized area in AWS IoT Core:
aws iot create-domain-configuration --domain-configuration-name "TargetTestIoTPlatform" --service-type "DATA" --domain-name "iot.instance.com" --server-certificate-arns "arn:aws:acm:eu-west-1:XXXXXXXXXXXXXXXXX:certificates/<certificate_id>"
Now you will have a customized area configuration in AWS IoT Core in your goal Area, you possibly can see the configuration seem in your AWS Administration Console below AWS IoT > Settings:
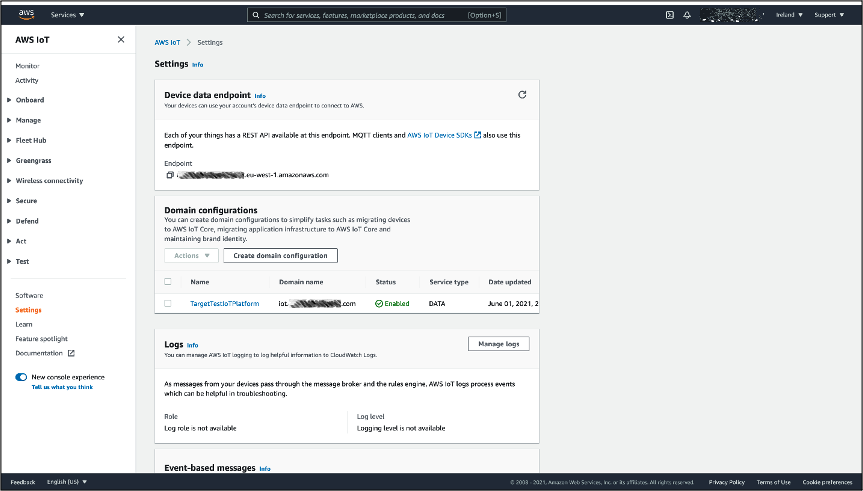
Customized Area Configuration in AWS IoT Core settings
Step 2c: Configure the goal IoT endpoint for the migration – Create machine certificates, and an IoT coverage in AWS IoT Core
The units in your fleet require a legitimate identification and an IoT coverage in your goal IoT endpoint to attach. As one of the best apply, your provisioning move ought to permit you to keep away from sharing personal key over the general public web, and it’s suggested that you just embed a provisioning move as a part of your IoT machine design.
AWS supplies a listing of choices for machine provisioning as a part of AWS IoT Core documentation and a whitepaper on “Machine Manufacturing and Provisioning with X.509 Certificates in AWS IoT Core” that explains in depth every possibility in respect to actual buyer eventualities.
Optionally available step: convey your personal machine certificates
You may import your present machine certificates and CA certificates in AWS IoT Core to permit a easy migration and keep away from performing OTAs or having the machine to rotate their certificates via an present PKI. You can too register machine certificates signed by a CA that’s not registered in AWS IoT Core. For extra data, see AWS IoT Core documentation on find out how to register your CA certificates and register a shopper certificates manually
Please word that the machine certificates you possibly can import ought to conform to the requirements supported by AWS IoT Core. Please see AWS IoT Core Documentation on X.509 certificates for added particulars.
In our instance, we create a check factor, machine certificates, and an IoT coverage utilizing the CLI. First, to create an identification for every of your check IoT units:
- Open a command line terminal window.
- Run the next command to generate a tool certificates and a key pair, the information are created in native:
aws iot create-keys-and-certificate--certificate-pem-outfile "TestThing.cert.pem"--public-key-outfile "TestThing.public.key"--private-key-outfile "TestThing.personal.key"--region <your_AWS_Region>
Response:{ "certificateArn": "arn:aws:iot:eu-west-1:XXXXXXXXXXXXXXXXX:cert/<certificate_id>", "certificateId": "<certificate_id>", "certificatePem": "-----BEGIN CERTIFICATE----- […] -----END CERTIFICATE-----", "keyPair": { "PublicKey": "-----BEGIN PUBLIC KEY----- […] -----END PUBLIC KEY-----", "PrivateKey": "-----BEGIN RSA PRIVATE KEY----- […] -----END RSA PRIVATE KEY-----" } } - Copy your “certificateArn” and “certificateId” from the output of the command.
- Run the next command to create a factor within the machine registry:
aws iot create-thing--thing-name TestThing--region <your_AWS_Region> - Create an IoT coverage utilizing factor coverage variables to allow least-privilege precept to our connecting IoT units. As a greatest apply, coverage variables must be used when potential. Create a TestPolicy.json file with the next content material:
{ "Model": "2012-10-17", "Assertion": [{ "Effect": "Allow", "Action": [ "iot:Publish" ], "Useful resource": [ "arn:aws:iot:eu-west-1:XXXXXXXXXXXXXXXXX:topic/test/device/${iot:Connection.Thing.ThingName}" ] }, { "Impact": "Permit", "Motion": [ "iot:Connect" ], "Useful resource": [ "arn:aws:iot:eu-west-1:XXXXXXXXXXXXXXXXX:client/${iot:Connection.Thing.ThingName}" ] } ] } - Run the next command to register the coverage in AWS IoT Core:
aws iot create-policy--policy-name TestPolicy--policy-document file://TestPolicy.json--region <your_AWS_Region> - Connect the coverage to our machine certificates, and our machine certificates to our IoT factor. Run the next command to connect the IoT coverage to our machine certificates (you want the certificates ARN):
aws iot attach-policy--policy-name TestPolicy--target <your__device_certificate_ARN>--region <your_AWS_Region> - Lastly, run the next command to connect the machine certificates to your IoT factor:
aws iot attach-thing-principal--thing-name TestThing--principal <your_device_certificate_ARN>--region <your_AWS_Region>
You see the registered factor, coverage, and machine certificates in your AWS Account via the AWS IoT Console.
Step 4: Arrange CNAME file in Route 53
The final step of the configuration course of is to create CNAME data in your DNS to implement the routing out of your area identify to the AWS IoT Core endpoint.
At least, you should create a CNAME file in your hosted zone, together with your desired AWS IoT Core endpoint as a goal. You may establish your AWS IoT Core endpoint via the next CLI command:aws iot describe-endpoint --endpoint-type iot:Information-ATS —area <your_AWS_Region>
When you use Route 53, you should utilize the out there routing mechanisms to implement extra advanced eventualities, corresponding to utilizing Weighted Routing to carry out blue/inexperienced deployments or to regularly shift site visitors from one endpoint to a different.
To create a Easy Routing coverage utilizing Route 53:
- Open a command line terminal window.
- Create a file named simpleRoutingRecords.json with the next content material:
{ "Remark": "Create Easy Routing CNAME data ", "Modifications": [{ "Action": "UPSERT", "ResourceRecordSet": { "Name": "iot.example.com.", "Type": "CNAME", "TTL": 300, "ResourceRecords": [{ "Value": "<prefix>-ats.iot.eu-west-1.amazonaws.com" }] } }] } - Run the next command so as to add the file to your hosted zone in Route 53:
aws route53 change-resource-record-sets --hosted-zone-id <hosted_zone_id> --change-batch file://simpleRoutingRecords.json
As soon as that is full, the brand new file is displayed within the hosted zone in Route 53.
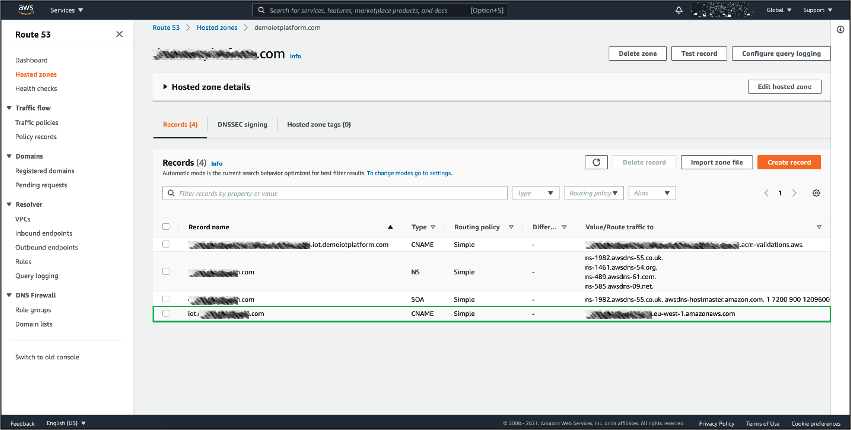
Easy routing CNAME file in Route53
Testing the answer
Subsequent, we ship check MQTT messages to the goal platform endpoint we registered as iot.instance.com utilizing the Eclipse Mosquitto MQTT shopper downloaded in the course of the conditions. This helps make sure the configured routing coverage and migration labored as anticipated.
Necessities to check the answer:
- The PEM encoded machine certificates and personal key created in Step2c of our walkthrough in “3. Implementing the Resolution in your AWS Account” saved as a file. In our instance you must have two information: TestThing.cert.pem and TestThing.personal.key.
- An AWS IoT Core root CA certificates. In our instance, we use RSA 2048 bit key: Amazon Root CA 1.
Process to check your resolution:
- Open a terminal window in your goal folder the place your machine certificates, personal key, and Amazon Root CA information are positioned.
- Open the AWS IoT console in your AWS account and navigate to the MQTT check shopper. You’ll find the check shopper at Check → MQTT check shopper.

AWS IoT Core console MQTT check shopper
- Within the Matter Filter field, enter “check/machine/TestThing”, choose Subscribe and go away the window open.
- In your terminal window, run the next command:
mosquitto_pub -h iot.instance.com --cafile AmazonRootCA1.pem --cert TestThing.cert.pem --key TestThing.personal.key -p 8883 -q 1 -d -t check/machine/TestThing -i TestThing -m "{"message": "helloFromTestThing"}" - Confirm that the messages are visualized within the AWS IoT Core check shopper console.

Check messages acquired within the AWS IoT Core console MQTT check shopper
Cleansing up Sources
To assist stop undesirable fees to your AWS account, delete the AWS sources that you just used for this walkthrough. These AWS sources embrace the AWS IoT Core, AWS Certificates Supervisor, Route 53. You need to use the AWS CLI, AWS Administration Console, or the AWS APIs to carry out the cleanup. On this part, we refer the AWS CLI strategy. If you wish to maintain these sources, you possibly can ignore this part.
Disabling your DNS configuration:
- Create a file with the next content material. In our instance, we identify the file change-resource-record-sets.json.
{ "Remark": "Delete the CNAME File Set", "Modifications": [ { "Action": "DELETE", "ResourceRecordSet": { "Name": "iot.example.com", "Type": "CNAME", "TTL": 300, "ResourceRecords": [ { "Value": "<prefix>-ats.iot.eu-west-1.amazonaws.com" } ] } }, { "Motion": "DELETE", "ResourceRecordSet": { "Title": "_XXXXXXXXXXXXXXXXXXXXX.iot.instance.com", "Kind": "CNAME", "TTL": 300, "ResourceRecords": [ { "Value": "_XXXXXXXXXXXXXXXXXXXXX.XXXXXXXXXXX.acm-validations.aws." } ] } } ] } - Delete the file utilizing the next CLI command:
aws route53 change-resource-record-sets --hosted-zone-id <your_hosted_zone_id> --change-batch file://change-resource-record-sets.json - Delete the hosted zones utilizing the next CLI command:
aws route53 delete-hosted-zone --id <your_hosted_zone_id>
Cleansing up AWS IoT Core sources
- Detach the Machine Certificates from the IoT coverage utilizing the next CLI command:
aws iot detach-policy --target "arn:aws:iot:eu-west-1:XXXXXXXXXXXXXXXXX:cert/<certificate_id>" --policy-name "TestPolicy" - Delete the IoT coverage utilizing the next CLI command:
aws iot delete-policy --policy-name TestPolicy - Detach the Machine Certificates from the check IoT factor utilizing the next CLI command:
aws iot detach-thing-principal --thing-name TestThing --principal arn:aws:iot:eu-west-1:XXXXXXXXXXXXXXXXX:cert/<certificate_id> - Delete the Machine Certificates from AWS IoT Core utilizing the next CLI command:
aws iot delete-certificate --certificate-id <certificate_id> - Delete the IoT factor from AWS IoT Core utilizing the next CLI command:
aws iot delete-thing --thing-name TestThing
Disabling your customized area configuration
- Disable the AWS IoT Core Customized Area Configuration Standing utilizing the next CLI command:
aws iot update-domain-configuration --domain-configuration-name "TargetTestIoTPlatform" --domain-configuration-status "DISABLED" - Delete the AWS IoT Core Customized Area Configuration utilizing the next CLI command:
aws iot delete-domain-configuration --domain-configuration-name "TargetTestIoTPlatform" - Delete all imported and requested server certificates in ACM utilizing the next CLI command:
aws acm delete-certificate --certificate-arn arn:aws:acm:eu-west-1:XXXXXXXXXXXXXXXXX:certificates/<certificate_id>
Conclusion
On this put up, we mentioned a few of the key challenges clients face when migrating their IoT machine fleet to AWS, and the way AWS IoT Core Configurable Endpoints may help simplify the method. The structure and instance proposed on this weblog supplies an answer you could undertake to allow a seamless migration of an IoT machine fleet to AWS, and lays the inspiration for a less complicated administration of future migration wants you may need to your IoT utility.
You need to use the supplied instance implementation for testing your self the aptitude, and organising the required sources in AWS IoT Core, Route 53 and AWS Certificates Supervisor. For extra flexibility you may also convey your personal Machine Certificates and CA Certificates in AWS IoT Core. To study extra about find out how to use AWS IoT Core Configurable Endpoints, you possibly can consult with the documentation.
Enthusiastic about migrating to AWS IoT?
AWS has helped clients like LG, Traeger Grills, Belkin, Centrica Hive, Weissbeerger, and plenty of others shortly and simply migrate from their homegrown or third-party IoT platforms. These clients migrated to make the most of the safety, scalability, reliability, and breadth and depth of AWS IoT companies.
Be taught extra about how AWS may help make your migration fast and simple on our AWS IoT Migrations Resolution Web page, or contact us, and somebody will likely be in contact to schedule time to stroll via your use case.
Concerning the authors

Daniele is a Senior IoT Information Architect with AWS Skilled Service. He helps AWS Clients obtain their enterprise objectives by architecting and constructing progressive options that leverage AWS IoT companies on the AWS Cloud. |

Prateek is a Senior IoT Architect with AWS Skilled Service International Speciality Observe. He helps AWS Clients obtain their enterprise outcomes by architecting and constructing fashionable utility platforms utilizing AWS IoT and associated companies. |

Ajinkya Farsole is a Cloud Infrastructure Architect at AWS Skilled Providers. He helps clients obtain their objectives by architecting safe and scalable options on the AWS Cloud. When he isn’t working, Ajinkya enjoys watching physics and historical past documentaries. |
[ad_2]