

[ad_1]
When you have a more recent Mac, it seemingly makes use of a speedy solid-state drive to retailer recordsdata, apps, music, movies, and a number of different essential stuff. However there’s one factor you could not learn about SSDs: They put on out over a protracted time period.
For the reason that SSD is such a significant a part of your Mac, it’s a good suggestion to retains tabs on its well being. Whereas it often takes a extremely very long time to wear down an SSD—seemingly far longer than you’ll maintain your Mac—issues can come up. (Earlier this yr, there have been numerous studies of Mac SSDs displaying superior put on after only a few months of use, However Apple stated this was a knowledge reporting error and stuck the issue in macOS Large Sur 11.4.)
So even if in case you have a model new M1 Mac, you may need to examine in your drive’s well being occasionally. To realize perception into the well being of your SSD, you should utilize a software program instrument referred to as , which faucets into the Self-Monitoring, Evaluation and Reporting Expertise (SMART) system that’s constructed into SSDs. There’s a catch with smartmontools, although. It’s not a typical app with an icon that you just double-click to launch and menus and home windows you navigate. It runs within the Terminal, the command-line interface for the Mac that you just’ll discover within the Utilities folder inside Functions.
On this article, you’ll discover ways to arrange the Terminal so you’ll be able to set up and run smartmontools. Put aside a while, nevertheless. Whereas the process isn’t tough (if I can do it, you actually can), because you’re coping with command line entries, it’s essential to pay slightly nearer consideration to what you’re doing than with apps you often use on the Mac. There are such a lot of instances I may’ve saved myself some frustration if I used to be simply extra cautious with my typing.
These directions have been created utilizing macOS Large Sur, however they may also be utilized in macOS Catalina. If one thing goes flawed, don’t panic. The worst-case situation is you’ll have to reinstall macOS in Restoration Mode, which can take a while however will depart your entire recordsdata intact.
Learn how to set up Xcode
The very first thing it’s essential to do is set up Xcode, an Apple app for builders. It has a set of command line instruments that your Mac wants earlier than you’ll be able to set up and run Homebrew, which is a prerequisite for working smartmontools. You possibly can without spending a dime.
After you obtain Xcode, head over to the Utilities folder to open it. That you must comply with its software program license earlier than you’ll be able to proceed, sort your Mac password, and in addition to the Phrases and Situations. Then you’ll be able to give up the app.
Learn how to set up Homebrew
Now it’s essential to set up a bundle supervisor, which is a set of instruments wanted to carry out duties like installations and uninstalls. There are totally different bundle managers obtainable, and is a well-liked one, so we’ll use it right here.
1. Open Terminal (Functions > Ultilities)
2. Copy the road beneath (triple-click it to pick out all) after which paste it into the Terminal, then press Return.
/bin/bash -c "$(curl -fsSL https://uncooked.githubusercontent.com/Homebrew/set up/HEAD/set up.sh)"
2. You’ll be requested to enter your Mac login password with a view to grant 'sudo' entry, which permits you to run applications with safety privileges. Terminal won’t present any visible indication that you’re typing in your password (no bullets, asterisks, or the like), so sort it in rigorously and press the Return key.
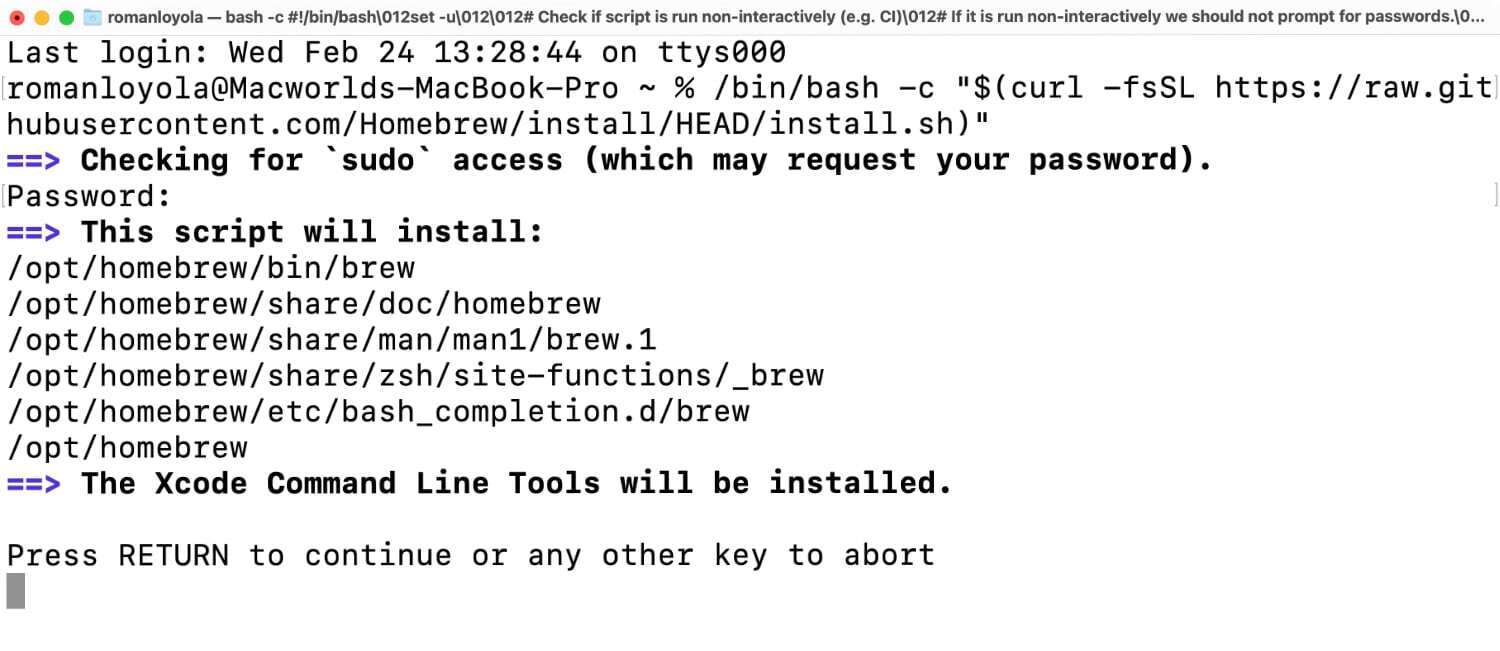
Terminal responds by telling you what will probably be put in. Press Return to proceed, or another key when you determine to cease set up.
3. Terminal shows standing updates on the set up, which takes a number of minutes, however you gained’t see any spinning icons, a progress bar, or something like that. It could sit at Putting in with Command Line Instruments for Xcode for a bit, however it’s working (actually, it’s).

Finally, Terminal will show a bunch of stuff in fast succession. You must see Downloading and putting in Homebrew, adopted by New Formulae, Up to date Formulae, and Deleted Formulae. Then beneath that, you need to see Set up profitable! adopted by some useful reference information.
4. On the finish of the set up there must be a Terminal immediate, and some traces above the immediate you may even see in daring Subsequent steps. You could want so as to add Homebrew to your PATH file. PATH tells the Terminal the place to search out executables.
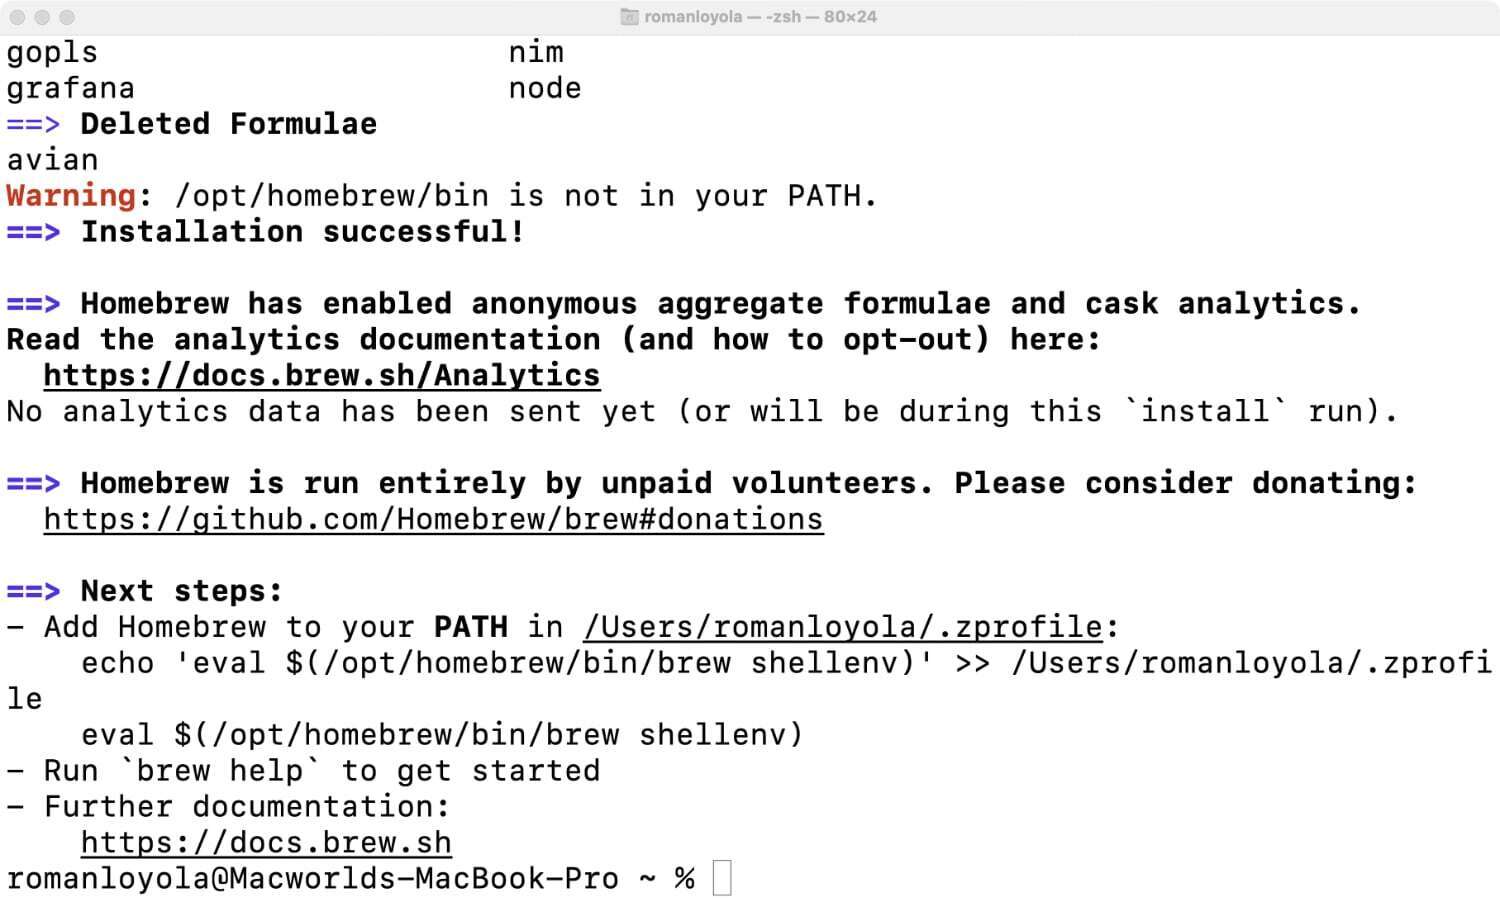
In present variations of macOS, the Terminal makes use of ZSH because the default shell, the UI used to execute instructions. The command to switch the PATH file is as follows:
nano ~/.zshrc
Copy and paste that into the Terminal and press Return.
5. A brand new window seems that appears just like the screenshot beneath, with the primary part clean. See that line in the primary part of the screenshot? You’re going to enter that in your individual window. Right here’s the code so you’ll be able to copy and paste it.
export PATH=/usr/native/bin:$PATH
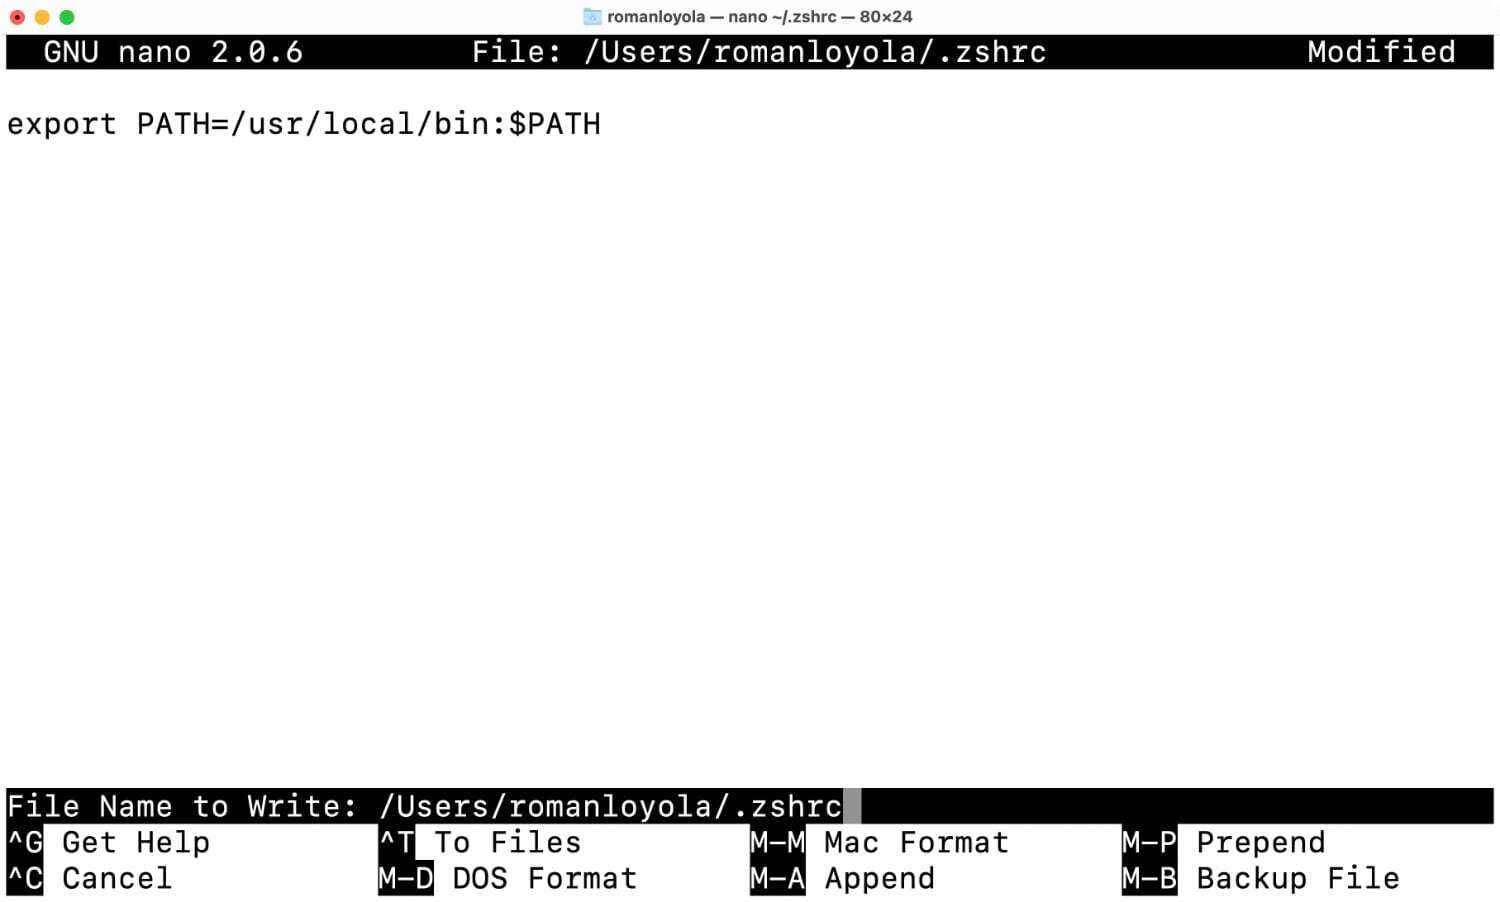
6. Now it can save you the file by urgent Management+O (the letter, not zero). A immediate will seem close to the underside of the window, telling you the file title that will probably be saved. Press Return, then exit by urgent Management+X, after which give up and relaunch Terminal to implement the modifications.
Now it’s time to put in the utility to allow you to examine the well being of your Mac’s SSD. You possibly can go to the to be taught extra concerning the software program.
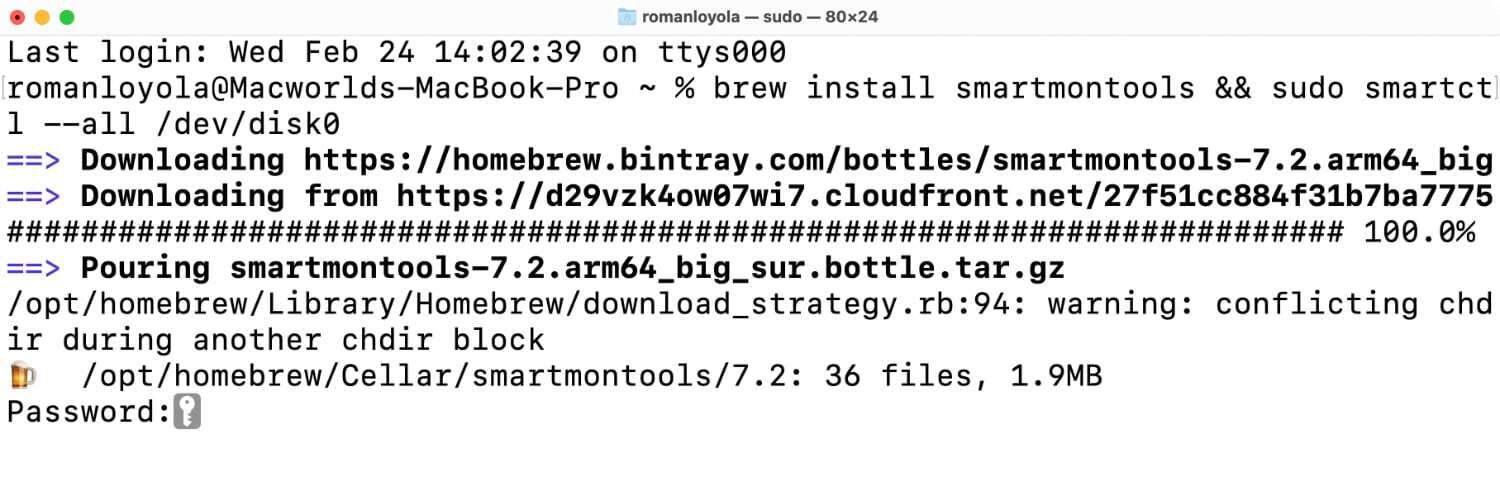
1. To put in smartmontools, copy and paste the code beneath into the Terminal (hat tip to ).
brew set up smartmontools && sudo smartctl --all /dev/disk0
Press Return.
Word: When you see zsh: command not discovered: brew, the PATH modification didn’t work. Re-type nano ~/.zshrc within the window after which
export PATH="/choose/homebrew/bin:$PATH"
2. Enter your password and press Return. This may set up the software program after which run it. Your Terminal window ought to appear like this earlier than you enter your password:
Smartmontools offers a useful variety of information factors about your Mac’s SSD. For fast reference, listed here are a number of.
Obtainable Spare: Share of the remaining spare capability obtainable to be used.
Share Used: That is an estimate of the quantity of life utilized by the SSD.
Information Items Learn/Information Items Written: Take note of the bracketed quantity in terabytes. The quantity in entrance of that’s the information introduced as 512 byte information items.
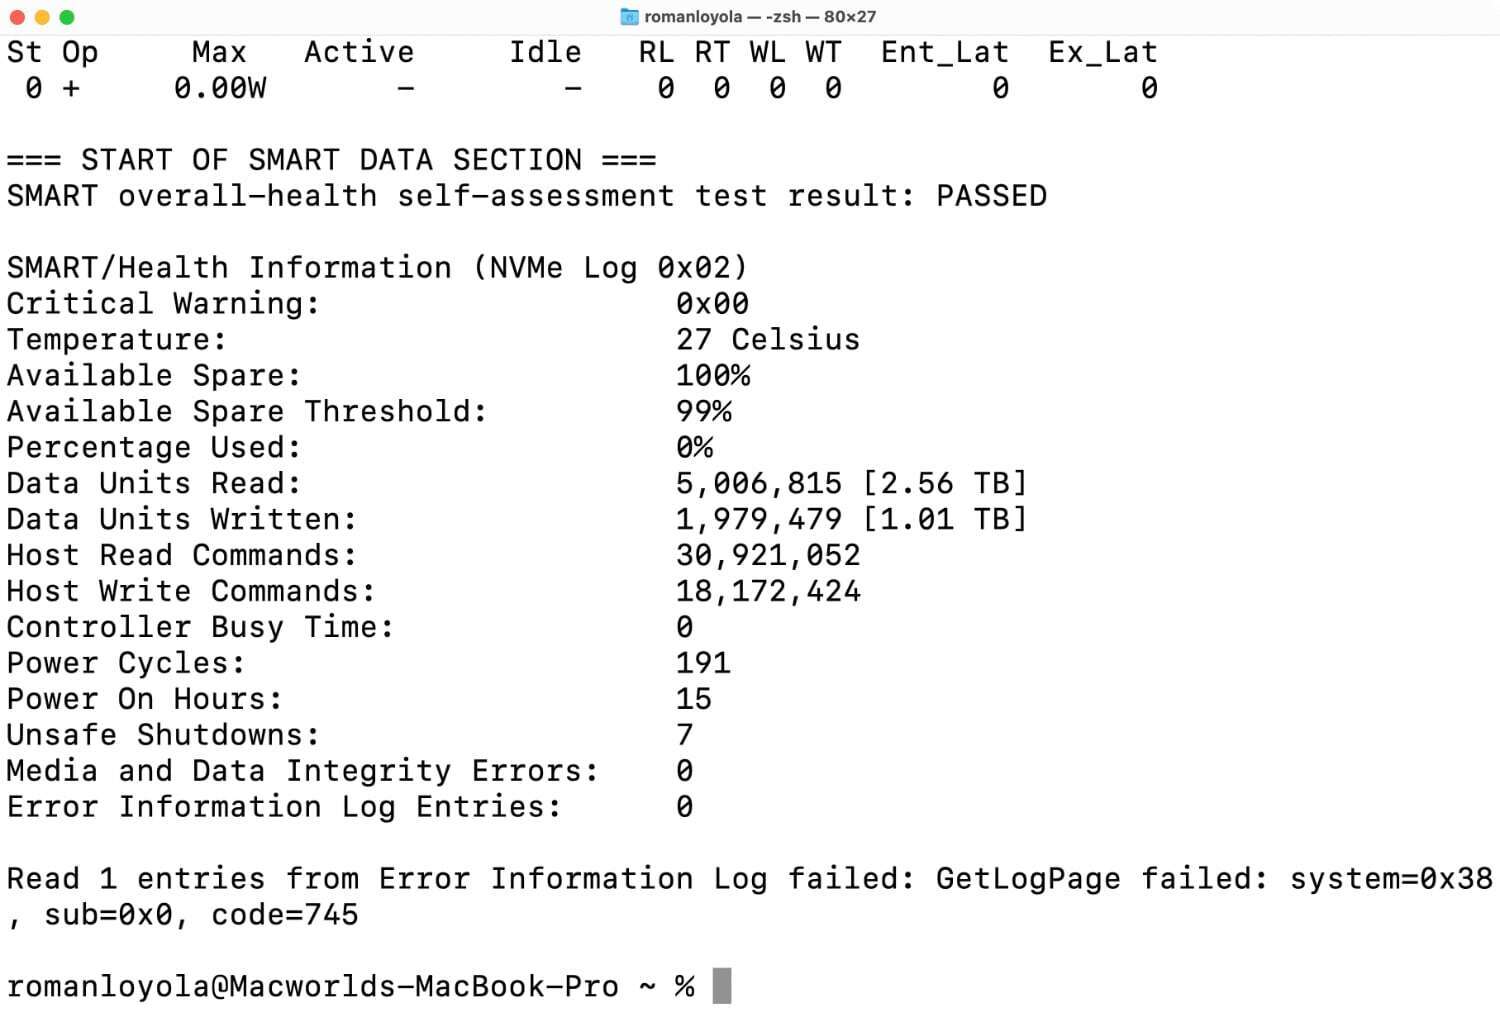
The Sensible Information Part is stuffed with useful stats. Control the Share Used quantity, as a result of that tells you the quantity of life utilized by the SSD. The upper the quantity, the shorter the life remaining.
Right here’s the right way to run smartmontools at a later level, because it’s a good suggestion to examine in your SSD each every now and then to ensure it’s in good well being. When you ran the set up famous above, smartmontools will probably be in your Mac so that you can use everytime you need.
1. Launch Terminal and on the immediate, sort diskutil record and press Return. This may present data on the SSD in your Mac.
2. Search for the part labeled /dev/disk0 (inside). Beneath the headers (#, TYPE NAME, SIZE, IDENTIFIERS), copy and paste the identifier of the entry beginning with 0. In my state of affairs, it’s disk0.
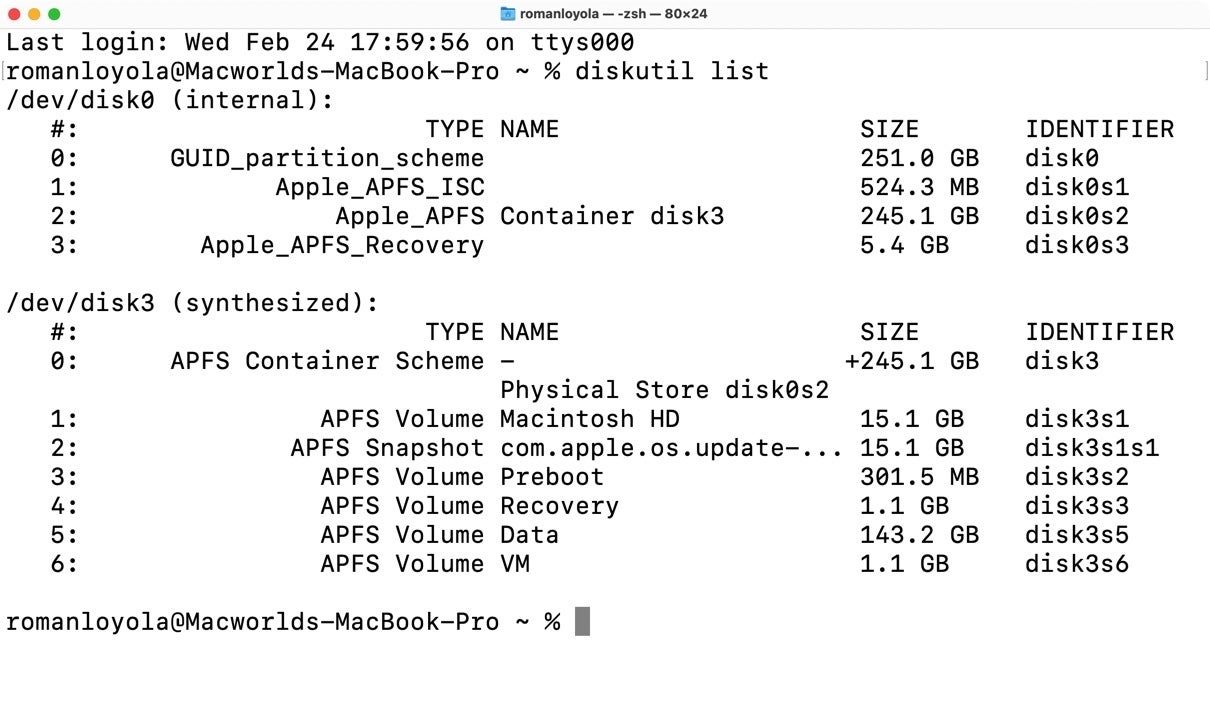
3. Go to the immediate beneath, then sort smartctl -a, then an area, after which paste within the identifier. So, for instance, in my state of affairs, I’d sort smartctl -a disk0. Press Return.
Smartmontools will run and publish a report on the well being of your drive. You may give the numbers a glance and ensure your SSD is okay.
Roman has lined expertise for the reason that early Nineteen Nineties. His profession began at MacUser, and he is labored for MacAddict, Mac|Life, and TechTV.
[ad_2]