

[ad_1]
Whereas tablets don’t appear excessive precedence for many platform or gadget makers, Apple by no means stops bettering iPad’s {hardware} and software program. In 2019, Apple renamed the pill’s working system iPadOS, emphasizing its distinctive multitasking and keyboard help. Persevering with Apple’s two-year cycle of appreciable iPadOS updates, iPadOS 15 gives many enhancements.
On this tutorial, you’ll study enhancements in iPadOS 15, together with:
- Multitasking enhancements
- Keyboard shortcuts enhancements
- Pointer updates
You’ll do that whereas modernizing the app NotesLite, which you should utilize to put in writing notes and add photographs.
Getting Began
Obtain the starter undertaking by clicking the Obtain Supplies button on the prime or backside of the tutorial.
The starter undertaking comprises a completely useful app with options launched for iPadOS 14 and under. You’ll enhance the app by including new options launched in iPadOS 15 and making it look extra trendy and useful.
A number of Home windows or Scenes
In iPadOS 13, Apple launched the idea of scenes to help a number of home windows in iPad apps.
Home windows are represented by UIScene cases. A UISceneSession manages a scene. All through this tutorial, whenever you see a scene or UISceneSession, you may consider it as a window.
For those who constructed an app earlier than iOS 13, AppDelegate is the one place that does all the things associated to app launch, foregrounding, backgrounding and extra.
In iOS 13, Apple moved a few of AppDelegate‘s obligations to SceneDelegate.
These days, utility entry factors are inside AppDelegate, and window-related stuff — reminiscent of backgrounding, foregrounding and URL dealing with — are inside an object conforming to UISceneDelegate or UIWindowSceneDelegate.
These additionally apply to iPhone apps. You may consider an iPhone app as a single window utility.
Every scene wants an occasion of UISceneConfiguration for its configuration. You outline these configurations inside Information.plist.
Now, you’ll see how all these join contained in the starter undertaking.
Exploring NotesLite
Open the starter undertaking and select an iPad goal. Then, construct and run.
The picture above exhibits how the app works out of the field.
Faucet the plus button so a brand new window seems on the aspect. Write your word, add an image and faucet Save. The creation window closes and the newly added word seems within the sidebar. Tapping the word within the sidebar will present the element web page on the suitable.
Notice: Generally including a picture within the simulator doesn’t work as anticipated. If this occurs, strive including a distinct picture or connecting your iPad and testing on gadget.
The app already helps a number of home windows. Check out the file construction:
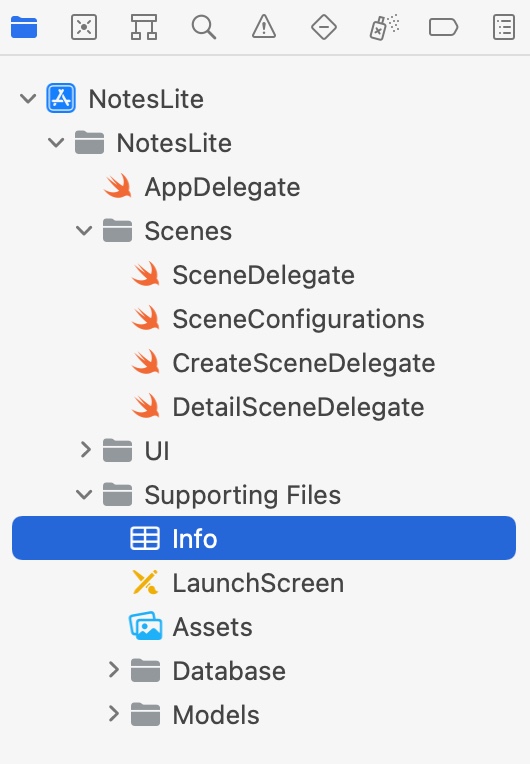
Contained in the Scenes folder are the three subclasses for UIWindowSceneDelegate:
- First, there’s
SceneDelegatefor the default window of the app. - Then, there’s
CreateSceneDelegatefor the word creation window. - Lastly, there’s
DetailSceneDelegatefor the word element window.
While you opened the app, the default window appeared. After tapping the plus button, CreateSceneDelegate took over. You’ll add help for a element window later within the tutorial.
Contained in the Supporting Recordsdata folder, open Information.plist.
There’s a key referred to as Utility Scene Manifest whose worth is already within the starter undertaking. You have to outline every scene configuration your app helps inside this key.

As you may see within the screenshot above, you’ll want to outline a minimum of the Configuration Identify and the Delegate Class Identify to which this configuration relates.
NSUserActivity
In iOS 8, Apple launched a category referred to as NSUserActivity. At first, you would use this class to combine the Handoff characteristic between gadgets.
Annually, this class grew to become extra highly effective. There’s even a operating joke locally that Apple may someday deprecate all iOS APIs and launch all the things underneath NSUserActivity‘s tent.
As of iOS 15, you may — and may — use NSUserActivity in case you help any of those options:
- Handoff
- In-app Highlight search
- Siri and Shortcuts Intents
- A number of home windows on iPad
While you wish to open a brand new window inside your app, ask the system to create a scene utilizing requestSceneSessionActivation(_:userActivity:choices:errorHandler:) on UIApplication‘s shared object.
Nevertheless, you may’t instantly specify a scene identify right here. You do that utilizing NSUserActivity. The system offers you again this occasion, and you may resolve which scene to configure and current.
Window Presentation Fashion
On iPadOS 14 and earlier, the consumer interface for managing an app’s home windows was so hidden and tough to make use of that even some professional customers prevented it. Happily, on iPadOS 15, this UI is significantly better.
On the prime of every app that helps Break up View and Slide Over, there’s a brand new button represented by three dots. With NotesLite open, faucet it.

Three buttons seem. This allows you to put the window in Full Display screen, Break up View or Slide Over with out going by means of the effort of dragging and dropping. Hurray!
Nevertheless, these aren’t the one choices out there. In iPadOS 15, Apple added a brand new type to the window modes: Distinguished.
It seems a like a Kind Sheet at first, however you may simply put it in some other mode. Now, it’s time so as to add it to the app.
Open NotesListViewController.swift contained in the UI group. Go to openNewNote(). Right here’s what it seems like:
@objc func openNewNote() {
  // 1
  if UIDevice.present.userInterfaceIdiom == .pad {
    // 2
    let userActivity = ActivityIdentifier.create.userActivity()

    // 3
    let choices = UIWindowScene.ActivationRequestOptions()
    choices.preferredPresentationStyle = .commonplace

    // 4
    UIApplication.shared.requestSceneSessionActivation(
      nil,
      userActivity: userActivity,
      choices: choices,
      errorHandler: nil)
  } else {
    let navigationController = UINavigationController(
      rootViewController: NoteViewController.storyboardInstance)
    current(navigationController, animated: true)
  }
}
Right here’s what this does:
- Since iPhone apps don’t help a number of scenes, partition primarily based on the gadget the code is operating on.
- Create a
userActivityutilizing a helper technique from SceneConfigurations.swift. - Subsequent, present the system with some activation choices. The system tries to think about these requests when activating a scene. This code asks the system to indicate a
commonplacepresentation type. This type is what made the creation window seem alongside the primary window. On iPadOS 15, this selection defaults toautomated, and the system decides what works finest. - Request a scene activation with the consumer exercise and the request choices. This makes the brand new window seem.
Now, change the popular presentation type line to this:
choices.preferredPresentationStyle = .outstanding
Construct and run. Then, faucet the plus button.

A brand new window seems on prime of the present view.
There’s a tiny indicator that exhibits this isn’t a type sheet or a standard modal presentation: the three dots button on the highest.
Faucet it, and also you’ll see a brand new possibility:
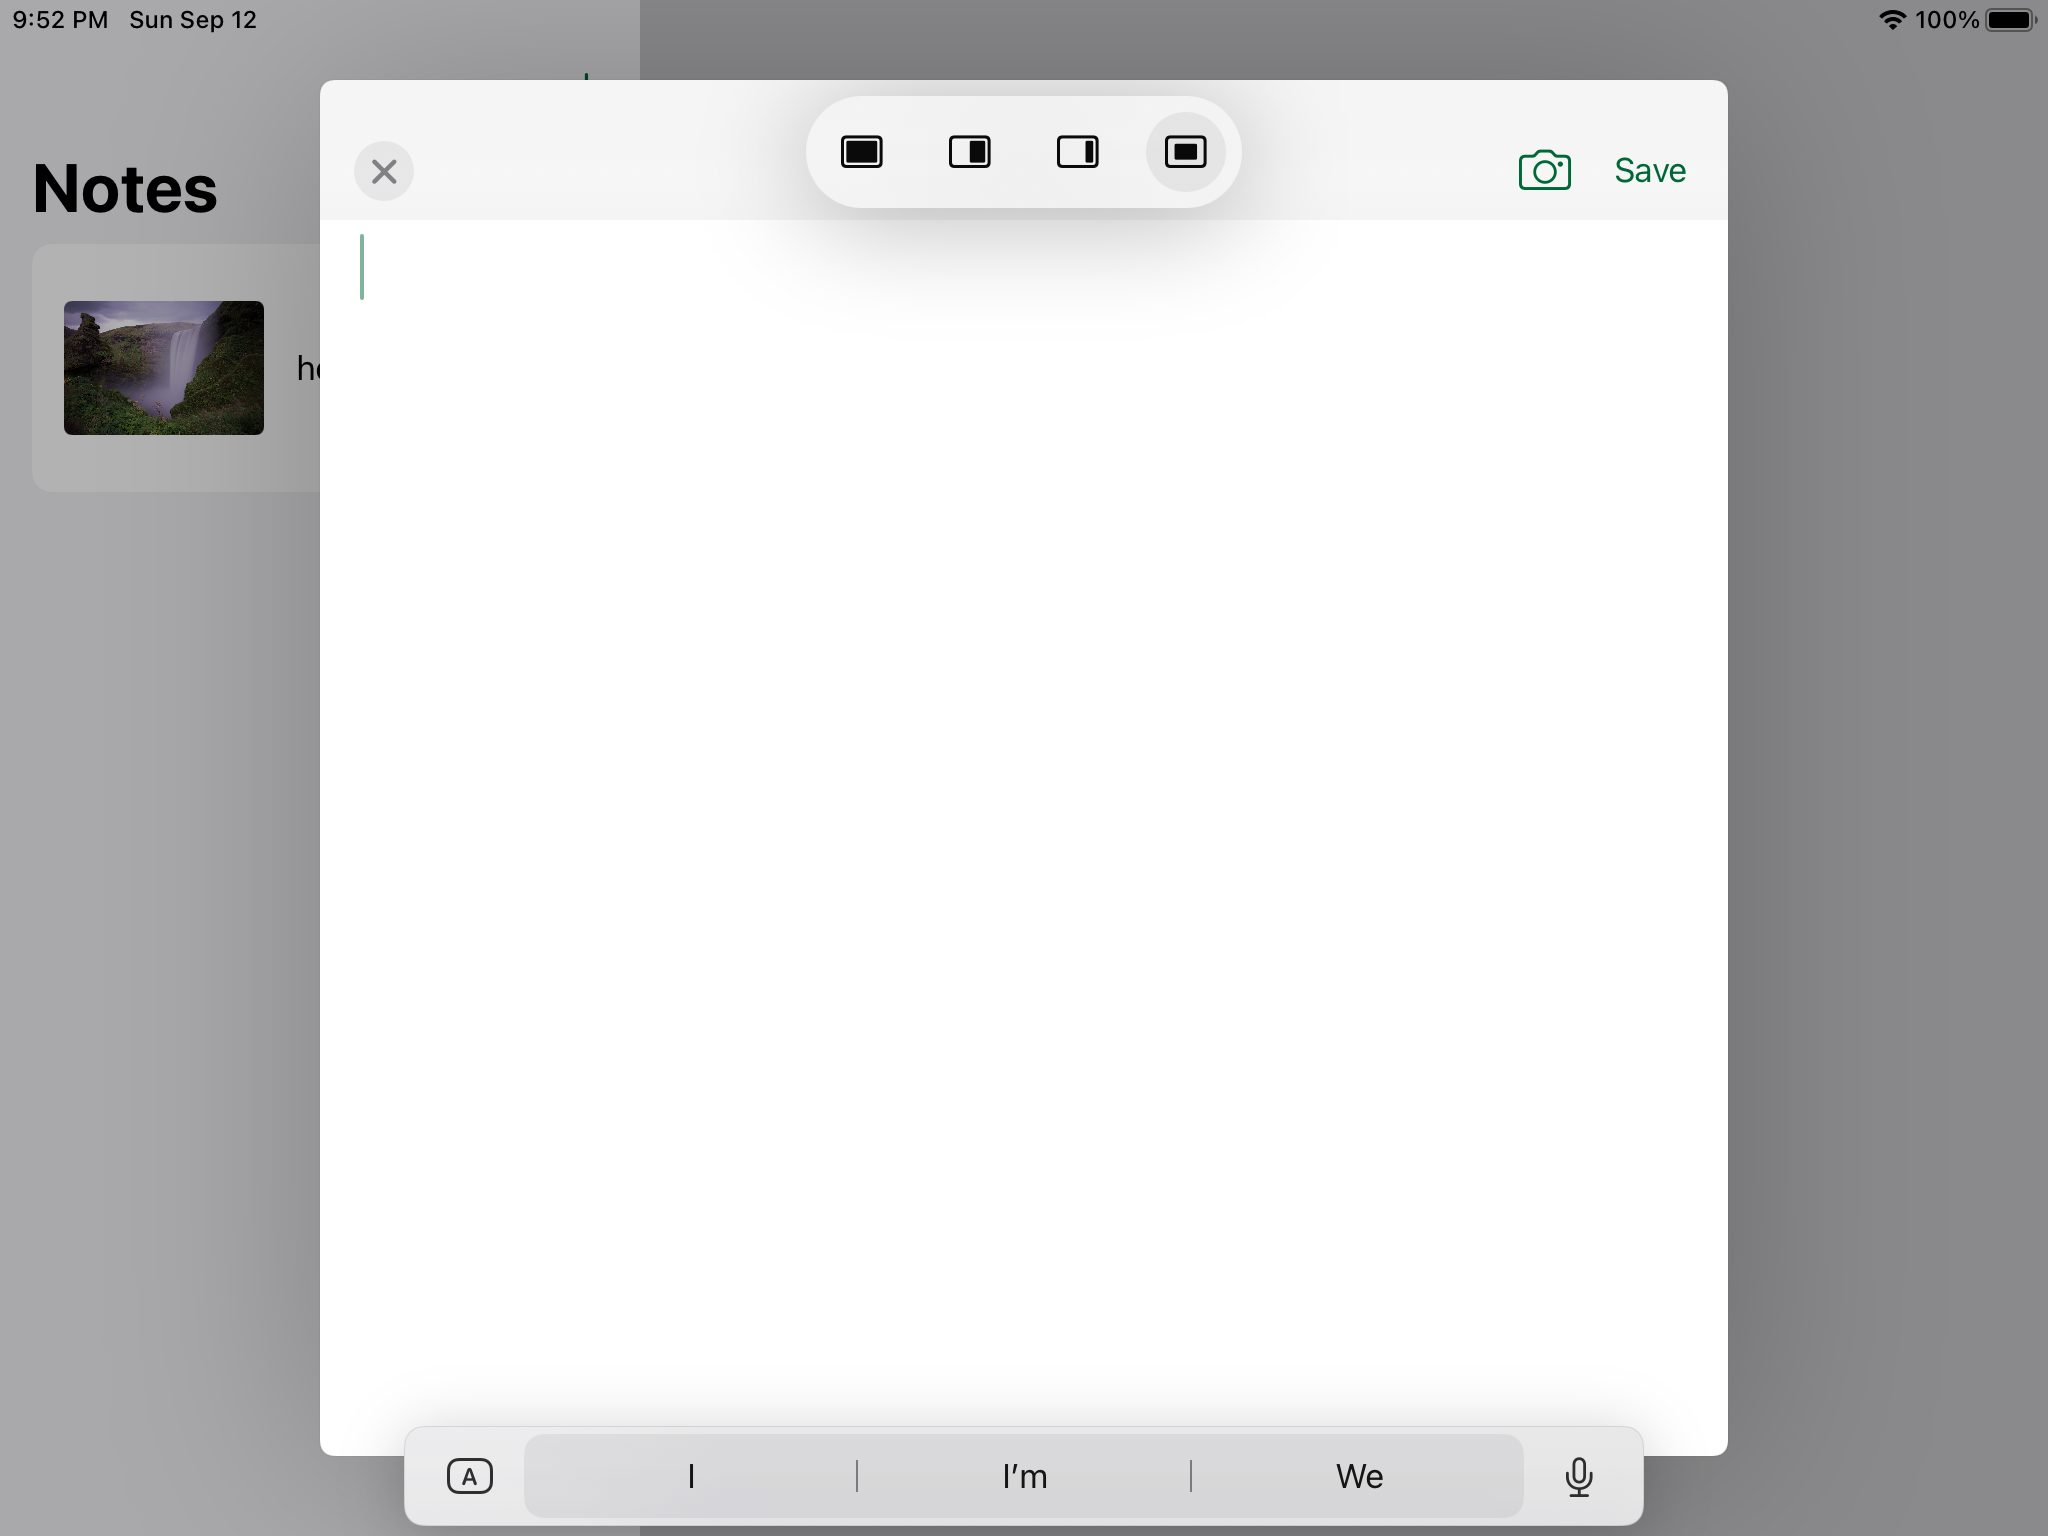
The icon speaks for itself. You requested the system to current this window prominently.
The three dots button does one other job, too. This time, as an alternative of tapping it, strive swiping it down. For those who look carefully, the window goes someplace on the backside of the display screen. This space is the App Shelf. It’s a spot the place you may see all open home windows for an app and swap between them.
If an app has a number of lively home windows, whenever you open it from Residence Display screen, the shelf seems for a break up second. It’s also possible to summon the shelf at any time by tapping on the three dots button. Shut the home windows from the shelf by swiping up.
Right here’s a GIF for instance these interactions:
Subsequent, you’ll study activation actions.
Activation Motion
Per Apple’s pointers, you solely have to open new home windows to your app primarily based on the consumer’s specific interplay. As you may implement many of those interactions utilizing UIAction, Apple supplied a code shortcut.
In NotesListViewController.swift, go to configureBarButtonItems(). Then, create an motion that calls openNewNote(), and fix it to the bar button merchandise.
Do that by changing the present configureBarButtonItems() with this:
non-public func configureBarButtonItems() {
  // 1
  let addAction = UIAction { _ in
    let navigationController = UINavigationController(
      rootViewController: NoteViewController.storyboardInstance)
    self.current(navigationController, animated: true)
  }

  // 2
  let newSceneAction = UIWindowScene.ActivationAction(
    alternate: addAction
  ) { _ in
    // 3
    let userActivity = ActivityIdentifier.create.userActivity()

    let choices = UIWindowScene.ActivationRequestOptions()
    choices.preferredPresentationStyle = .outstanding

    // 4
    return UIWindowScene.ActivationConfiguration(
      userActivity: userActivity,
      choices: choices)
  }

  // 5
  navigationItem.rightBarButtonItem = UIBarButtonItem(
    systemItem: .add,
    primaryAction: newSceneAction,
    menu: nil)
}
Right here’s what this does:
- First, create a
UIActionthat presentsNoteViewControllermodally. - Subsequent, create an occasion of
UIWindowsScene.ActivationAction. Because the identify implies, you employ it for activating a scene. Move theaddActionyou created in step 1 as a parameter to this perform.UIKitroutinely runs thealternatemotion when the gadget doesn’t help a number of home windows. How handy is that? - Then, create a consumer exercise for the word creation scene and configure the request choices. You’re already conversant in this step.
- Right here, you come an occasion of
UIWindowScene.ActivationConfiguration, passing the consumer exercise and choices. It’s like whenever you handed this stuff torequestSceneSessionActivation(_:userActivity:choices:errorHandler:). - Since
newSceneActionis definitely an occasion ofUIAction, you set it as the first motion of the bar button merchandise.
Construct and run. Then, strive tapping the plus icon. If nothing adjustments, it means you had been profitable.
Activation Interplay
Whereas on iPadOS 14 and under, Apple insisted on Drag & Drop as the strategy to open a brand new window, on iPadOS 15, it advertises context menus and a brand new pinch open gesture. Apple additionally built-in these in its personal apps. As an example, open the Notes app.
Within the sidebar, you may contact and maintain or right-click with a mouse or trackpad to open the context menu. Selecting Open In New Window will open a word in a brand new window with the outstanding type you noticed earlier.

It’s also possible to pinch open with two fingers on any merchandise within the sidebar to open it in a brand new window, prominently.
Subsequent, you’ll add these choices to NotesLite.
Context Menu
In NotesListViewController.swift, scroll to the mark line // MARK: - UICollectionViewDelegate.
Take a look at collectionView(_:contextMenuConfigurationForItemAt:level:). This technique provides context menu objects for every row. For now, it solely comprises delete. You’ll add a brand new motion for opening the word in a brand new window.
First, although, you’ll want to create a helper technique for configuration, which you’ll use within the subsequent step. Add this inside NotesListViewController slightly below the definition of `deleteItem(at:)`:
non-public func activationConfiguration(
  for indexPath: IndexPath
) -> UIWindowScene.ActivationConfiguration? {
  // 1
  guard let word = dataSource.itemIdentifier(for: indexPath) else {
    return nil
  }
  // 2
  var data: [String: Any] = [
    NoteUserInfoKey.id.rawValue: note.id,
    NoteUserInfoKey.content.rawValue: note.content
  ]

  // 3
  if let knowledge = word.picture?.jpegData(compressionQuality: 1) {
    data[NoteUserInfoKey.image.rawValue] = knowledge
  }

  // 4
  let userActivity = ActivityIdentifier.element.userActivity(userInfo: data)

  let choices = UIWindowScene.ActivationRequestOptions()
  choices.preferredPresentationStyle = .outstanding

  let configuration = UIWindowScene.ActivationConfiguration(
    userActivity: userActivity,
    choices: choices)
  return configuration
}
It seems slightly lengthy; nonetheless, it’s fairly easy:
- Get the
wordpertaining to theindexPathfrom thecollectionView‘sdataSource. It might returnnil, so useguard-letsyntax and exit the strategy early if the index isnil. - The way in which to go knowledge to the system for creating a brand new window is thru consumer actions. Every consumer exercise has
userInfo, in which you’ll retailer property checklist knowledge. SinceuserInfomakes use of a string-based key-value dictionary, lower attainable errors through the use of some predefined keys, that are contained in the starter undertaking. Right here, you retailer the word’sidandcontent material. - Examine if the word has an related picture. In that case, compress it to JPEG and put it aside to
userInfoasKnowledge. - Like earlier than, create a consumer exercise, set the request choices and return a configuration made with them.
Now, return to // MARK: - UICollectionViewDelegate and change let actions = [delete] with the next:
// 1
var actions = [delete]

// 2
if let configuration = self.activationConfiguration(for: indexPath) {
  // 3
  let newSceneAction = UIWindowScene.ActivationAction { _ in
    return configuration
  }

  // 4
  actions.insert(newSceneAction, at: 0)
}
Within the code above, you:
- Change
actionsfrom aletto avar, so you may add objects later. - Get an occasion of
UIWindowScene.ActivationConfigurationutilizingactivationConfiguration(for:), which you’ll write later. Since it could benilin sure circumstances, you conditionally unwrap it. - Create a brand new activation motion as you probably did earlier, after which return the configuration you bought from step 2.
- Insert
newSceneActionon the prime ofactions.
As within the unique code, this returns a menu utilizing the desired actions.
Construct and run. Invoke the context menu within the notes checklist by touching and holding or right-clicking. You could now open the word in a brand new window.


Subsequent, you’ll add pinch help on UICollectionView objects.
Pinching
First, implement a brand new delegate technique. Add this on the finish of NotesListViewController.swift, simply earlier than the closing brace:
override func collectionView(
  _ collectionView: UICollectionView,
  sceneActivationConfigurationForItemAt
  indexPath: IndexPath,
  level: CGPoint
) -> UIWindowScene.ActivationConfiguration? {
  activationConfiguration(for: indexPath)
}
You come back an activation configuration for every merchandise you’d wish to help pinching.
Construct and run. Then, strive pinching open on a word.

The whole row will get larger whilst you pinch. You may customise the transition in a means that solely the picture scales up. To do that, inform the system on which view the dimensions transition ought to happen.
Open activationConfiguration(for:), and proper earlier than the return configuration line, add:
// 1
if let cell = collectionView.cellForItem(at: indexPath) {
  // 2
  if let imageView = cell.contentView.subviews.first(
    the place: { subview in
      (subview as? UIImageView)?.picture != nil
    }
  ) {
    // 3
    configuration.preview = UITargetedPreview(view: imageView)
  }
}
Right here’s what this does:
- First, get the cell the consumer pinched.
- Discover the
imageViewcontained in the subviews of the cell’scontentViewthe placepictureisn’tnil. - Set the
imageViewyou present in step 2 because thepreviewof the activation configuration.
Construct and run. Strive pinching another time. It seems rather more polished.

Notice: To help this pinch gesture on views aside from cells in a UICollectionView, create a UIWindowScene.ActivationInteraction and fix it to a customized view anyplace within the hierarchy. It’s straightforward to do, however past the scope of this tutorial.
Saving and Restoring State in Scenes
Offering polished, handy methods to open content material in new home windows is necessary. Nevertheless, it’s equally necessary to save lots of and restore the scene’s state to have the ability to return to it seamlessly.
When a scene strikes to the background, the system asks the scene’s delegate for an occasion of NSUserActivity to symbolize its state.
For one of the best expertise, the scene state shouldn’t solely save the content material, but additionally the visible and interplay state reminiscent of scroll and cursor place.
You need to save and restore state for all of your app’s scenes, however for brevity, you’ll discover ways to save and restore the state just for the word creation window.
To make saving and restoring simpler, Apple launched two new strategies in UISceneDelegate and its inherited object, UIWindowSceneDelegate.
Open CreateSceneDelegate.swift and add:
func stateRestorationActivity(for scene: UIScene) -> NSUserActivity? {
  // 1
  guard
    let navigationController = window?.rootViewController
      as? UINavigationController,
    let noteVC = navigationController.viewControllers.first
      as? NoteViewController
  else {
    return nil
  }

  // 2
  let stateActivity = ActivityIdentifier.create.userActivity()

  // 3
  var data: [String: Any] = [
    NoteUserInfoKey.content.rawValue: noteVC.textView.text ?? "",
    NoteUserInfoKey.contentInteractionState.rawValue:
      noteVC.textView.interactionState
  ]
  if let picture = noteVC.selectedImage?.jpegData(compressionQuality: 1) {
    data[NoteUserInfoKey.image.rawValue] = picture
  }

  // 4
  stateActivity.addUserInfoEntries(from: data)

  return stateActivity
}
The system calls this technique to save lots of the state for a scene. It returns a consumer exercise, which the system provides again to you whenever you wish to restore the state.
Right here, you:
- Attempt to discover the occasion of
NoteViewController, which is within the view hierarchy. If there isn’t any, you don’t have something to save lots of, so returnnil. - Create an empty consumer exercise for the word creation web page, as you probably did whenever you needed to request a brand new window.
- Retailer the values of the
textual contentandinteractionStateproperties oftextViewinto theuserInfodictionary.interactionStateis a brand new property ofUITextFieldandUITextViewon iPadOS 15 that permits you to save and restore cursor and scroll place. You additionally save thepictureasKnowledgeif it’s out there. - Add the contents of the
datadictionary to the consumer exercise and return it.
To revive the state, implement the strategy under, extracting the info you saved into the consumer exercise and restoring it within the respective views. Add this technique under the strategy you simply added in CreateSceneDelegate.swift:
func scene(
  _ scene: UIScene,
  restoreInteractionStateWith stateRestorationActivity: NSUserActivity
) {
  // 1
  guard
    let navigationController = window?.rootViewController
      as? UINavigationController,
    let noteVC = navigationController.viewControllers.first
      as? NoteViewController,
    let userInfo = stateRestorationActivity.userInfo
  else {
    return
  }

  // 2
  noteVC.viewType = .create

  // 3
  let picture: UIImage?
  if let knowledge = userInfo[NoteUserInfoKey.image.rawValue] as? Knowledge {
    picture = UIImage(knowledge: knowledge)
  } else {
    picture = nil
  }

  // 4
  let textual content = userInfo[NoteUserInfoKey.content.rawValue] as? String
  noteVC.textView.textual content = textual content ?? ""
  noteVC.selectedImage = picture

  // 5
  if let interactionState =
    userInfo[NoteUserInfoKey.contentInteractionState.rawValue] {
      noteVC.textView.interactionState = interactionState
  }
}
Within the code above:
- First, you examine if the system has completed establishing the view controllers. You additionally examine if there’s any
userInfoout there to revive. - Subsequent, you set the
viewTypeofNoteViewControllerto.create. As you will have observed,NoteViewControlleris used for each creating and viewing a word. - Then, you examine if picture knowledge is offered inside
userInfo. If it’s there and you may create aUIImagefrom it, you retailer itspicturevariable. - Subsequent, you set the contents of
textViewandselectedImage. - Lastly, after setting
textual contentonUITextView, you setinteractionStateif it’s out there. All the time set the interplay state after setting the content material.
That’s it. Construct and run.

Now, comply with these directions to see the save and restore mechanism in motion:
- Run the app from Xcode.
- Faucet the plus button.
- Add some textual content and maybe a picture.
- Transfer the cursor to someplace other than the tip of the textual content.
- Swipe down on the three dots button of the note-creating window to attenuate it to the shelf.
- Kill the app from Xcode utilizing the Cease button. It will simulate the scenario the place the system kills the app course of.
- Run the app once more from Xcode.
- Faucet the New Notice window from the shelf.
- All the things is there, even the cursor place.
Within the subsequent part, you’ll study keyboard enhancements.
Keyboard Shortcuts Enhancements
One attribute of a Mac app is its Menu Bar, a single place containing each attainable motion for the app. After Apple began embracing the {hardware} keyboard for iPad, many individuals wished for a menu bar on iPad. On iPadOS 15, Apple fulfilled this want — sort of!
Apps on iPad received’t get a persistent menu bar like Mac apps. Moderately, whenever you maintain Command on the {hardware} keyboard linked to the iPad, you’ll get a brand new menu system that appears just like the Mac implementation.
Listed here are a few of the options of this new system:
- Apps can categorize actions into teams.
- Customers can seek for out there actions, similar to on macOS.
- The system routinely hides inactive actions as an alternative of disabling them.
- The API is just like the one used to create menu objects for a Catalyst app. Because of this, you don’t have to duplicate issues when including keyboard shortcuts for iPad and Mac Catalyst.
In NotesLite, there are a few keyboard shortcuts out there.
Particularly, NoteViewController comprises Save and Shut actions triggered by Command-S and Command-W. In NotesListViewController, you may create a brand new word by urgent Command-N.
See the shortcut motion teams out there proper now in NotesLite by holding the Command key:

The class for the motion is the identify of the app. When the builders of an app use the previous mechanism for offering keyboard shortcuts, that is the way it seems. Subsequent, you’ll replace to the fashionable method.
Updating to the Menu Builder API
One of many previous methods of including keyboard shortcuts help was overriding the keyCommands property of UIResponder. Since UIViewController is a UIResponder, you are able to do this in view controllers.
There are two occurrences of keyCommands in NotesLite. In NoteViewController.swift, you’ll see:
override var keyCommands: [UIKeyCommand]? {
  [
    UIKeyCommand(title: "Save", action: #selector(saveNote),
      input: "s", modifierFlags: .command),
    UIKeyCommand(title: "Close", action: #selector(dismiss),
      input: "w", modifierFlags: .command)
  ]
}
Take away keyCommands from NotesListViewController.swift and NoteViewController.swift. You need to use Xcode’s Discover characteristic.
Apple recommends defining all menu objects to your app at launch. To take action, open AppDelegate.swift.
Override buildMenu(with:), which is a technique on UIResponder:
override func buildMenu(with builder: UIMenuBuilder) {
  tremendous.buildMenu(with: builder)

  // 1
  guard builder.system == .major else { return }

  // 2
  let newNoteMenu = UIMenu(
    choices: .displayInline,
    youngsters: [
      UIKeyCommand(
        title: "New Note",
        action: #selector(NotesListViewController.openNewNote),
        input: "n",
        modifierFlags: .command)
    ])

  // 3
  let saveMenu = UIMenu(
    choices: .displayInline,
    youngsters: [
      UIKeyCommand(
        title: "Save",
        action: #selector(NoteViewController.saveNote),
        input: "s",
        modifierFlags: .command)
    ])

  // 4
  let closeMenu = UIMenu(
    choices: .displayInline,
    youngsters: [
      UIKeyCommand(
        title: "Close",
        action: #selector(NoteViewController.dismiss),
        input: "w",
        modifierFlags: .command)
    ])

  // 5
  builder.insertChild(newNoteMenu, atStartOfMenu: .file)
  builder.insertChild(closeMenu, atEndOfMenu: .file)
  builder.insertChild(saveMenu, atEndOfMenu: .file)
}
Within the code above, you:
- Examine if the system is looking the menu builder API for the
majormenu bar. - Create
UIMenucases for all objects you need within the menu bar. Right here, you’re making a menu merchandise referred to as New Notice with the keyboard shortcut Command-N. The selector for this motion isopenNewNote()inside NotesListViewController. - Make a menu merchandise for saving a word. This time, the set off is inside NoteViewController.
- Create a menu merchandise for closing the word window.
- Put menu objects in numerous system-defined teams, reminiscent of File and Edit. You may create a brand new class in case you want.
Construct and run. Faucet the plus button or press Command-N, after which maintain the Command key.

The system even added textual content modifying shortcuts underneath the Edit menu without cost. Who doesn’t like free stuff?
Notice: If the shortcuts don’t seem, ensure you’re returning true in utility(_:didFinishLaunchingWithOptions:) in AppDelegate.
Conditionally Disabling Sure Actions
There’s a small concern, although. What if you wish to conditionally disable sure actions? As an example, the Save motion doesn’t make sense when the NoteViewController isn’t in create mode.
To resolve this, override one other UIResponder technique referred to as canPerformAction(_:withSender:). While you return true right here, the motion works; in any other case, it’ll get ignored. Add this technique inside NoteViewController proper after viewDidLoad():
override func canPerformAction(
  _ motion: Selector,
  withSender sender: Any?
) -> Bool {
  if motion == #selector(dismiss) { // 1
    return splitViewController == nil
  } else if motion == #selector(saveNote) { // 2
    return viewType == .create
  } else { // 3
    return tremendous.canPerformAction(motion, withSender: sender)
  }
}
Within the code above:
- The system calls this any time a selector reaches this view controller within the responder chain. Because of this, you’ll want to examine for
motionto behave primarily based on the enter. If it’s thedismissselector, returntrueprovided thatsplitViewControllerisnil. For those who offered this web page inside a brand new window, there can be noUISplitViewControllerconcerned. Urgent Command-W will kill the app in case you don’t do that examine. - If the motion is
saveNote, examine whether or not this view controller is increatemode. - In any other case, let the system resolve.
Construct and run.

Open a word in a brand new window, and maintain the Command key. This time, the Save motion isn’t there anymore.
Pointer Enhancements
Apple launched pointer help in iPadOS 13.4. This 12 months, it acquired its first set of enhancements.
Band Choice
The primary addition is band choice, a brand new pointer-specific multi-selection expertise acquainted to Mac customers.
In iPadOS 15, whenever you click on and drag in a non-list UICollectionView, the pointer stretches right into a rectangle, and the gathering view selects the objects the rectangle encompasses.
Any UICollectionView that helps the present one and two-finger multi-selection gestures by way of the shouldBeginMultiple Choice Interplay API will get this habits routinely in iPadOS 15.
For something other than a UICollectionView, the brand new UIBandSelectionInteraction API means that you can simply undertake this expertise.
Right here’s a GIF from the Recordsdata app:

Pointer Equipment
The second addition to the system pointer is the flexibility to connect equipment.
In iPadOS 14 and earlier, you would present a customized form for the pointer in case you desired. Nevertheless, for many use circumstances, you solely want so as to add sure equipment across the system pointer.
For those who look carefully on the word element web page, there’s a deal with on the backside of the picture. For those who contact and drag it, you may resize the picture. You’ll add equipment to the pointer, so it’s clearer which you could resize the picture vertically.

In NoteViewController.swift, discover dragHandler. On the finish of the didSet block, add:
let interplay = UIPointerInteraction(delegate: self)
dragHandler.addInteraction(interplay)
This creates a brand new pointer interplay, units the NoteViewController as its delegate and provides it to the interactions checklist of dragHandler.
To silence the compiler’s nagging, on the finish of the present file, add this:
extension NoteViewController: UIPointerInteractionDelegate {
  // 1
  func pointerInteraction(
    _ interplay: UIPointerInteraction,
    styleFor area: UIPointerRegion
  ) -> UIPointerStyle? {
    // 2
    let preview = UITargetedPreview(view: dragHandler)

    // 3
    let type = UIPointerStyle(impact: .raise(preview))

    // 4
    type.equipment = [
      .arrow(.top),
      .arrow(.bottom)
    ]

    // 5
    area.latchingAxes = .vertical

    return type
  }
}
Within the code above, you:
- Override
pointerInteraction(_:styleFor:). The system consults this technique for a pointer’s type on a sure view. - Create a focused preview with
dragHandler. You recognize this API because you used it to customise the pinch transition. - Create a pointer-style object with the
raiseimpact. Different choices arespotlightandhover. Elevate seems finest for this interplay. - Add equipment across the pointer. Right here, you added two arrows to the highest and backside of the pointer. You’re not restricted to this, although. One can use a customized form with a customized place.
- Being able to set
latchingAxesis new this 12 months. When set, the type related to this area will lock in and permit free-form motion alongside the desired axes.
Lastly, construct and run. For those who’re testing within the simulator, choose Enter ▸ Ship Pointer to System from the I/O menu.
Look how cool the pointer interplay is!
The place to Go From Right here?
You may obtain the finished undertaking information by clicking Obtain Supplies on the prime or backside of this tutorial.
Whilst you’ve carried out so much right this moment, iPadOS 15 is a stable launch and there’s extra to be taught.
Listed here are some locations to seek the advice of:
We hope you loved this tutorial. When you’ve got any questions or feedback, please be part of the discussion board dialogue under!
[ad_2]