

[ad_1]
Welcome to the primary weblog of our collection on easy methods to use the Webex API to code up ChatOps workflows! On this publish, you’ll learn to create a Webex bot, register a Webhook in Webex, and configure your bot to hearken to Webhook – all with loads of code examples. Examine again for extra as we construct new use circumstances that leverage totally different points of automation utilizing chat-driven interfaces.
Within the DevOps world, we’re at all times on the lookout for new methods to drive automation round communication. After we deploy new code, scale our deployments, or handle our function flags – we wish our groups to find out about it. The Webex API makes it straightforward to construct announcement flows triggered by profitable occasions in our infrastructure. Nonetheless, if we will set off these occasions from Webex as nicely, then we’ve entered the world of ChatOps.
ChatOps is using chat shoppers like Webex Groups, chatbots, and real-time communication instruments to facilitate how software program improvement and operation duties are communicated and executed. Utilizing Webex APIs, we will construct bots that enable us to enter instructions that handle our infrastructure, set off approval workflows, deploy code, and rather more.
Safety Disclaimer
Safety is a high concern right here at Cisco. In regular software improvement, safety ought to at all times be constructed into the preliminary steps of getting code up and working. Right now, we’re going to maintain it easy and concentrate on the fundamentals. Then, we’ll cowl easy methods to authenticate and authorize Webhook requests. We’ll maintain off on safety till the subsequent weblog publish in our ChatOps collection, as soon as we’ve confirmed an end-to-end connection.
Methods to create a Webex bot
First, let’s create a Webex bot utilizing the Webex Developer UI.

Webex for Builders has an ideal step-by-step information right here that will help you stand up and working.
Some necessary issues to contemplate:
- Take into consideration what you need to identify your bot. It ought to be intuitive, however distinctive. Relying on the way you arrange your Webhook, you might be typing the bot’s identify quite a bit, so take that under consideration.
- The key token that’s auto-generated in your bot is used for authenticating with the Webex API. While you use this token, Webex will deal with your bot like an actual consumer who can create messages, be part of rooms, or be tagged by different customers.
- Will this bot work together with lots of people? Will it have a really public presence, or will it solely talk with a couple of customers? The reply to that query could have an effect on the way you need to identify it, what icon you choose, and many others.
When you’ve taken all of that under consideration and stuffed out the bot creation kind, it’s best to see one thing like this, which incorporates the all-important entry token:

Methods to obtain Webhook Occasions regionally
Subsequent, you’ll must host your bot the place it may be accessed by Webex by way of API calls. If you happen to’re creating regionally and need to run a server that’s accessible to the web, the Webex information recommends localtunnel.me or ngrok. I went with localtunnel.me for my native setting.
$ npm i -g localtunnel
$ lt --port 3000
The ensuing output is the general public area identify that you should use to tunnel by means of to a neighborhood port in your machine:
![]()
Observe: If you happen to’re having bother working localtunnel by way of the command line after putting in (as a couple of folks have reported right here), be certain that your PATH contains the listing the place NPM installs your binaries. For instance, on a Mac, that’s /usr/native/bin. This command would possibly assist:
$ npm config set prefix /usr/native
$ npm i -g localtunnel
$ lt --port 3000
Methods to register a Webhook
As soon as your internet-accessible endpoint has been arrange, you now have a site that you should use to register a Webex Webhook. Your Webex Webhook will hearken to particular occasions that happen throughout the Webex platform and notify your internet service by way of HTTP POST requests.
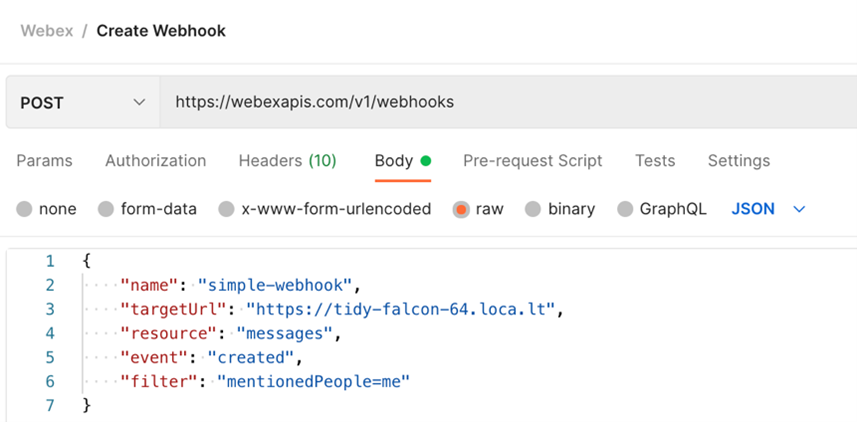
There are a number of methods to register a webhook. Beneath the hood, nonetheless, all of them boil down to creating your personal HTTP POST request. I’ve posted a Postman assortment that you should use to make this course of a little bit simpler. Fill in your personal setting’s variables as you go and embody the entry token used within the header.
That is what my Postman request appears to be like like:
Be at liberty to make use of no matter expertise you want, together with good old-fashion CURL:
curl --location --request POST 'https://webexapis.com/v1/webhooks'
--header 'Authorization: Bearer $BOT_TOKEN
--header 'Content material-Sort: software/json'
--data-raw '{
    "identify": "simple-webhook",
    "targetUrl": "https://tidy-falcon-64.loca.lt",
    "useful resource": "messages",
    "occasion": "created",
    "filter": "mentionedPeople=me"
}'
What’s necessary to notice, is that Webex will ship notifications to the area that you just specify in your POST request. If you happen to’re utilizing a tunnel into your native setting, record the area that was given to you once you activated your proxy.
A really impactful a part of your Webhook would be the filter property. This determines which Webex occasions are despatched to your bot as notifications (and that are filtered out). To maintain issues easy, my bot is simply notified when customers ship a message that particularly mentions it in a Webex Groups Room:

Webex has a pleasant, handy tag for this: me makes use of the authorization token from the request to find out the identification of the consumer making that request (on this case, our bot), and applies that identification wherever it sees me referenced.
Alternatively, you may set a filter that solely triggers notifications for direct messages to your bot, versus mentions in Webex rooms. For the reason that objective of this publish is to broaden visibility into the assorted processes, these examples present interactions in a Webex Groups Room, nonetheless, each are equally viable choices.
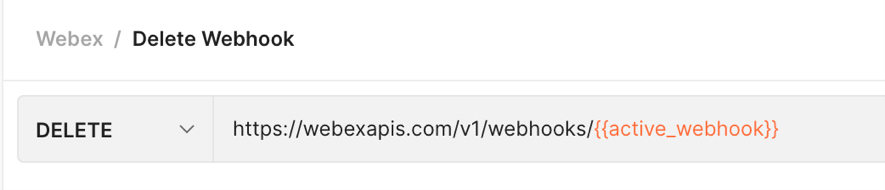
While you ship your POST request, Webex will reply with a physique that accommodates an ID in your Webhook. Whereas you should use the Webex API to GET an inventory of your Webhooks, it may be a good suggestion to carry onto this, in case you need to shortly replace or delete this Webhook sooner or later. The Postman assortment linked above shops probably the most just lately created Webhook ID in an active_webhook setting variable robotically, which then powers the DELETE name in that assortment.
Methods to create your bot server
For easy use circumstances, you might need to use the Webex Node Bot Framework, which is nice for fast implementation. With the intention to get extra conversant in the totally different parts concerned on this collection, we’ll begin from scratch, diving into the step that powers your Webex bot.
Getting Began with Categorical
Let’s arrange an online server that may hear for POST requests from the Webex Webhook that we’ll create in a minute. This doesn’t should be difficult for now, simply one thing to display that we’re in a position to obtain requests. For simplicity, we will use the ExpressJS generator, however you should use any internet framework or expertise that you just like.
$ npm i -g express-generator
$ cd the place/you/need/your/undertaking
$ categorical
Since my IDE handles JavaScript Modules quite a bit higher than it handles require statements, I opted to go along with a extra trendy method for my dependency administration. That is completely non-compulsory and has no bearing on the way you arrange your code. Nonetheless, if you wish to comply with the code snippets as I’ve laid them out, you’ll need to do the identical. Step one is so as to add the next key/worth pair to your bundle.json file, anyplace within the root of the JSON object:
"kind": "module",
Plenty of the boilerplate code will be stripped out when you like – we received’t want a favicon, a public/ folder, or a customers route handler. Right here’s what my code appeared like after I stripped a variety of the straightforward stuff out:
// in app.js

// discover that I modified the require statements to make use of JS modules import statements
import categorical from 'categorical';
import logger from 'morgan';
import indexRouter from './routes/index.js';

const app = categorical();
app.use(logger('dev'));
app.use(categorical.json());
app.use(categorical.urlencoded({ prolonged: false }));

app.use('/', indexRouter);

// boilerplate error code didn’t change
// …

// **you'll want to bear in mind to set app because the default export on the finish of the file**
export default app;
Since I’m utilizing JS Modules, I additionally needed to change the executed file in an Categorical app www/bin to www/bin.js, and revise the boilerplate require statements there as nicely to make use of import syntax:
// in www/bin.js

/**
* Module dependencies.
*/

import app from '../app.js';
import _debugger from 'debug';
const debug = _debugger('chatops-webhook:server');
import http from 'http';

// nothing else on this file wanted to vary
Including a Route Handler
That takes care of the vast majority of the boilerplate. At this level, I solely have 4 recordsdata in my codebase, regardless of what number of Categorical provides me out of the field:
- app.js
- bundle.json
- bin/www.js
- routes/index.js
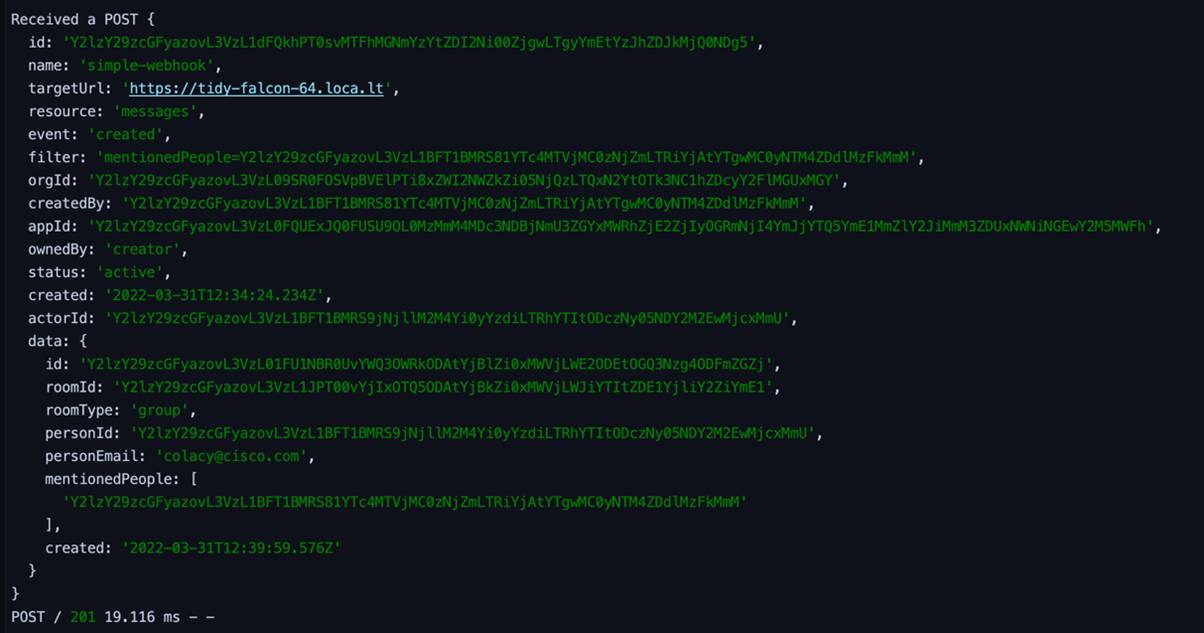
We’ll need to add a route handler that lets us know once we’ve obtained a POST request from our Webex Webhook. It may be a easy perform that prints the request physique to the appliance console – nothing difficult, just some traces of code:
// in routes/index.js

import categorical from 'categorical'

const router = categorical.Router();

router.publish('/', async perform(req, res) {
  console.log(`Acquired a POST`, req.physique);
  res.statusCode = 201;
  res.finish();
});

export default router;
Give it a attempt
You now have the entire necessary parts for receiving message notifications from Webex:
- A bot to behave as an identification in your Webex interactions
- If relevant, a community tunnel to reveal your native internet service to the general public web
- A Webhook arrange by your bot to obtain Webex notifications
- An internet service to obtain Webex notifications on a POST endpoint
Let’s try it out! To maintain issues easy for now, create a brand new room in Webex Groups and add your bot as a member. Subsequent, begin typing your message, mentioning your Bot (you should use the @ image or kind its identify) as a part of the textual content. While you hit enter, after a quick pause, it’s best to see a request come by means of to your working internet service, which ought to log the POST physique that it obtained in its console output:
Congratulations, you’ve simply arrange your very personal Webex bot!
What’s subsequent
As promised, our subsequent publish will stroll by means of the extraordinarily necessary facet of securing our bot. We’ll guarantee that solely Webex can entry it and solely approved customers can set off automation. After that, we’ll transfer on to new and thrilling methods that you may automate on a regular basis workflows proper from a Webex Groups Room!
Study, practice, and certify in Cisco Collaboration
As you make your approach by means of this ChatOps collection, think about validating your abilities with a Cisco Certification.
The 300-835 CLAUTO: Automating and Programming Cisco Collaboration Options is a 90-minute examination that counts towards three certifications — the CCNP Collaboration, Cisco Licensed DevNet Skilled, and Cisco Licensed DevNet Specialist – Collaboration Automation and Programmability certifications. Try the CLAUTO examination matters, and also you’ll discover that 25% of the examination covers Cloud Collaboration applied sciences. Earlier than we meet once more, take a while to flick through the free CLAUTO Research Supplies accessible on the Cisco Studying Community, which can allow you to solidify in the present day’s ChatOps concentrate on constructing your first Webex bot.
Did you construct a Webex bot? I’d love to listen to the way it went. Go away me a remark beneath and let me know what you suppose!
Observe Cisco Studying & Certifications
Twitter, Fb, LinkedIn and Instagram.
Share:
[ad_2]