

[ad_1]
Final Up to date on July 19, 2022
Information preparation is required when working with neural community and deep studying fashions. More and more knowledge augmentation can also be required on extra complicated object recognition duties.
On this publish you’ll uncover easy methods to use knowledge preparation and knowledge augmentation together with your picture datasets when creating and evaluating deep studying fashions in Python with Keras.
After studying this publish, you’ll know:
- Concerning the picture augmentation API present by Keras and easy methods to use it together with your fashions.
- Tips on how to carry out function standardization.
- Tips on how to carry out ZCA whitening of your pictures.
- Tips on how to increase knowledge with random rotations, shifts and flips.
- Tips on how to save augmented picture knowledge to disk.
Kick-start your mission with my new ebook Deep Studying With Python, together with step-by-step tutorials and the Python supply code information for all examples.
Let’s get began.
- Jun/2016: First revealed
- Replace Aug/2016: The examples on this publish had been up to date for the newest Keras API. The datagen.subsequent() operate was eliminated.
- Replace Oct/2016: Up to date for Keras 1.1.0, TensorFlow 0.10.0 and scikit-learn v0.18.
- Replace Jan/2017: Up to date for Keras 1.2.0 and TensorFlow 0.12.1.
- Replace Mar/2017: Up to date for Keras 2.0.2, TensorFlow 1.0.1 and Theano 0.9.0.
- Replace Sep/2019: Up to date for Keras 2.2.5 API.
- Replace Jul/2022: Up to date for TensorFlow 2.x API with workaround on the function standardization concern
For an prolonged tutorial on the ImageDataGenerator for picture knowledge augmentation, see:
Keras Picture Augmentation API
Like the remainder of Keras, the picture augmentation API is easy and highly effective.
Keras supplies the ImageDataGenerator class that defines the configuration for picture knowledge preparation and augmentation. This contains capabilities equivalent to:
- Pattern-wise standardization.
- Characteristic-wise standardization.
- ZCA whitening.
- Random rotation, shifts, shear and flips.
- Dimension reordering.
- Save augmented pictures to disk.
An augmented picture generator could be created as follows:
|
from tensorflow.keras.preprocessing.picture import ImageDataGenerator datagen = ImageDataGenerator() |
Somewhat than performing the operations in your whole picture dataset in reminiscence, the API is designed to be iterated by the deep studying mannequin becoming course of, creating augmented picture knowledge for you just-in-time. This reduces your reminiscence overhead, however provides some further time value throughout mannequin coaching.
After you’ve created and configured your ImageDataGenerator, it’s essential to match it in your knowledge. This can calculate any statistics required to really carry out the transforms to your picture knowledge. You are able to do this by calling the match() operate on the info generator and go it your coaching dataset.
The information generator itself is in truth an iterator, returning batches of picture samples when requested. We are able to configure the batch dimension and put together the info generator and get batches of pictures by calling the circulate() operate.
|
X_batch, y_batch = datagen.circulate(prepare, prepare, batch_size=32) |
Lastly we will make use of the info generator. As an alternative of calling the match() operate on our mannequin, we should name the fit_generator() operate and go within the knowledge generator and the specified size of an epoch in addition to the whole variety of epochs on which to coach.
|
fit_generator(datagen, samples_per_epoch=len(prepare), epochs=100) |
You’ll be able to study extra in regards to the Keras picture knowledge generator API within the Keras documentation.
Need assistance with Deep Studying in Python?
Take my free 2-week electronic mail course and uncover MLPs, CNNs and LSTMs (with code).
Click on to sign-up now and in addition get a free PDF E-book model of the course.
Level of Comparability for Picture Augmentation
Now that you know the way the picture augmentation API in Keras works, let’s take a look at some examples.
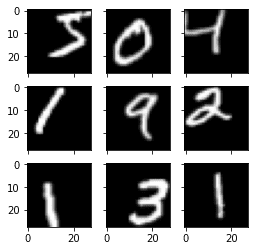
We are going to use the MNIST handwritten digit recognition process in these examples. To start with, let’s check out the primary 9 pictures within the coaching dataset.
|
# Plot pictures from tensorflow.keras.datasets import mnist import matplotlib.pyplot as plt # load dbata (X_train, y_train), (X_test, y_test) = mnist.load_data() # create a grid of 3×3 pictures fig, ax = plt.subplots(3, 3, sharex=True, sharey=True, figsize=(4,4)) for i in vary(3): for j in vary(3): ax[i][j].imshow(X_train[i*3+j], cmap=plt.get_cmap(“grey”)) # present the plot plt.present() |
Operating this instance supplies the next picture that we will use as some extent of comparability with the picture preparation and augmentation within the examples under.
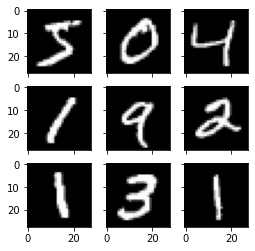
Instance MNIST pictures
Characteristic Standardization
It’s also attainable to standardize pixel values throughout all the dataset. That is known as function standardization and mirrors the kind of standardization usually carried out for every column in a tabular dataset.
You’ll be able to carry out function standardization by setting the featurewise_center and featurewise_std_normalization arguments to True on the ImageDataGenerator class. These are set to False by default. Nevertheless, the current model of Keras has a bug on the function standardization that the imply and normal deviation is calculated throughout all pixels. Should you use the match() operate from the ImageDataGenerator class, you will notice a picture much like the one above:
|
1 2 3 4 5 6 7 8 9 10 11 12 13 14 15 16 17 18 19 20 21 22 23 24 25 26 27 |
# Standardize pictures throughout the dataset, imply=0, stdev=1 from tensorflow.keras.datasets import mnist from tensorflow.keras.preprocessing.picture import ImageDataGenerator import matplotlib.pyplot as plt # load knowledge (X_train, y_train), (X_test, y_test) = mnist.load_data() # reshape to be [samples][width][height][channels] X_train = X_train.reshape((X_train.form[0], 28, 28, 1)) X_test = X_test.reshape((X_test.form[0], 28, 28, 1)) # convert from int to drift X_train = X_train.astype(‘float32’) X_test = X_test.astype(‘float32’) # outline knowledge preparation datagen = ImageDataGenerator(featurewise_center=True, featurewise_std_normalization=True) # match parameters from knowledge datagen.match(X_train) # configure batch dimension and retrieve one batch of pictures for X_batch, y_batch in datagen.circulate(X_train, y_train, batch_size=9, shuffle=False): print(X_batch.min(), X_batch.imply(), X_batch.max()) # create a grid of 3×3 pictures fig, ax = plt.subplots(3, 3, sharex=True, sharey=True, figsize=(4,4)) for i in vary(3): for j in vary(3): ax[i][j].imshow(X_batch[i*3+j], cmap=plt.get_cmap(“grey”)) # present the plot plt.present() break |
The minimal, imply, and most worth from the batch printed above is, for instance:
|
-0.42407447 -0.04093817 2.8215446 |
and the picture displayed is as follows:

Picture from featurewise standardization
The workaround is to compute the function standardization manually. Every pixel ought to have a separate imply and normal deviation and it ought to be computed throughout totally different samples however impartial from different pixels in the identical pattern. We simply want to interchange the match() operate with our personal computation:
|
1 2 3 4 5 6 7 8 9 10 11 12 13 14 15 16 17 18 19 20 21 22 23 24 25 26 27 28 |
# Standardize pictures throughout the dataset, each pixel has imply=0, stdev=1 from tensorflow.keras.datasets import mnist from tensorflow.keras.preprocessing.picture import ImageDataGenerator import matplotlib.pyplot as plt # load knowledge (X_train, y_train), (X_test, y_test) = mnist.load_data() # reshape to be [samples][width][height][channels] X_train = X_train.reshape((X_train.form[0], 28, 28, 1)) X_test = X_test.reshape((X_test.form[0], 28, 28, 1)) # convert from int to drift X_train = X_train.astype(‘float32’) X_test = X_test.astype(‘float32’) # outline knowledge preparation datagen = ImageDataGenerator(featurewise_center=True, featurewise_std_normalization=True) # match parameters from knowledge datagen.imply = X_train.imply(axis=0) datagen.std = X_train.std(axis=0) # configure batch dimension and retrieve one batch of pictures for X_batch, y_batch in datagen.circulate(X_train, y_train, batch_size=9, shuffle=False): print(X_batch.min(), X_batch.imply(), X_batch.max()) # create a grid of 3×3 pictures fig, ax = plt.subplots(3, 3, sharex=True, sharey=True, figsize=(4,4)) for i in vary(3): for j in vary(3): ax[i][j].imshow(X_batch[i*3+j], cmap=plt.get_cmap(“grey”)) # present the plot plt.present() break |
The minimal, imply, and most as printed is now having a wider vary:
|
-1.2742625 -0.028436039 17.46127 |
Operating this instance you possibly can see that the impact is totally different, seemingly darkening and lightening totally different digits.
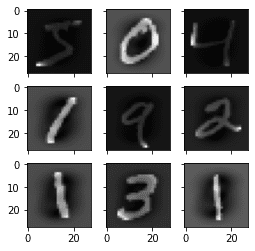
Standardized Characteristic MNIST Photographs
ZCA Whitening
A whitening remodel of a picture is a linear algebra operation that reduces the redundancy within the matrix of pixel pictures.
Much less redundancy within the picture is meant to raised spotlight the constructions and options within the picture to the training algorithm.
Usually, picture whitening is carried out utilizing the Principal Element Evaluation (PCA) approach. Extra not too long ago, another known as ZCA (study extra in Appendix A of this tech report) reveals higher outcomes and leads to remodeled pictures that retains the entire authentic dimensions and in contrast to PCA, ensuing remodeled pictures nonetheless appear like their originals. Exactly, whitening is to transform every picture right into a white noise vector, i.e., every component within the vector has zero imply, unit normal derivation, and statistically impartial of one another.
You’ll be able to carry out a ZCA whitening remodel by setting the zca_whitening argument to True. However because of the similar concern as function standardization, we should first zero-center our enter knowledge individually:
|
1 2 3 4 5 6 7 8 9 10 11 12 13 14 15 16 17 18 19 20 21 22 23 24 25 26 27 28 |
# ZCA Whitening from tensorflow.keras.datasets import mnist from tensorflow.keras.preprocessing.picture import ImageDataGenerator import matplotlib.pyplot as plt # load knowledge (X_train, y_train), (X_test, y_test) = mnist.load_data() # reshape to be [samples][width][height][channels] X_train = X_train.reshape((X_train.form[0], 28, 28, 1)) X_test = X_test.reshape((X_test.form[0], 28, 28, 1)) # convert from int to drift X_train = X_train.astype(‘float32’) X_test = X_test.astype(‘float32’) # outline knowledge preparation datagen = ImageDataGenerator(featurewise_center=True, featurewise_std_normalization=True, zca_whitening=True) # match parameters from knowledge X_mean = X_train.imply(axis=0) datagen.match(X_train – X_mean) # configure batch dimension and retrieve one batch of pictures for X_batch, y_batch in datagen.circulate(X_train – X_mean, y_train, batch_size=9, shuffle=False): print(X_batch.min(), X_batch.imply(), X_batch.max()) # create a grid of 3×3 pictures fig, ax = plt.subplots(3, 3, sharex=True, sharey=True, figsize=(4,4)) for i in vary(3): for j in vary(3): ax[i][j].imshow(X_batch[i*3+j].reshape(28,28), cmap=plt.get_cmap(“grey”)) # present the plot plt.present() break |
Operating the instance, you possibly can see the identical common construction within the pictures and the way the define of every digit has been highlighted.
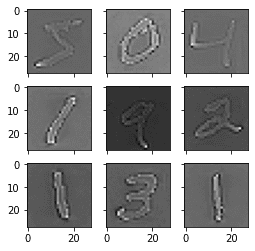
ZCA Whitening MNIST Photographs
Random Rotations
Typically pictures in your pattern knowledge could have various and totally different rotations within the scene.
You’ll be able to prepare your mannequin to raised deal with rotations of pictures by artificially and randomly rotating pictures out of your dataset throughout coaching.
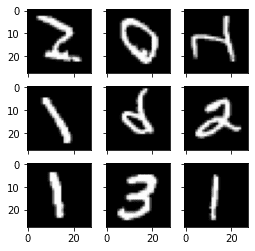
The instance under creates random rotations of the MNIST digits as much as 90 levels by setting the rotation_range argument.
|
1 2 3 4 5 6 7 8 9 10 11 12 13 14 15 16 17 18 19 20 21 22 23 24 |
# Random Rotations from tensorflow.keras.datasets import mnist from tensorflow.keras.preprocessing.picture import ImageDataGenerator import matplotlib.pyplot as plt # load knowledge (X_train, y_train), (X_test, y_test) = mnist.load_data() # reshape to be [samples][width][height][channels] X_train = X_train.reshape((X_train.form[0], 28, 28, 1)) X_test = X_test.reshape((X_test.form[0], 28, 28, 1)) # convert from int to drift X_train = X_train.astype(‘float32’) X_test = X_test.astype(‘float32’) # outline knowledge preparation datagen = ImageDataGenerator(rotation_range=90) # configure batch dimension and retrieve one batch of pictures for X_batch, y_batch in datagen.circulate(X_train, y_train, batch_size=9, shuffle=False): # create a grid of 3×3 pictures fig, ax = plt.subplots(3, 3, sharex=True, sharey=True, figsize=(4,4)) for i in vary(3): for j in vary(3): ax[i][j].imshow(X_batch[i*3+j].reshape(28,28), cmap=plt.get_cmap(“grey”)) # present the plot plt.present() break |
Operating the instance, you possibly can see that pictures have been rotated left and proper as much as a restrict of 90 levels. This isn’t useful on this downside as a result of the MNIST digits have a normalized orientation, however this remodel is likely to be of assist when studying from images the place the objects could have totally different orientations.
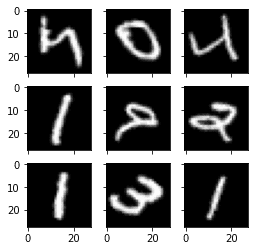
Random Rotations of MNIST Photographs
Random Shifts
Objects in your pictures is probably not centered within the body. They could be off-center in a wide range of other ways.
You’ll be able to prepare your deep studying community to count on and at present deal with off-center objects by artificially creating shifted variations of your coaching knowledge. Keras helps separate horizontal and vertical random shifting of coaching knowledge by the width_shift_range and height_shift_range arguments.
|
1 2 3 4 5 6 7 8 9 10 11 12 13 14 15 16 17 18 19 20 21 22 23 24 25 |
# Random Shifts from tensorflow.keras.datasets import mnist from tensorflow.keras.preprocessing.picture import ImageDataGenerator import matplotlib.pyplot as plt # load knowledge (X_train, y_train), (X_test, y_test) = mnist.load_data() # reshape to be [samples][width][height][channels] X_train = X_train.reshape((X_train.form[0], 28, 28, 1)) X_test = X_test.reshape((X_test.form[0], 28, 28, 1)) # convert from int to drift X_train = X_train.astype(‘float32’) X_test = X_test.astype(‘float32’) # outline knowledge preparation shift = 0.2 datagen = ImageDataGenerator(width_shift_range=shift, height_shift_range=shift) # configure batch dimension and retrieve one batch of pictures for X_batch, y_batch in datagen.circulate(X_train, y_train, batch_size=9, shuffle=False): # create a grid of 3×3 pictures fig, ax = plt.subplots(3, 3, sharex=True, sharey=True, figsize=(4,4)) for i in vary(3): for j in vary(3): ax[i][j].imshow(X_batch[i*3+j].reshape(28,28), cmap=plt.get_cmap(“grey”)) # present the plot plt.present() break |
Operating this instance creates shifted variations of the digits. Once more, this isn’t required for MNIST because the handwritten digits are already centered, however you possibly can see how this is likely to be helpful on extra complicated downside domains.
Random Shifted MNIST Photographs
Random Flips
One other augmentation to your picture knowledge that may enhance efficiency on massive and complicated issues is to create random flips of pictures in your coaching knowledge.
Keras helps random flipping alongside each the vertical and horizontal axes utilizing the vertical_flip and horizontal_flip arguments.
|
1 2 3 4 5 6 7 8 9 10 11 12 13 14 15 16 17 18 19 20 21 22 23 24 |
# Random Flips from tensorflow.keras.datasets import mnist from tensorflow.keras.preprocessing.picture import ImageDataGenerator import matplotlib.pyplot as plt # load knowledge (X_train, y_train), (X_test, y_test) = mnist.load_data() # reshape to be [samples][width][height][channels] X_train = X_train.reshape((X_train.form[0], 28, 28, 1)) X_test = X_test.reshape((X_test.form[0], 28, 28, 1)) # convert from int to drift X_train = X_train.astype(‘float32’) X_test = X_test.astype(‘float32’) # outline knowledge preparation datagen = ImageDataGenerator(horizontal_flip=True, vertical_flip=True) # configure batch dimension and retrieve one batch of pictures for X_batch, y_batch in datagen.circulate(X_train, y_train, batch_size=9, shuffle=False): # create a grid of 3×3 pictures fig, ax = plt.subplots(3, 3, sharex=True, sharey=True, figsize=(4,4)) for i in vary(3): for j in vary(3): ax[i][j].imshow(X_batch[i*3+j].reshape(28,28), cmap=plt.get_cmap(“grey”)) # present the plot plt.present() break |
Operating this instance you possibly can see flipped digits. Flipping digits shouldn’t be helpful as they’ll all the time have the proper left and proper orientation, however this can be helpful for issues with images of objects in a scene that may have a diverse orientation.
Randomly Flipped MNIST Photographs
Saving Augmented Photographs to File
The information preparation and augmentation is carried out simply in time by Keras.
That is environment friendly by way of reminiscence, however you could require the precise pictures used throughout coaching. For instance, maybe you want to use them with a distinct software program bundle later or solely generate them as soon as and use them on a number of totally different deep studying fashions or configurations.
Keras means that you can save the pictures generated throughout coaching. The listing, filename prefix and picture file sort could be specified to the circulate() operate earlier than coaching. Then, throughout coaching, the generated pictures will probably be written to file.
The instance under demonstrates this and writes 9 pictures to a “pictures” subdirectory with the prefix “aug” and the file sort of PNG.
|
1 2 3 4 5 6 7 8 9 10 11 12 13 14 15 16 17 18 19 20 21 22 23 24 25 |
# Save augmented pictures to file from tensorflow.keras.datasets import mnist from tensorflow.keras.preprocessing.picture import ImageDataGenerator import matplotlib.pyplot as plt # load knowledge (X_train, y_train), (X_test, y_test) = mnist.load_data() # reshape to be [samples][width][height][channels] X_train = X_train.reshape((X_train.form[0], 28, 28, 1)) X_test = X_test.reshape((X_test.form[0], 28, 28, 1)) # convert from int to drift X_train = X_train.astype(‘float32’) X_test = X_test.astype(‘float32’) # outline knowledge preparation datagen = ImageDataGenerator(horizontal_flip=True, vertical_flip=True) # configure batch dimension and retrieve one batch of pictures for X_batch, y_batch in datagen.circulate(X_train, y_train, batch_size=9, shuffle=False, save_to_dir=‘pictures’, save_prefix=‘aug’, save_format=‘png’): # create a grid of 3×3 pictures fig, ax = plt.subplots(3, 3, sharex=True, sharey=True, figsize=(4,4)) for i in vary(3): for j in vary(3): ax[i][j].imshow(X_batch[i*3+j].reshape(28,28), cmap=plt.get_cmap(“grey”)) # present the plot plt.present() break |
Operating the instance you possibly can see that pictures are solely written when they’re generated.
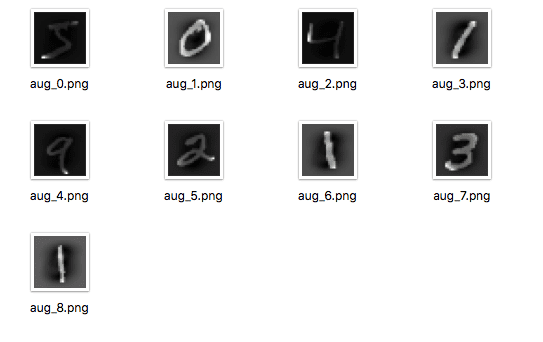
Augmented MNIST Photographs Saved To File
Ideas For Augmenting Picture Information with Keras
Picture knowledge is exclusive in you could overview the info and remodeled copies of the info and shortly get an concept of how the mannequin could also be understand it by your mannequin.
Beneath are some ideas for getting essentially the most from picture knowledge preparation and augmentation for deep studying.
- Overview Dataset. Take a while to overview your dataset in nice element. Take a look at the pictures. Be aware of picture preparation and augmentations which may profit the coaching technique of your mannequin, equivalent to the necessity to deal with totally different shifts, rotations or flips of objects within the scene.
- Overview Augmentations. Overview pattern pictures after the augmentation has been carried out. It’s one factor to intellectually know what picture transforms you might be utilizing, it’s a very totally different factor to take a look at examples. Overview pictures each with particular person augmentations you might be utilizing in addition to the complete set of augmentations you propose to make use of. You may even see methods to simplify or additional improve your mannequin coaching course of.
- Consider a Suite of Transforms. Attempt multiple picture knowledge preparation and augmentation scheme. Typically you could be stunned by outcomes of a knowledge preparation scheme you didn’t assume can be helpful.
Abstract
On this publish you found picture knowledge preparation and augmentation.
You found a variety of methods that you should use simply in Python with Keras for deep studying fashions. You discovered about:
- The ImageDataGenerator API in Keras for producing remodeled pictures simply in time.
- Pattern-wise and Characteristic clever pixel standardization.
- The ZCA whitening remodel.
- Random rotations, shifts and flips of pictures.
- Tips on how to save remodeled pictures to file for later reuse.
Do you’ve any questions on picture knowledge augmentation or this publish? Ask your questions within the feedback and I’ll do my greatest to reply.
Develop Deep Studying Initiatives with Python!

What If You Might Develop A Community in Minutes
…with just some strains of Python
Uncover how in my new E-book:
Deep Studying With Python
It covers end-to-end initiatives on subjects like:
Multilayer Perceptrons, Convolutional Nets and Recurrent Neural Nets, and extra…
Lastly Deliver Deep Studying To
Your Personal Initiatives
Skip the Lecturers. Simply Outcomes.
[ad_2]