
[ad_1]
Final Up to date on Could 3, 2022
Once we end a Python undertaking and roll it out for different individuals to make use of, the simplest approach is to current our undertaking as a command-line program. If you wish to make it friendlier, you could need to develop a GUI in your program so individuals can work together with it with mouse clicks whereas it runs. Creating a GUI will be troublesome because the mannequin of human-computer interplay is advanced. Subsequently, a compromise is to create an online interface in your program. It requires some additional work in comparison with a pure command-line program, however not as heavy as writing an interface utilizing, say, Qt5 library. On this put up, we’ll present you the main points of an online interface and the way simple it’s to offer your program one.
After ending this tutorial, you’ll be taught:
- The Flask framework from a easy instance
- Utilizing Sprint to construct an interactive internet web page fully in Python
- How an online utility operates
Let’s get began!

Internet Frameworks for Your Python Initiatives
Photograph by Quang Nguyen Vinh. Some rights reserved.
Overview
This tutorial is split into 5 elements; they’re:
- Python and the online
- Flask for internet API functions
- Sprint for interactive widgets
- Polling in Sprint
- Combining Flask and Sprint
Python and the Internet
The net is served utilizing the hypertext switch protocol (HTTP). Python’s commonplace library comes with help for interacting with HTTP. In case you merely need to run an online server with Python, nothing will be simpler than going to a listing of recordsdata to serve and run the command.
This may normally launch an online server at port 8000. If index.html exists within the listing, that may be the default web page to serve if we open a browser on the identical pc with the tackle http://localhost:8000/.
This built-in internet server is nice if we simply have to shortly arrange an online server (e.g., let one other pc on the native community obtain a file). However it might not be adequate if we need to do extra, comparable to having some dynamic content material.
Earlier than we transfer on to the main points, let’s assessment what we wish to obtain after we converse of the online interface. Firstly, an online web page within the modern-day could be an interface for disseminating info to the person interactively. This implies not solely sending info from the server but in addition receiving enter from the person. The browser is able to rendering the data aesthetically.
Alternatively, we might use an online web page and not using a browser. A case could be to obtain a file utilizing internet protocols. In Linux, we now have the wget instrument well-known for doing this process. One other case is to question info or cross info to the server. For instance, in AWS EC2 situations, you may examine the machine situations’ metadata on the tackle http://169.254.169.254/newest/meta-data/ (the place the 169.254.169.254 is the particular IP tackle accessible on EC2 machines). In Linux situations, we might use the curl instrument to examine. Its output is not going to be in HTML however in a plain-text machine-readable format. Typically, we name this the online API as we use it like a remotely executed perform.
These are two completely different paradigms in internet functions. The primary one wants to write down code for the interplay between person and server. The second must arrange numerous end-points on the URL so customers can request various things utilizing completely different addresses. In Python, there are third-party libraries to do each.
Flask for Internet API Purposes
The instruments that enable us to write down packages in Python to construct a web-based utility are referred to as internet frameworks. There are quite a bit. Django might be probably the most well-known one. Nonetheless, the educational curve of various internet frameworks can fluctuate dramatically. Some internet frameworks assume you utilize a model-view design, and it’s good to perceive the rationale behind it to make sense of how it is best to use it.
As a machine studying practitioner, you most likely need to do one thing fast, not too advanced, and but highly effective sufficient to fulfill many use circumstances. Flask might be a good selection on this class.
Flask is a light-weight internet framework. You’ll be able to run it as a command and use it as a Python module. Let’s say we need to write an online server that reviews the present time in any user-specified time zone. It may be accomplished utilizing Flask in a trivial approach:
|
from datetime import datetime import pytz from flask import Flask
app = Flask(“time now”)
@app.route(“/now/<path:timezone>”) def timenow(timezone): strive: zone = pytz.timezone(timezone) now = datetime.now(zone) return now.strftime(“%Y-%m-%d %H:%M:%S %z %Zn”) besides pytz.exceptions.UnknownTimeZoneError: return f“Unknown time zone: {timezone}n”
app.run() |
Save the above into server.py or any filename you want, then run it on a terminal. You will note the next:
|
* Serving Flask app ‘time now’ (lazy loading) * Surroundings: manufacturing WARNING: This can be a growth server. Don’t use it in a manufacturing deployment. Use a manufacturing WSGI server as an alternative. * Debug mode: off * Working on http://127.0.0.1:5000 (Press CTRL+C to stop) |
This implies your script is now operating as an online server at http://127.0.0.1:5000. It would serve internet requests without end till you interrupt it with Ctrl-C.
In case you open up one other terminal and question for the URL, e.g., utilizing curl in Linux:
|
$ curl http://127.0.0.1:5000/now/Asia/Tokyo 2022-04-20 13:29:42 +0900 JST |
You will note the time printed on the display within the time zone you requested (Asia/Tokyo on this case, you may see the checklist of all supported time zone on Wikipedia). The string returned by the perform in your code would be the content material responded by the URL. If the time zone just isn’t acknowledged, you will note the “Unknown time zone” message as returned by the besides block within the code above.
If we need to lengthen this somewhat bit such that we are going to assume UTC if no time zone is supplied, we simply want so as to add one other decorator to the perform:
|
1 2 3 4 5 6 7 8 9 10 11 12 13 14 15 16 17 18 19 20 |
from datetime import datetime import pytz from flask import Flask
app = Flask(“time now”)
@app.route(‘/now’, defaults={‘timezone’: ”}) @app.route(“/now/<path:timezone>”) def timenow(timezone): strive: if not timezone: zone = pytz.utc else: zone = pytz.timezone(timezone) now = datetime.now(zone) return now.strftime(“%Y-%m-%d %H:%M:%S %z %Zn”) besides pytz.exceptions.UnknownTimeZoneError: return f“Unknown timezone: {timezone}n”
app.run() |
Restarting the server, we will see the consequence as follows:
|
$ curl http://127.0.0.1:5000/now/Asia/Tokyo 2022-04-20 13:37:27 +0900 JST $ curl http://127.0.0.1:5000/now/Asia/Tok Unknown timezone: Asia/Tok $ curl http://127.0.0.1:5000/now 2022-04-20 04:37:29 +0000 UTC |
These days, many such functions return a JSON string for extra advanced information, however technically something will be delivered. In case you want to create extra internet APIs, merely outline your features to return the info and enhance it with @app.route() as within the above examples.
The net finish factors, as supplied by Flask, are highly effective. Loads of internet functions are accomplished on this approach. For instance, we will write the online person interface utilizing HTML and deal with the person interplay with Javascript. As soon as the person triggers an occasion, we will let Javascript deal with any UI change and create an AJAX name to the server by sending information to an finish level and ready for the reply. An AJAX name is asynchronous; therefore when the online server’s response is acquired (normally inside a fraction of a piece), Javascript is triggered once more to additional replace the UI to let the person learn about it.
Nonetheless, as the online interface will get increasingly advanced, writing Javascript code will be tedious. Therefore there are a lot of client-side libraries to simplify this. Some are to simplify Javascript programming, comparable to jQuery. Some are to vary the way in which HTML and Javascript ought to work together, comparable to ReactJS. However since we’re growing machine studying initiatives in Python, it might be nice to develop an interactive internet utility in Python with out resorting to Javascript. Sprint is a instrument for this.
Let’s think about an instance in machine studying: We need to use the MNIST handwritten digits dataset to coach a handwritten digit recognizer. The LeNet5 mannequin is legendary for this process. However we need to let the person fine-tune the LeNet5 mannequin, retrain it, after which use it for recognition. Coaching a easy LeNet5 mannequin will be accomplished with just a few strains of code:
|
1 2 3 4 5 6 7 8 9 10 11 12 13 14 15 16 17 18 19 20 21 22 23 24 25 26 27 28 29 30 31 32 33 34 |
import numpy as np import tensorflow as tf from tensorflow.keras.datasets import mnist from tensorflow.keras.fashions import Sequential from tensorflow.keras.layers import Conv2D, Dense, AveragePooling2D, Flatten from tensorflow.keras.utils import to_categorical
# Load MNIST digits (X_train, y_train), (X_test, y_test) = mnist.load_data()
# Reshape information to (n_samples, top, width, n_channel) X_train = np.expand_dims(X_train, axis=3).astype(“float32”) X_test = np.expand_dims(X_test, axis=3).astype(“float32”)
# One-hot encode the output y_train = to_categorical(y_train) y_test = to_categorical(y_test)
# LeNet5 mannequin mannequin = Sequential([ Conv2D(6, (5,5), activation=“tanh”, input_shape=(28,28,1), padding=“same”), AveragePooling2D((2,2), strides=2), Conv2D(16, (5,5), activation=“tanh”), AveragePooling2D((2,2), strides=2), Conv2D(120, (5,5), activation=“tanh”), Flatten(), Dense(84, activation=“tanh”), Dense(10, activation=“softmax”) ])
# Practice the mannequin mannequin.compile(loss=“categorical_crossentropy”, optimizer=“adam”, metrics=[“accuracy”]) mannequin.match(X_train, y_train, validation_data=(X_test, y_test), epochs=100, batch_size=32) |
There are a number of hyperparameters that we will change on this code, such because the activation perform, the optimizer for coaching, the variety of epochs, and the batch dimension. We are able to make an interface in Sprint to let the person change these and retrain the mannequin. This interface shall be introduced in HTML however coded in Python:
|
1 2 3 4 5 6 7 8 9 10 11 12 13 14 15 16 17 18 19 20 21 22 23 24 25 26 27 28 29 30 31 32 33 34 35 36 37 38 39 40 41 42 43 44 45 46 47 48 49 50 51 52 53 54 55 56 57 58 59 60 61 62 63 64 65 66 67 68 |
... from flask import Flask from sprint import Sprint, html, dcc
# default values model_data = { “activation”: “relu”, “optimizer”: “adam”, “epochs”: 100, “batchsize”: 32, } ... server = Flask(“multi level marketing”) app = Sprint(server=server) app.structure = html.Div( id=“mother or father”, youngsters=[ html.H1( children=“LeNet5 training”, style={“textAlign”: “center”} ), html.Div( className=“flex-container”, children=[ html.Div(children=[ html.Div(id=“activationdisplay”, children=“Activation:”), dcc.Dropdown( id=“activation”, options=[ {“label”: “Rectified linear unit”, “value”: “relu”}, {“label”: “Hyperbolic tangent”, “value”: “tanh”}, {“label”: “Sigmoidal”, “value”: “sigmoid”}, ], worth=model_data[“activation”] ) ]), html.Div(youngsters=[ html.Div(id=“optimizerdisplay”, children=“Optimizer:”), dcc.Dropdown( id=“optimizer”, options=[ {“label”: “Adam”, “value”: “adam”}, {“label”: “Adagrad”, “value”: “adagrad”}, {“label”: “Nadam”, “value”: “nadam”}, {“label”: “Adadelta”, “value”: “adadelta”}, {“label”: “Adamax”, “value”: “adamax”}, {“label”: “RMSprop”, “value”: “rmsprop”}, {“label”: “SGD”, “value”: “sgd”}, {“label”: “FTRL”, “value”: “ftrl”}, ], worth=model_data[“optimizer”] ), ]), html.Div(youngsters=[ html.Div(id=“epochdisplay”, children=“Epochs:”), dcc.Slider(1, 200, 1, marks={1: “1”, 100: “100”, 200: “200”}, value=model_data[“epochs”], id=“epochs”), ]), html.Div(youngsters=[ html.Div(id=“batchdisplay”, children=“Batch size:”), dcc.Slider(1, 128, 1, marks={1: “1”, 128: “128”}, value=model_data[“batchsize”], id=“batchsize”), ]), ] ), html.Button(id=“prepare”, n_clicks=0, youngsters=“Practice”), ] ) |
Right here we arrange a Sprint app constructed on prime of a Flask server. The vast majority of the code above is to arrange the structure of the Sprint app that shall be displayed on the internet browser. The structure has a title on prime, a button (with the label “Practice”) on the backside, and a big field containing a number of choice widgets within the center. There’s a dropdown field for an activation perform, one other for a coaching optimizer, and two sliders, one for the variety of epochs and one for the batch dimension. The structure shall be like the next: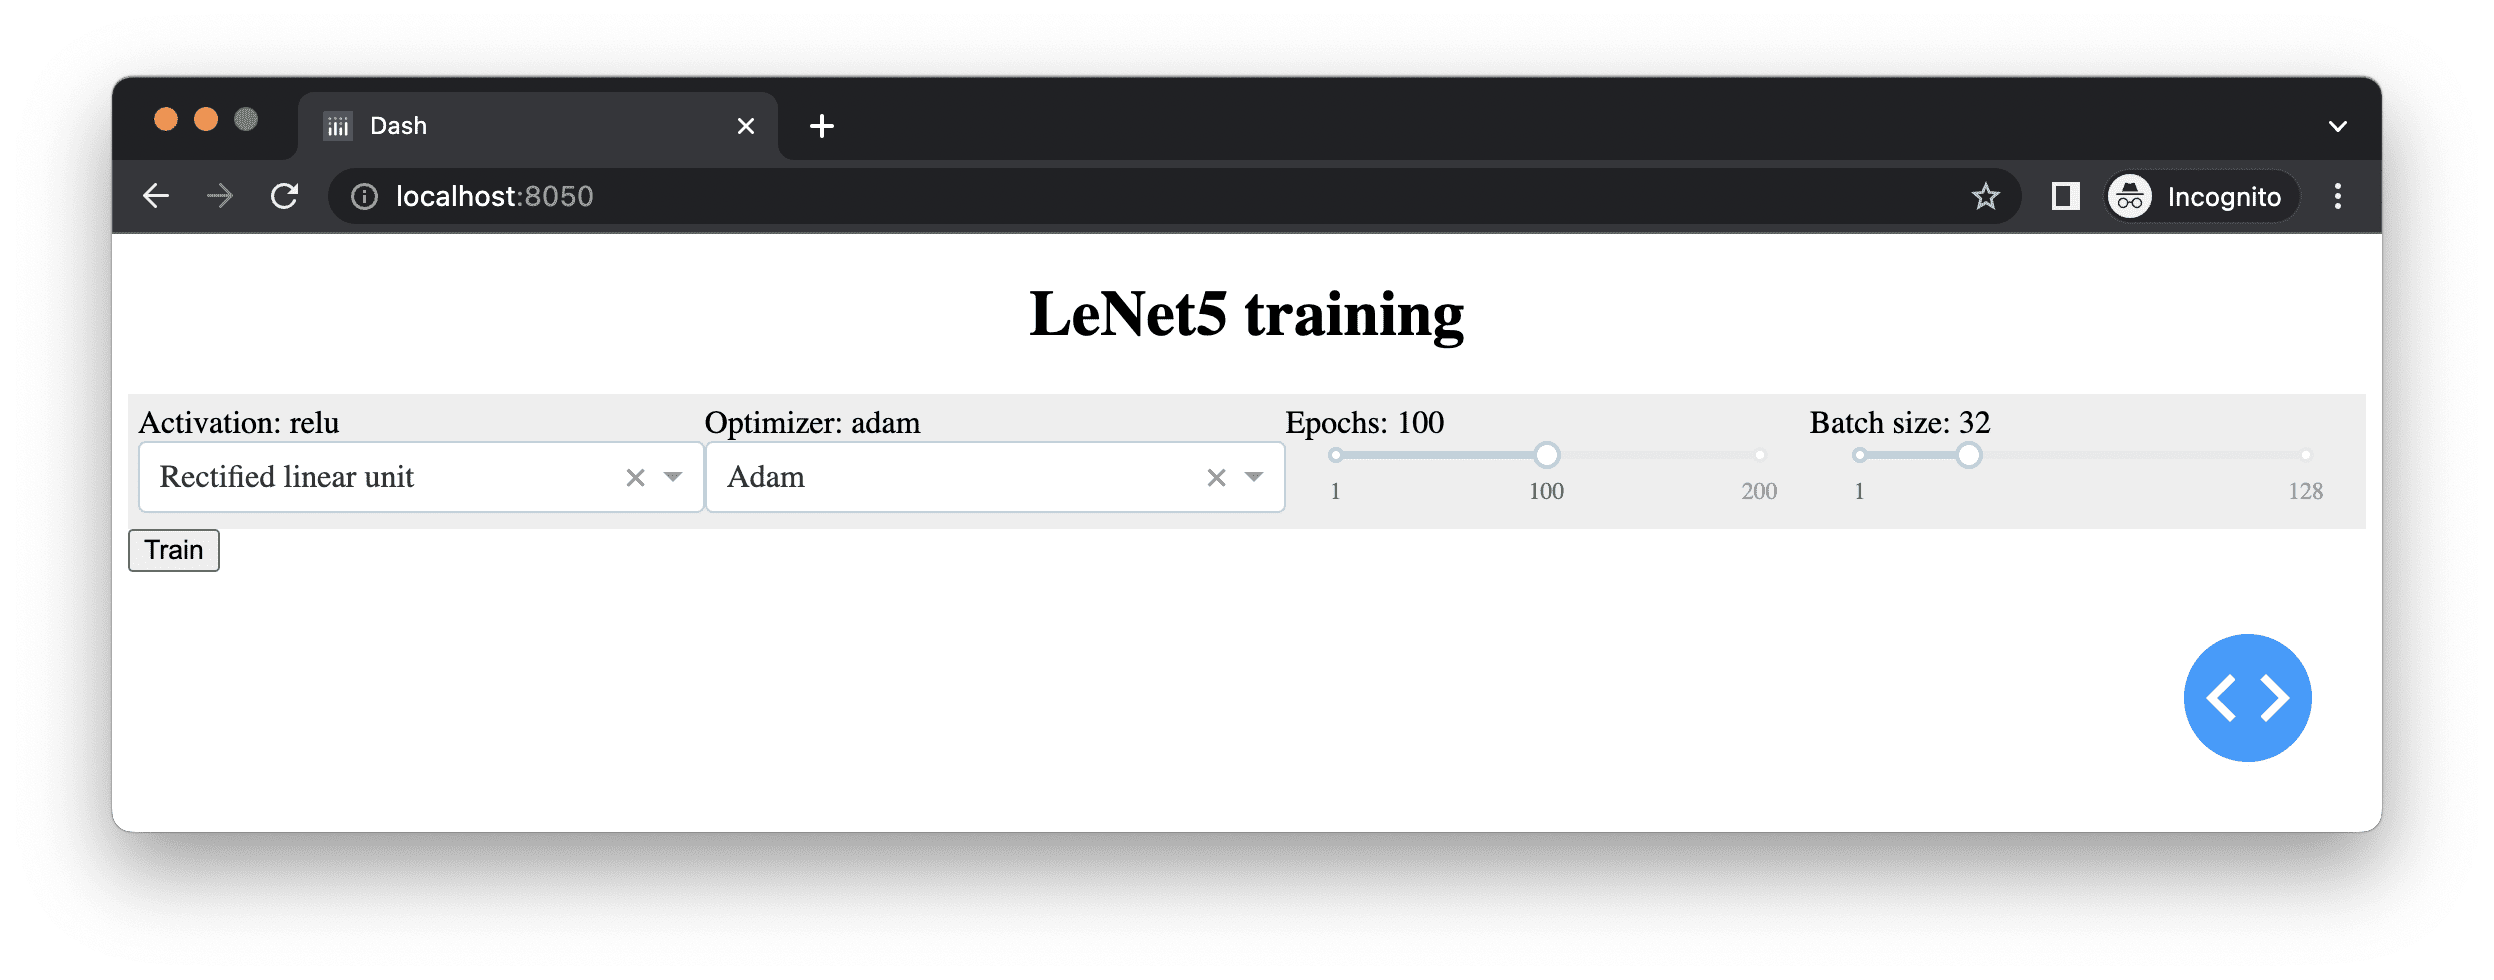
In case you’re aware of HTML growth, you most likely seen we used many <div> components above. Furthermore, we supplied model arguments to some components to vary the way in which they’re rendered on the browser. Certainly, we saved this Python code into file server.py and created a file belongings/principal.css with the next content material:
|
.flex-container { show: flex; padding: 5px; flex-wrap: nowrap; background-color: #EEEEEE; }
.flex-container > * { flex-grow: 1 } |
That is how we will have the 4 completely different person choices aligned horizontally when this code is run.
After we now have the HTML frontend created, the hot button is to let the person change the hyperparameter by deciding on from the dropdown checklist or transferring the slider. Then, we kick begin the mannequin coaching after the person clicks on the “Practice” button. Let’s outline the coaching perform as follows:
|
1 2 3 4 5 6 7 8 9 10 11 12 13 14 15 16 17 18 19 20 21 22 23 24 25 26 27 28 29 |
... from tensorflow.keras.fashions import Sequential from tensorflow.keras.layers import Conv2D, Dense, AveragePooling2D, Flatten from tensorflow.keras.callbacks import EarlyStopping
def prepare(): activation = model_data[“activation”] mannequin = Sequential([ Conv2D(6, (5, 5), activation=activation, input_shape=(28, 28, 1), padding=“same”), AveragePooling2D((2, 2), strides=2), Conv2D(16, (5, 5), activation=activation), AveragePooling2D((2, 2), strides=2), Conv2D(120, (5, 5), activation=activation), Flatten(), Dense(84, activation=activation), Dense(10, activation=“softmax”) ]) mannequin.compile(loss=“categorical_crossentropy”, optimizer=model_data[“optimizer”], metrics=[“accuracy”]) earlystop = EarlyStopping(monitor=“val_loss”, endurance=3, restore_best_weights=True) historical past = mannequin.match( X_train, y_train, validation_data=(X_test, y_test), epochs=model_data[“epochs”], batch_size=model_data[“batchsize”], verbose=0, callbacks=[earlystop]) return mannequin, historical past |
This perform relies on an exterior dictionary model_data for the parameters and the dataset, comparable to X_train and y_train, outlined outdoors of the perform. It would simply create a brand new mannequin, prepare it, and return the mannequin with the coaching historical past. We simply have to run this perform when the “Practice” button on the browser is clicked. We set verbose=0 within the match() perform to ask the coaching course of to not print something to the display since it’s speculated to run within the server whereas the person is wanting on the browser. The person can’t see the terminal output on the server anyway. We are able to additionally take one step additional to show the historical past of loss and analysis metrics alongside the coaching epochs. That is what we have to do:
|
1 2 3 4 5 6 7 8 9 10 11 12 13 14 15 16 17 18 19 20 21 22 23 24 25 26 27 28 29 30 31 32 33 34 35 36 37 |
... import pandas as pd import plotly.categorical as px from sprint.dependencies import Enter, Output, State
... app.structure = html.Div( id=“mother or father”, youngsters=[ ... html.Button(id=“train”, n_clicks=0, children=“Train”), dcc.Graph(id=“historyplot”), ] )
... @app.callback(Output(“historyplot”, “determine”), Enter(“prepare”, “n_clicks”), State(“activation”, “worth”), State(“optimizer”, “worth”), State(“epochs”, “worth”), State(“batchsize”, “worth”), prevent_initial_call=True) def train_action(n_clicks, activation, optimizer, epoch, batchsize): model_data.replace({ “activation”: activation, “optimizer”: optimizer, “epoch”: epoch, “batchsize”: batchsize, }) mannequin, historical past = prepare() model_data[“model”] = mannequin # preserve the educated mannequin historical past = pd.DataFrame(historical past.historical past) fig = px.line(historical past, title=“Mannequin coaching metrics”) fig.update_layout(xaxis_title=“epochs”, yaxis_title=“metric worth”, legend_title=“metrics”) return fig |
We first add a Graph element to the online web page to show our coaching metrics. The Graph element just isn’t a regular HTML ingredient however a Sprint element. There are a selection of such elements supplied by Sprint as its main function. Sprint is a sister undertaking of Plotly, one other visualization library just like Bokeh that renders interactive charts into HTML. The Graph element is to show a Plotly chart.
Then we outlined a perform train_action() and adorned it with our Sprint utility’s callback perform. The perform train_action() takes a number of inputs (mannequin hyperparameters) and returns an output. In Sprint, the output is normally a string, however we return a Plotly graph object right here. The callback decorator requires us to specify the enter and output. These are the online web page elements specified by their ID discipline and the property that served because the enter or output. On this instance, along with enter and output, we additionally want some extra information referred to as “states.”
In Sprint, enter is what triggers an motion. On this instance, a button in Sprint will bear in mind the variety of occasions it has been pressed within the element’s property n_clicks. So we declared the change on this property because the set off for this perform. Equally, when this perform is returned, the graph object will substitute the Graph element. The state parameters are supplied as non-trigger arguments to this perform. The order of specifying the output, enter, and states is crucial as that is what the callback decorator expects, in addition to the order of arguments to the perform we outlined.
We aren’t going to elucidate the Plotly syntax intimately. In case you realized what a visualization library like Bokeh does, it shouldn’t be very troublesome to adapt your information to Plotly after consulting its documentation.
Nonetheless, there may be one factor we have to point out about Sprint callbacks: When the online web page is first loaded, all callbacks shall be invoked as soon as as a result of the elements are newly created. Since all elements’ properties modified from non-existence to some values, they’re set off occasions. If we don’t need to have them invoked on the web page load (e.g., on this case, we are not looking for our time-consuming coaching course of to start out till the person confirms the hyperparameters), we have to specify prevent_initial_call=True within the decorator.
We are able to go one step additional by getting the hyperparameter choice interactive as nicely. That is well mannered since you give the person suggestions on their motion. As we have already got a <div> ingredient for the title of every choice element, we will make use of it for suggestions by creating the next features:
|
1 2 3 4 5 6 7 8 9 10 11 12 13 14 15 16 17 18 19 20 21 22 23 24 |
...
@app.callback(Output(component_id=“epochdisplay”, component_property=“youngsters”), Enter(component_id=“epochs”, component_property=“worth”)) def update_epochs(worth): return f“Epochs: {worth}”
@app.callback(Output(“batchdisplay”, “youngsters”), Enter(“batchsize”, “worth”)) def update_batchsize(worth): return f“Batch dimension: {worth}”
@app.callback(Output(“activationdisplay”, “youngsters”), Enter(“activation”, “worth”)) def update_activation(worth): return f“Activation: {worth}”
@app.callback(Output(“optimizerdisplay”, “youngsters”), Enter(“optimizer”, “worth”)) def update_optimizer(worth): return f“Optimizer: {worth}” |
These features are trivial and return a string, which is able to grow to be the “youngsters” of the <div> components. We additionally demonstrated the named arguments within the first perform’s decorator in case you favor to be extra specific.
Placing the whole lot collectively, the next is the whole code that may management a mannequin coaching from an online interface:
|
1 2 3 4 5 6 7 8 9 10 11 12 13 14 15 16 17 18 19 20 21 22 23 24 25 26 27 28 29 30 31 32 33 34 35 36 37 38 39 40 41 42 43 44 45 46 47 48 49 50 51 52 53 54 55 56 57 58 59 60 61 62 63 64 65 66 67 68 69 70 71 72 73 74 75 76 77 78 79 80 81 82 83 84 85 86 87 88 89 90 91 92 93 94 95 96 97 98 99 100 101 102 103 104 105 106 107 108 109 110 111 112 113 114 115 116 117 118 119 120 121 122 123 124 125 126 127 128 129 130 131 132 133 134 135 136 137 138 139 140 141 142 143 144 145 146 147 148 149 150 151 152 153 154 155 156 157 158 159 160 161 162 163 164 165 166 167 |
import numpy as np import pandas as pd from tensorflow.keras.datasets import mnist from tensorflow.keras.fashions import Sequential from tensorflow.keras.layers import Conv2D, Dense, AveragePooling2D, Flatten from tensorflow.keras.utils import to_categorical from tensorflow.keras.callbacks import EarlyStopping
import plotly.categorical as px from sprint import Sprint, html, dcc from sprint.dependencies import Enter, Output, State from flask import Flask
server = Flask(“multi level marketing”) app = Sprint(server=server) # Load MNIST digits (X_train, y_train), (X_test, y_test) = mnist.load_data() X_train = np.expand_dims(X_train, axis=3).astype(“float32”) X_test = np.expand_dims(X_test, axis=3).astype(“float32”) y_train = to_categorical(y_train) y_test = to_categorical(y_test)
model_data = { “activation”: “relu”, “optimizer”: “adam”, “epochs”: 100, “batchsize”: 32, }
def prepare(): activation = model_data[“activation”] mannequin = Sequential([ Conv2D(6, (5, 5), activation=activation, input_shape=(28, 28, 1), padding=“same”), AveragePooling2D((2, 2), strides=2), Conv2D(16, (5, 5), activation=activation), AveragePooling2D((2, 2), strides=2), Conv2D(120, (5, 5), activation=activation), Flatten(), Dense(84, activation=activation), Dense(10, activation=“softmax”) ]) mannequin.compile(loss=“categorical_crossentropy”, optimizer=model_data[“optimizer”], metrics=[“accuracy”]) earlystop = EarlyStopping(monitor=“val_loss”, endurance=3, restore_best_weights=True) historical past = mannequin.match( X_train, y_train, validation_data=(X_test, y_test), epochs=model_data[“epochs”], batch_size=model_data[“batchsize”], verbose=0, callbacks=[earlystop]) return mannequin, historical past
app.structure = html.Div( id=“mother or father”, youngsters=[ html.H1( children=“LeNet5 training”, style={“textAlign”: “center”} ), html.Div( className=“flex-container”, children=[ html.Div(children=[ html.Div(id=“activationdisplay”), dcc.Dropdown( id=“activation”, options=[ {“label”: “Rectified linear unit”, “value”: “relu”}, {“label”: “Hyperbolic tangent”, “value”: “tanh”}, {“label”: “Sigmoidal”, “value”: “sigmoid”}, ], worth=model_data[“activation”] ) ]), html.Div(youngsters=[ html.Div(id=“optimizerdisplay”), dcc.Dropdown( id=“optimizer”, options=[ {“label”: “Adam”, “value”: “adam”}, {“label”: “Adagrad”, “value”: “adagrad”}, {“label”: “Nadam”, “value”: “nadam”}, {“label”: “Adadelta”, “value”: “adadelta”}, {“label”: “Adamax”, “value”: “adamax”}, {“label”: “RMSprop”, “value”: “rmsprop”}, {“label”: “SGD”, “value”: “sgd”}, {“label”: “FTRL”, “value”: “ftrl”}, ], worth=model_data[“optimizer”] ), ]), html.Div(youngsters=[ html.Div(id=“epochdisplay”), dcc.Slider(1, 200, 1, marks={1: “1”, 100: “100”, 200: “200”}, value=model_data[“epochs”], id=“epochs”), ]), html.Div(youngsters=[ html.Div(id=“batchdisplay”), dcc.Slider(1, 128, 1, marks={1: “1”, 128: “128”}, value=model_data[“batchsize”], id=“batchsize”), ]), ] ), html.Button(id=“prepare”, n_clicks=0, youngsters=“Practice”), dcc.Graph(id=“historyplot”), ] )
@app.callback(Output(component_id=“epochdisplay”, component_property=“youngsters”), Enter(component_id=“epochs”, component_property=“worth”)) def update_epochs(worth): model_data[“epochs”] = worth return f“Epochs: {worth}”
@app.callback(Output(“batchdisplay”, “youngsters”), Enter(“batchsize”, “worth”)) def update_batchsize(worth): model_data[“batchsize”] = worth return f“Batch dimension: {worth}”
@app.callback(Output(“activationdisplay”, “youngsters”), Enter(“activation”, “worth”)) def update_activation(worth): model_data[“activation”] = worth return f“Activation: {worth}”
@app.callback(Output(“optimizerdisplay”, “youngsters”), Enter(“optimizer”, “worth”)) def update_optimizer(worth): model_data[“optimizer”] = worth return f“Optimizer: {worth}”
@app.callback(Output(“historyplot”, “determine”), Enter(“prepare”, “n_clicks”), State(“activation”, “worth”), State(“optimizer”, “worth”), State(“epochs”, “worth”), State(“batchsize”, “worth”), prevent_initial_call=True) def train_action(n_clicks, activation, optimizer, epoch, batchsize): model_data.replace({ “activation”: activation, “optimizer”: optimizer, “epcoh”: epoch, “batchsize”: batchsize, }) mannequin, historical past = prepare() model_data[“model”] = mannequin # preserve the educated mannequin historical past = pd.DataFrame(historical past.historical past) fig = px.line(historical past, title=“Mannequin coaching metrics”) fig.update_layout(xaxis_title=“epochs”, yaxis_title=“metric worth”, legend_title=“metrics”) return fig
# run server, with hot-reloading app.run_server(debug=True, threaded=True) |
The ultimate line of the above code is to run the Sprint utility, identical to we run our Flask app within the earlier part. The debug=True argument to the run_server() perform is for “hot-reloading,” which suggests to reload the whole lot each time Sprint detects our script has been modified. It’s handy to see the way it will work whereas modifying our code on one other window, because it doesn’t require us to terminate our Sprint server and run it once more. The threaded=True is to ask the Sprint server to run in multithreads when serving a number of requests. It’s usually not advisable for Python packages to run in multithread as a result of problem of world interpreter locks. Nonetheless, it’s acceptable within the internet server setting as largely the server is ready for I/O. If not multithread, the choice could be to run in multiprocesses. We can’t run a server in a single thread in a single course of as a result of even when we serve just one person, the browser will launch a number of HTTP queries on the similar time (e.g., request for the CSS file we created above whereas loading the online web page).
Polling in Sprint
If we run the above Sprint utility with a average variety of epochs, it might take noticeable time to finish. We need to see it operating moderately than simply having the chart up to date after it’s completed. There’s a technique to ask Sprint to push updates to our browser, however that may require a plugin (e.g., dash_devices bundle can do that). However we will additionally ask the browser to pull for any updates. This design is known as polling.
Within the prepare() perform we outlined above, we set verbose=0 to skip the terminal output. However we nonetheless have to know the progress of the coaching course of. In Keras, this may be accomplished with a customized callback. We are able to outline one as follows:
|
1 2 3 4 5 6 7 8 9 10 11 12 13 14 15 16 17 18 19 20 21 22 23 24 25 26 27 28 29 30 31 32 33 34 35 36 37 38 |
... from tensorflow.keras.callbacks import Callback
train_status = { “operating”: False, “epoch”: 0, “batch”: 0, “batch metric”: None, “final epoch”: None, }
class ProgressCallback(Callback): def on_train_begin(self, logs=None): train_status[“running”] = True train_status[“epoch”] = 0 def on_train_end(self, logs=None): train_status[“running”] = False def on_epoch_begin(self, epoch, logs=None): train_status[“epoch”] = epoch train_status[“batch”] = 0 def on_epoch_end(self, epoch, logs=None): train_status[“last epoch”] = logs def on_train_batch_begin(self, batch, logs=None): train_status[“batch”] = batch def on_train_batch_end(self, batch, logs=None): train_status[“batch metric”] = logs
def prepare(): ... historical past = mannequin.match( X_train, y_train, validation_data=(X_test, y_test), epochs=model_data[“epochs”], batch_size=model_data[“batchsize”], verbose=0, callbacks=[earlystop, ProgressCallback()]) return mannequin, historical past |
If we offer an occasion of this class to the match() perform of a Keras mannequin, the member perform of this class shall be invoked originally or the top of the coaching cycle, or epoch, or a batch in a single epoch. It’s fairly versatile on what we will do contained in the perform. On the finish of an epoch or a batch, the logs arguments to the features are a dictionary of the loss and validation metrics. Therefore we outlined a worldwide dictionary object to recollect the metrics.
Now given we will examine the dictionary train_status any time to know the progress of our mannequin coaching, we will modify our internet web page to show it:
|
1 2 3 4 5 6 7 8 9 10 11 12 13 14 15 16 17 18 19 20 21 |
...
app.structure = html.Div( id=“mother or father”, youngsters=[ ... html.Button(id=“train”, n_clicks=0, children=“Train”), html.Pre(id=“progressdisplay”), dcc.Interval(id=“trainprogress”, n_intervals=0, interval=1000), dcc.Graph(id=“historyplot”), ] )
import json
@app.callback(Output(“progressdisplay”, “youngsters”), Enter(“trainprogress”, “n_intervals”)) def update_progress(n): return json.dumps(train_status, indent=4) |
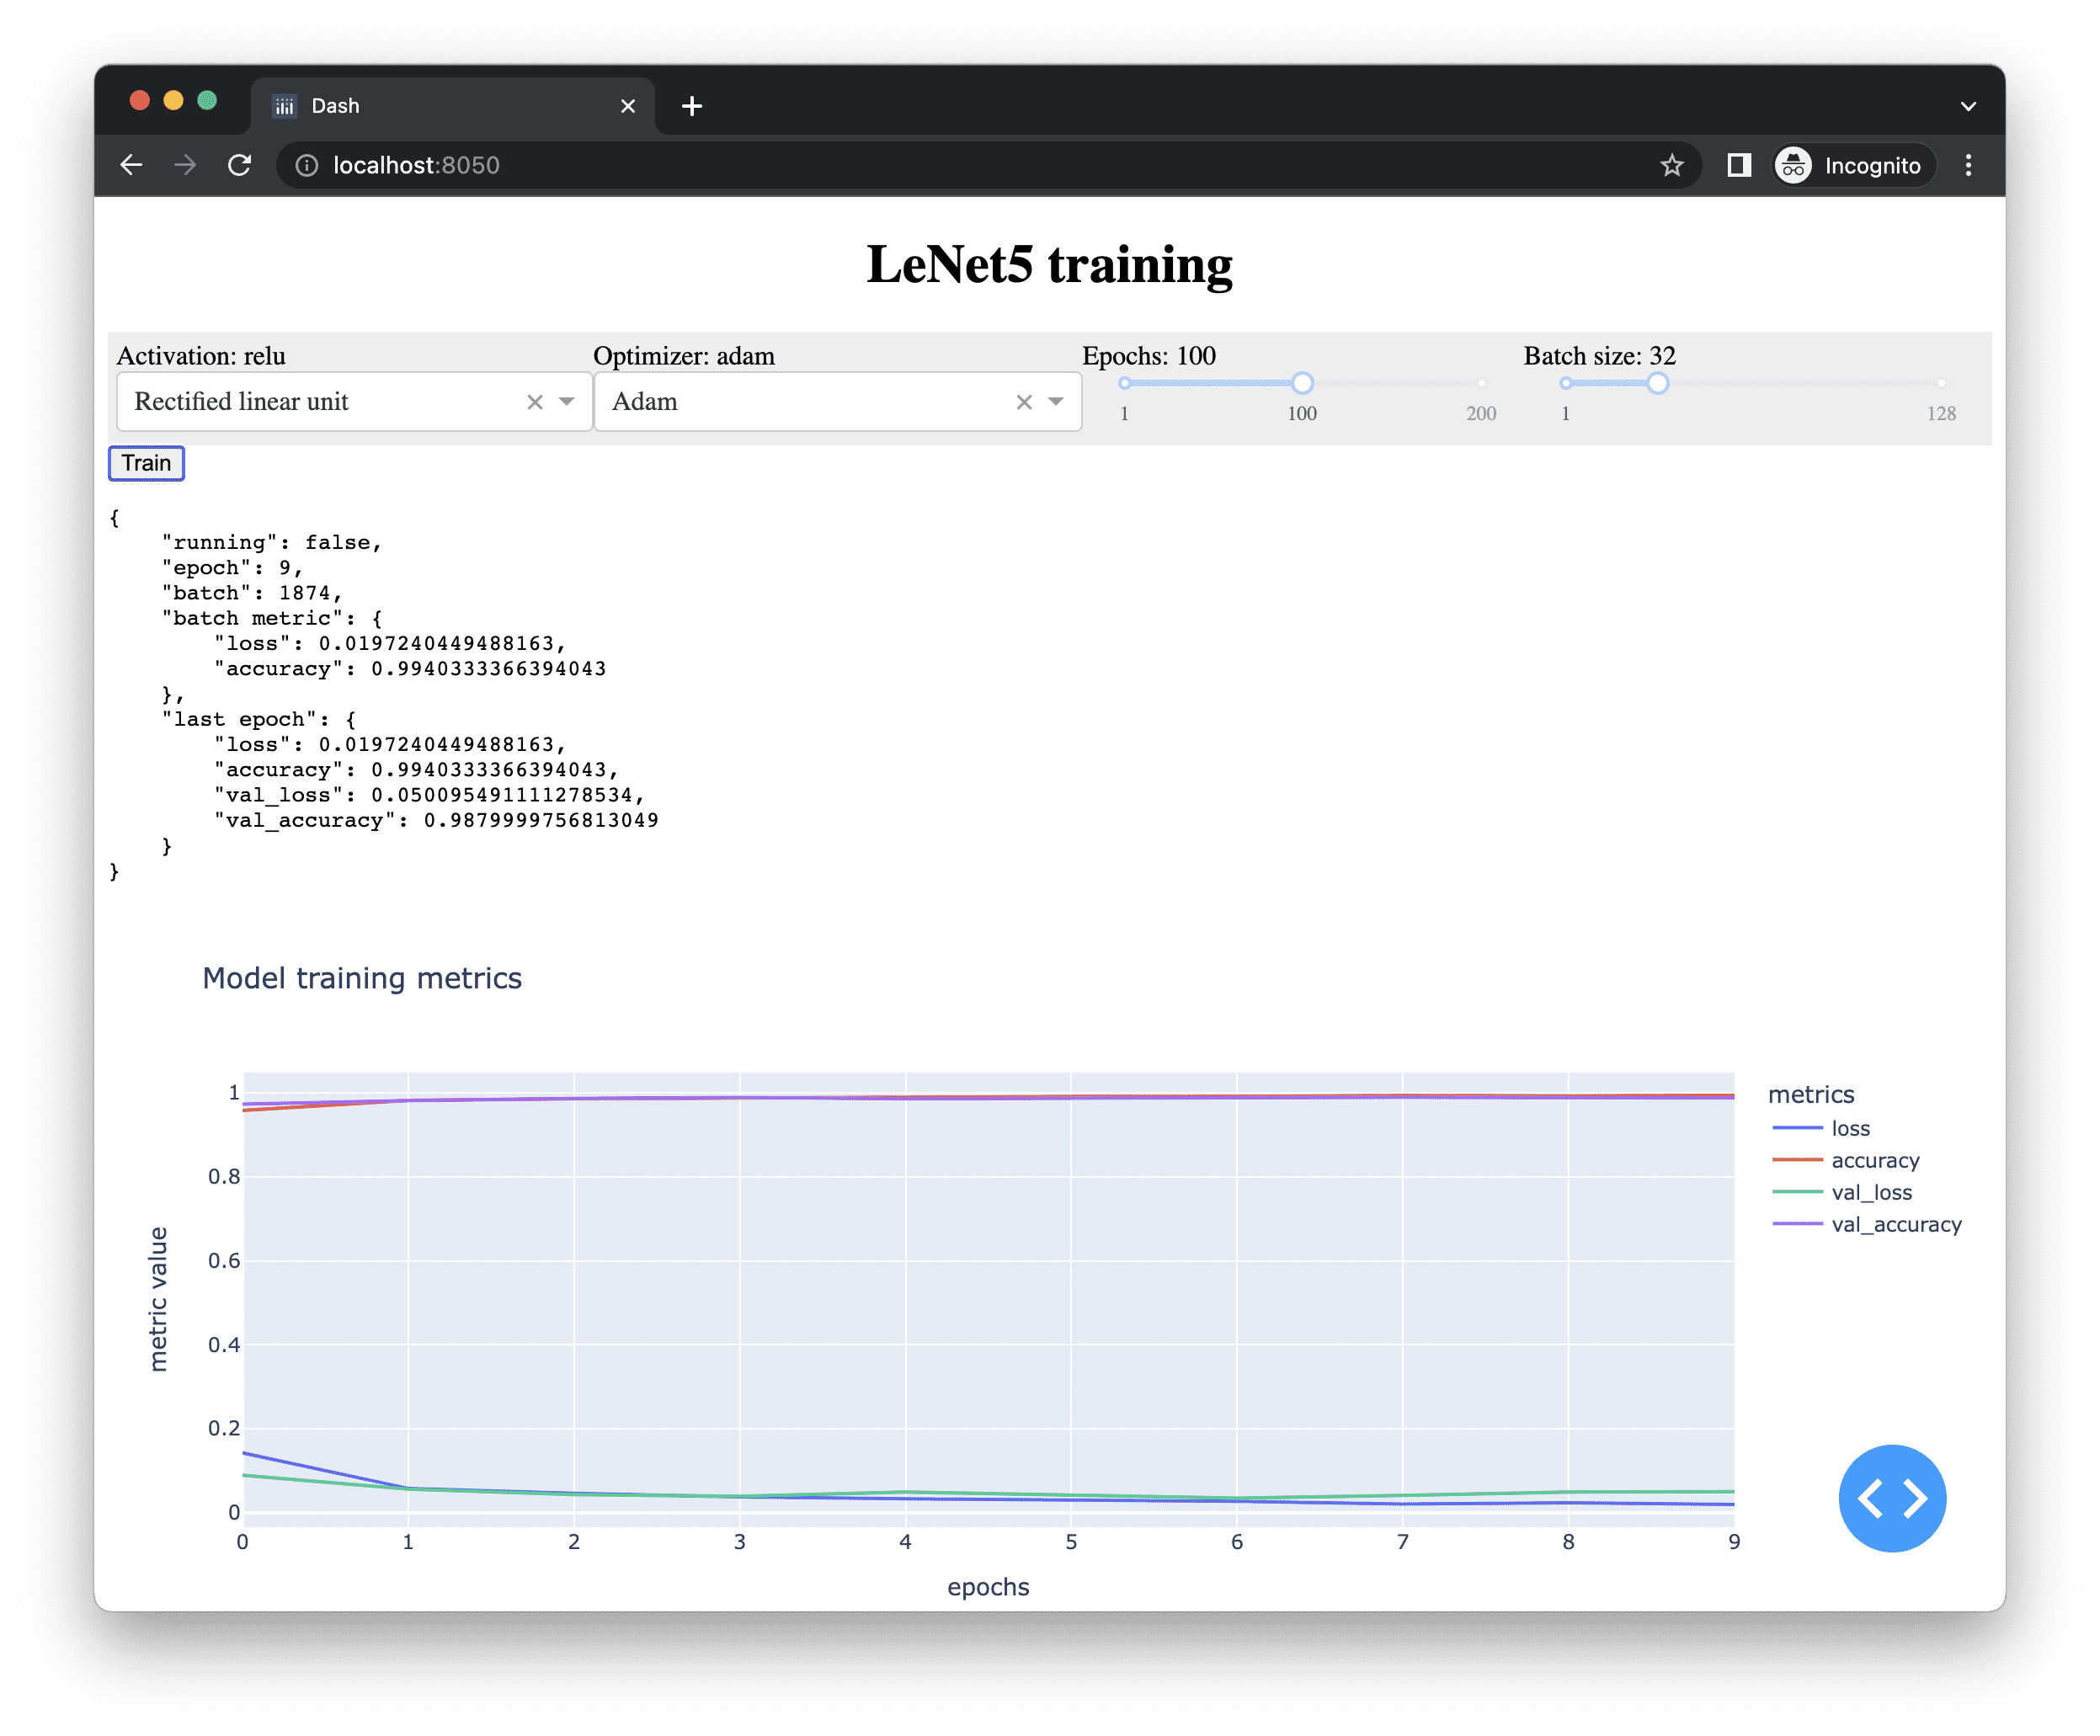
We create a non-visible element dcc.Interval() that adjustments its property n_intervals routinely as soon as each 1000 milliseconds (= 1 second). Then we create a <pre> ingredient beneath our “Practice” button and identify it progressdisplay. Every time the Interval element fires, we convert the train_status dictionary right into a JSON string and show it in that <pre> ingredient. In case you choose, you can also make a widget to show this info. Sprint has just a few supplied.
With simply these adjustments, your browser will seem like the next when your mannequin is educated:
Beneath is the whole code. Don’t overlook you additionally want the belongings/principal.css file to correctly render the online web page:
|
1 2 3 4 5 6 7 8 9 10 11 12 13 14 15 16 17 18 19 20 21 22 23 24 25 26 27 28 29 30 31 32 33 34 35 36 37 38 39 40 41 42 43 44 45 46 47 48 49 50 51 52 53 54 55 56 57 58 59 60 61 62 63 64 65 66 67 68 69 70 71 72 73 74 75 76 77 78 79 80 81 82 83 84 85 86 87 88 89 90 91 92 93 94 95 96 97 98 99 100 101 102 103 104 105 106 107 108 109 110 111 112 113 114 115 116 117 118 119 120 121 122 123 124 125 126 127 128 129 130 131 132 133 134 135 136 137 138 139 140 141 142 143 144 145 146 147 148 149 150 151 152 153 154 155 156 157 158 159 160 161 162 163 164 165 166 167 168 169 170 171 172 173 174 175 176 177 178 179 180 181 182 183 184 185 186 187 188 189 190 191 192 193 194 195 196 197 198 199 |
import json
import numpy as np import pandas as pd from tensorflow.keras.datasets import mnist from tensorflow.keras.fashions import Sequential from tensorflow.keras.layers import Conv2D, Dense, AveragePooling2D, Flatten from tensorflow.keras.utils import to_categorical from tensorflow.keras.callbacks import Callback, EarlyStopping
import plotly.categorical as px from sprint import Sprint, html, dcc from sprint.dependencies import Enter, Output, State from flask import Flask
server = Flask(“multi level marketing”) app = Sprint(server=server)
# Load MNIST digits (X_train, y_train), (X_test, y_test) = mnist.load_data() X_train = np.expand_dims(X_train, axis=3).astype(“float32”) X_test = np.expand_dims(X_test, axis=3).astype(“float32”) y_train = to_categorical(y_train) y_test = to_categorical(y_test)
model_data = { “activation”: “relu”, “optimizer”: “adam”, “epochs”: 100, “batchsize”: 32, }
train_status = { “operating”: False, “epoch”: 0, “batch”: 0, “batch metric”: None, “final epoch”: None, }
class ProgressCallback(Callback): def on_train_begin(self, logs=None): train_status[“running”] = True train_status[“epoch”] = 0 def on_train_end(self, logs=None): train_status[“running”] = False def on_epoch_begin(self, epoch, logs=None): train_status[“epoch”] = epoch train_status[“batch”] = 0 def on_epoch_end(self, epoch, logs=None): train_status[“last epoch”] = logs def on_train_batch_begin(self, batch, logs=None): train_status[“batch”] = batch def on_train_batch_end(self, batch, logs=None): train_status[“batch metric”] = logs
def prepare(): activation = model_data[“activation”] mannequin = Sequential([ Conv2D(6, (5, 5), activation=activation, input_shape=(28, 28, 1), padding=“same”), AveragePooling2D((2, 2), strides=2), Conv2D(16, (5, 5), activation=activation), AveragePooling2D((2, 2), strides=2), Conv2D(120, (5, 5), activation=activation), Flatten(), Dense(84, activation=activation), Dense(10, activation=“softmax”) ]) mannequin.compile(loss=“categorical_crossentropy”, optimizer=model_data[“optimizer”], metrics=[“accuracy”]) earlystop = EarlyStopping(monitor=“val_loss”, endurance=3, restore_best_weights=True) historical past = mannequin.match( X_train, y_train, validation_data=(X_test, y_test), epochs=model_data[“epochs”], batch_size=model_data[“batchsize”], verbose=0, callbacks=[earlystop, ProgressCallback()]) return mannequin, historical past
app.structure = html.Div( id=“mother or father”, youngsters=[ html.H1( children=“LeNet5 training”, style={“textAlign”: “center”} ), html.Div( className=“flex-container”, children=[ html.Div(children=[ html.Div(id=“activationdisplay”), dcc.Dropdown( id=“activation”, options=[ {“label”: “Rectified linear unit”, “value”: “relu”}, {“label”: “Hyperbolic tangent”, “value”: “tanh”}, {“label”: “Sigmoidal”, “value”: “sigmoid”}, ], worth=model_data[“activation”] ) ]), html.Div(youngsters=[ html.Div(id=“optimizerdisplay”), dcc.Dropdown( id=“optimizer”, options=[ {“label”: “Adam”, “value”: “adam”}, {“label”: “Adagrad”, “value”: “adagrad”}, {“label”: “Nadam”, “value”: “nadam”}, {“label”: “Adadelta”, “value”: “adadelta”}, {“label”: “Adamax”, “value”: “adamax”}, {“label”: “RMSprop”, “value”: “rmsprop”}, {“label”: “SGD”, “value”: “sgd”}, {“label”: “FTRL”, “value”: “ftrl”}, ], worth=model_data[“optimizer”] ), ]), html.Div(youngsters=[ html.Div(id=“epochdisplay”), dcc.Slider(1, 200, 1, marks={1: “1”, 100: “100”, 200: “200”}, value=model_data[“epochs”], id=“epochs”), ]), html.Div(youngsters=[ html.Div(id=“batchdisplay”), dcc.Slider(1, 128, 1, marks={1: “1”, 128: “128”}, value=model_data[“batchsize”], id=“batchsize”), ]), ] ), html.Button(id=“prepare”, n_clicks=0, youngsters=“Practice”), html.Pre(id=“progressdisplay”), dcc.Interval(id=“trainprogress”, n_intervals=0, interval=1000), dcc.Graph(id=“historyplot”), ] )
@app.callback(Output(component_id=“epochdisplay”, component_property=“youngsters”), Enter(component_id=“epochs”, component_property=“worth”)) def update_epochs(worth): return f“Epochs: {worth}”
@app.callback(Output(“batchdisplay”, “youngsters”), Enter(“batchsize”, “worth”)) def update_batchsize(worth): return f“Batch dimension: {worth}”
@app.callback(Output(“activationdisplay”, “youngsters”), Enter(“activation”, “worth”)) def update_activation(worth): return f“Activation: {worth}”
@app.callback(Output(“optimizerdisplay”, “youngsters”), Enter(“optimizer”, “worth”)) def update_optimizer(worth): return f“Optimizer: {worth}”
@app.callback(Output(“historyplot”, “determine”), Enter(“prepare”, “n_clicks”), State(“activation”, “worth”), State(“optimizer”, “worth”), State(“epochs”, “worth”), State(“batchsize”, “worth”), prevent_initial_call=True) def train_action(n_clicks, activation, optimizer, epoch, batchsize): model_data.replace({ “activation”: activation, “optimizer”: optimizer, “epoch”: epoch, “batchsize”: batchsize, }) mannequin, historical past = prepare() model_data[“model”] = mannequin # preserve the educated mannequin historical past = pd.DataFrame(historical past.historical past) fig = px.line(historical past, title=“Mannequin coaching metrics”) fig.update_layout(xaxis_title=“epochs”, yaxis_title=“metric worth”, legend_title=“metrics”) return fig
@app.callback(Output(“progressdisplay”, “youngsters”), Enter(“trainprogress”, “n_intervals”)) def update_progress(n): return json.dumps(train_status, indent=4)
# run server, with hot-reloading app.run_server(debug=True, threaded=True) |
Combining Flask and Sprint
Are you able to additionally present an online interface to use the educated mannequin? Definitely. It will likely be simpler if the mannequin takes just a few numerical inputs as a result of we will simply present an enter field ingredient on the web page. On this case, since it’s a handwritten digit recognition mannequin, we have to have a approach to supply a picture on the browser and cross it on to the mannequin on the server. Solely then can we get the consequence and show it. There are two choices we will do that: We are able to let the person add a picture of a digit for our mannequin to acknowledge it, or we will let the person draw the picture instantly on the browser.
In HTML5, we now have a <canvas> ingredient that permits us to attract or show pixels in an space on the internet web page. We are able to make use of this to let the person draw on it, then convert it right into a numerical matrix of dimension 28×28, and ship it to the server facet for the mannequin to foretell and show the prediction consequence.
Doing this may not be Sprint’s job as a result of we need to learn the <canvas> ingredient and convert it to a matrix of the right format. We’ll do that in Javascript. However after that, we’d invoke the mannequin in an online URL like what we described originally of this put up. A question is distributed with the parameter, and the response from the server could be the digit that our mannequin acknowledged.
Behind the scene, Sprint makes use of Flask, and the foundation URL factors to the Sprint utility. We are able to create a Flask endpoint that makes use of the mannequin as follows:
|
... @server.route(“/acknowledge”, strategies=[“POST”]) def acknowledge(): if not model_data.get(“mannequin”): return “Please prepare your mannequin.” matrix = json.hundreds(request.kind[“matrix”]) matrix = np.asarray(matrix).reshape(1, 28, 28) proba = model_data[“model”].predict(matrix).reshape(–1) consequence = np.argmax(proba) return “Digit “+str(consequence) |
As we will recall, the variable server is the Flask server upon which we construct our Sprint utility. We create an endpoint with its decorator. Since we’re going to cross a 28×28 matrix because the parameter, we use the HTTP POST methodology, which is extra appropriate for a big block of information. The info supplied by the POST methodology is not going to be a part of the URL. Therefore we don’t arrange a path parameter to the @server.route() decorator. As an alternative, we learn the info with request.kind["matrix"] through which "matrix" is the identify of the parameter we handed in. Then we convert the string into a listing of numbers by assuming it’s in JSON format, after which additional convert it right into a NumPy array and provides it to the mannequin to foretell the digit. We stored our educated mannequin in model_data["model"], however we will make the above code extra strong by checking if this educated mannequin exists and returning an error message if it doesn’t.
To switch the online web page, we simply add just a few extra elements:
|
1 2 3 4 5 6 7 8 9 10 11 12 13 14 15 16 17 18 19 20 21 22 |
app.structure = html.Div( id=“mother or father”, youngsters=[ ... dcc.Graph(id=“historyplot”), html.Div( className=“flex-container”, id=“predict”, children=[ html.Div( children=html.Canvas(id=“writing”), style={“textAlign”: “center”} ), html.Div(id=“predictresult”, children=“?”), html.Pre( id=“lastinput”, ), ] ), html.Div(id=“dummy”, model={“show”: “none”}), ] ) |
The underside one is a hidden <div> ingredient that we are going to use later. The primary block is one other <div> ingredient with three gadgets in it, particularly, a <canvas> ingredient (with ID "writing"), a <div> ingredient (with ID "predictresult") to show the consequence, and a <pre> ingredient (with ID "lastinput") to show the matrix that we handed to the server.
Since these components will not be dealt with by Sprint, we don’t have to create any extra features in Python. However as an alternative, we have to create a Javascript file belongings/principal.js for the interplay with these elements. A Sprint utility will routinely load the whole lot beneath the listing belongings and ship it to the person when the online web page is loaded. We are able to write this in plain Javascript, however to make our code extra concise, we’ll use jQuery. Therefore we have to inform Sprint that we are going to require jQuery on this internet utility:
|
... app = Sprint(server=server, external_scripts=[ “https://code.jquery.com/jquery-3.6.0.min.js” ]) |
The external_scripts argument is a listing of URLs to be loaded as extra scripts earlier than the online web page is loaded. Therefore we normally present the library right here however preserve our personal code away.
Our personal Javascript code could be a single perform as a result of it’s referred to as after our internet web page is totally loaded:
|
perform pageinit() { // Arrange canvas object var canvas = doc.getElementById(“writing”); canvas.width = parseInt($(“#writing”).css(“width”)); canvas.top = parseInt($(“#writing”).css(“top”)); var context = canvas.getContext(“second”); // to recollect drawing context.strokeStyle = “#FF0000”; // attract brilliant purple context.lineWidth = canvas.width / 15; // thickness adaptive to canvas dimension
... }; |
We first arrange our <canvas> ingredient in Javascript. These are particular to our requirement. Firstly, we added the next into our belongings/principal.css:
|
canvas#writing { width: 300px; top: 300px; margin: auto; padding: 10px; border: 3px stable #7f7f7f; background-color: #FFFFFF; } |
This fastened the width and top to 300 pixels to make our canvas sq., together with different beauty fantastic tuning. Since in the end, we’d convert our handwriting right into a 28×28 pixel picture to suit what our mannequin expects, each stroke we write on the canvas can’t be too skinny. Subsequently we set the stoke width relative to the canvas dimension.
Having this isn’t sufficient to make our canvas usable. Let’s assume we by no means apply it to cellular gadgets however solely on a desktop browser, the drawing is completed by mouse click on and actions. We have to outline what a mouse click on does on the canvas. Therefore we added the next features to Javascript code:
|
1 2 3 4 5 6 7 8 9 10 11 12 13 14 15 16 17 18 19 20 21 22 23 24 25 26 27 28 29 30 31 32 33 34 35 36 37 38 39 40 41 42 43 44 45 46 47 48 49 50 51 52 53 54 55 56 |
perform pageinit() { ...
// Canvas reset by timeout var timeout = null; // holding the timeout occasion var reset = perform() { // clear the canvas context.clearRect(0, 0, canvas.width, canvas.top); }
// Arrange drawing with mouse var mouse = {x:0, y:0}; // to recollect the coordinate w.r.t. canvas var onPaint = perform() { clearTimeout(timeout); // occasion handler for mouse transfer in canvas context.lineTo(mouse.x, mouse.y); context.stroke(); };
// HTML5 Canvas mouse occasion – in case of desktop browser canvas.addEventListener(“mousedown”, perform(e) { clearTimeout(timeout); // mouse down, start path at present mouse place context.moveTo(mouse.x, mouse.y); context.beginPath(); // all mouse transfer any more ought to be painted canvas.addEventListener(“mousemove”, onPaint, false); }, false); canvas.addEventListener(“mousemove”, perform(e) { // mouse transfer bear in mind place w.r.t. canvas mouse.x = e.pageX – this.offsetLeft; mouse.y = e.pageY – this.offsetTop; }, false); canvas.addEventListener(“mouseup”, perform(e) { clearTimeout(timeout); // all mouse transfer any more ought to NOT be painted canvas.removeEventListener(“mousemove”, onPaint, false); // learn drawing into picture var img = new Picture(); // on load, this would be the canvas in similar WxH img.onload = perform() { // Draw the 28×28 to prime left nook of canvas context.drawImage(img, 0, 0, 28, 28); // Extract information: Every pixel turns into a RGBA worth, therefore 4 bytes every var information = context.getImageData(0, 0, 28, 28).information; var enter = []; for (var i=0; i<information.size; i += 4) { // scan every pixel, extract first byte (R element) enter.push(information[i]); };
// TODO: use “enter” for prediction }; img.src = canvas.toDataURL(“picture/png”); timeout = setTimeout(reset, 5000); // clear canvas after 5 sec }, false); }; |
This can be a bit verbose however basically we ask to hear on three mouse occasions on the canvas, particularly, press down the mouse button, transferring the mouse, and launch the mouse button. These three occasions mixed is how we draw one stroke on the canvas.
Firstly, the mousemove occasion handler we added to the <canvas> ingredient is to easily bear in mind the present mouse place within the Javascript object mouse.
Then within the mousedown occasion handler, we begin our drawing context on the newest mouse place. And because the drawing is began, all subsequent mouse transfer ought to be painted on the canvas. We outlined the onPaint perform to increase a line phase on the canvas to the present mouse place. This perform is now registered as a further occasion handler to the mousemove occasion.
Lastly, the mouseup occasion handler is to deal with the case when person completed one stroke and launched the mouse button. All subsequent mouse motion shouldn’t be painted on the canvas so we have to take away the occasion handler of the onPaint perform. Then, as we completed one stroke, this could also be a completed digit so we need to extract it right into a 28×28 pixel model. This may be accomplished simply. We merely create a brand new Picture object in Javascript and cargo our complete canvas into it. When that is completed, Javascript will routinely invoke the onload perform related to it. Through which, we’ll rework this Picture object into 28×28 pixel and draw into the highest left nook of our context object. Then we learn it again pixel by pixel (every would be the RGB values of 0 to 255 per channel, however since we paint in purple, we concern solely the purple channel) into the Javascript array enter. We simply want to offer this enter array to our mannequin and the prediction will be carryed out.
We don’t need to create any extra buttons to clear our canvas or submit our digit for recognition. Therefore we need to clear our canvas routinely if the person has not draw something new for five seconds. That is achieved with the Javascript perform setTimeout() and clearTimeout(). We make a reset perform to clear the canvas which shall be fired at 5 seconds after the mouseup occasion. And this scheduled name to the reset perform shall be cancelled each time a drawing occasion occurs earlier than the timeout. Equally, the popularity is automated each time a mouseup occasion occurs.
Given we now have the enter information in 28×28 pixels reworked right into a Javascript array, we will simply make use of the acknowledge finish level we created with Flask. It will be useful if we will see what we handed into acknowledge and what it returns. So we show the enter within the <pre> ingredient with ID lastinput, and show the consequence returned by the acknowledge finish level within the <div> ingredient with ID predictresult. This may be accomplished simply by extending a bit on the mouseup occasion handler:
|
1 2 3 4 5 6 7 8 9 10 11 12 13 14 15 16 17 18 19 20 21 22 23 24 25 26 27 28 29 30 31 32 33 |
perform pageinit() { canvas.addEventListener(“mouseup”, perform(e) { ... img.onload = perform() { ... var enter = []; for (var i=0; i<information.size; i += 4) { // scan every pixel, extract first byte (R element) enter.push(information[i]); }; var matrix = []; for (var i=0; i<enter.size; i+=28) { matrix.push(enter.slice(i, i+28).toString()); }; $(“#lastinput”).html(“[[“ + matrix.join(“],<br/>[“) + “]]”); // name predict perform with the matrix predict(enter); }; img.src = canvas.toDataURL(“picture/png”); setTimeout(reset, 5000); // clear canvas after 5 sec }, false);
perform predict(enter) { $.ajax({ sort: “POST”, url: “/acknowledge”, information: {“matrix”: JSON.stringify(enter)}, success: perform(consequence) { $(“#predictresult”).html(consequence); } }); }; }; |
We outlined a brand new Javascript funuction predict() that fires a AJAX name to the acknowledge finish level that we arrange with Flask. It’s utilizing POST methodology with the info matrix assigned with a JSON model of the Javascript array. We can’t cross an array instantly on a HTTP request as a result of the whole lot need to be serialized. When the AJAX name returns, we replace our <div> ingredient with the consequence.
This predict() perform is invoked by the mouseup occasion handler, after we completed reworking our 28×28 pixel picture into numerical array. On the similar time, we write a model into the <pre> ingredient solely for show goal.
As much as right here, our utility is completed. However we nonetheless have to name the pageinit() perform when our Sprint utility is loaded. Behind the scene, Sprint utility is utilizing React for the online for delayed rendering, due to this fact we should always not hook our pageinit() perform to the doc.onload occasion handler or we’ll discover that the elements we’re on the lookout for doesn’t exists. The proper technique to name a Javascript perform solely when Sprint utility is totally loaded is to arrange a consumer callback, which suggests it’s a callback however dealt with by the browser-side Javascript moderately than on the server-side Python. We add the next perform name to our Python program, server.py:
|
... app.clientside_callback( “pageinit”, Output(“dummy”, “youngsters”), Enter(“dummy”, “youngsters”) ) |
The clientside_callback() perform just isn’t used as a decorator however an entire perform name. It takes the Javascript perform as the primary argument, and the Output and Enter object because the second and third argument just like the case of callback decorators. Due to this, we created a hidden dummy element in our internet web page structure simply to assist triggering the Javascript perform at web page load, all Sprint callback could be invoked as soon as except prevent_initial_call=True is an argument to the callback.
Right here we’re all set. We are able to now run our server.py script to start out our internet server, and it’ll load the 2 recordsdata beneath the belongings/ listing. Opening a browser to go to the URL reported by our Sprint utility, we will change the hyperparameter and prepare the mannequin, then use the mannequin for prediction.
Tying the whole lot collectively, the beneath is the whole code on our Javascript half, saved as belongings/principal.js:
|
1 2 3 4 5 6 7 8 9 10 11 12 13 14 15 16 17 18 19 20 21 22 23 24 25 26 27 28 29 30 31 32 33 34 35 36 37 38 39 40 41 42 43 44 45 46 47 48 49 50 51 52 53 54 55 56 57 58 59 60 61 62 63 64 65 66 67 68 69 70 71 72 73 74 75 76 77 78 |
perform pageinit() { // Arrange canvas object var canvas = doc.getElementById(“writing”); canvas.width = parseInt($(“#writing”).css(“width”)); canvas.top = parseInt($(“#writing”).css(“top”)); var context = canvas.getContext(“second”); // to recollect drawing context.strokeStyle = “#FF0000”; // attract brilliant purple context.lineWidth = canvas.width / 15; // thickness adaptive to canvas dimension
// Canvas reset by timeout var timeout = null; // holding the timeout occasion var reset = perform() { // clear the canvas context.clearRect(0, 0, canvas.width, canvas.top); }
// Arrange drawing with mouse var mouse = {x:0, y:0}; // to recollect the coordinate w.r.t. canvas var onPaint = perform() { clearTimeout(timeout); // occasion handler for mousemove in canvas context.lineTo(mouse.x, mouse.y); context.stroke(); };
// HTML5 Canvas mouse occasion – in case of desktop browser canvas.addEventListener(“mousedown”, perform(e) { clearTimeout(timeout); // mousedown, start path at mouse place context.moveTo(mouse.x, mouse.y); context.beginPath(); // all mousemove any more ought to be painted canvas.addEventListener(“mousemove”, onPaint, false); }, false); canvas.addEventListener(“mousemove”, perform(e) { // mousemove bear in mind place w.r.t. canvas mouse.x = e.pageX – this.offsetLeft; mouse.y = e.pageY – this.offsetTop; }, false); canvas.addEventListener(“mouseup”, perform(e) { clearTimeout(timeout); // all mousemove any more ought to NOT be painted canvas.removeEventListener(“mousemove”, onPaint, false); // learn drawing into picture var img = new Picture(); // on load, this would be the canvas in similar WxH img.onload = perform() { // Draw the 28×28 to prime left nook of canvas context.drawImage(img, 0, 0, 28, 28); // Extract information: Every pixel turns into a RGBA worth, therefore 4 bytes every var information = context.getImageData(0, 0, 28, 28).information; var enter = []; for (var i=0; i<information.size; i += 4) { // scan every pixel, extract first byte (R element) enter.push(information[i]); }; var matrix = []; for (var i=0; i<enter.size; i+=28) { matrix.push(enter.slice(i, i+28).toString()); }; $(“#lastinput”).html(“[[“ + matrix.join(“],n[“) + “]]”); // name predict perform with the matrix predict(enter); }; img.src = canvas.toDataURL(“picture/png”); timeout = setTimeout(reset, 5000); // clear canvas after 5 sec }, false);
perform predict(enter) { $.ajax({ sort: “POST”, url: “/acknowledge”, information: {“matrix”: JSON.stringify(enter)}, success: perform(consequence) { $(“#predictresult”).html(consequence); } }); }; }; |
and the next are the whole code for the CSS, belongings/principal.css (the pre#lastinput half is to make use of smaller font to show our enter matrix):
|
1 2 3 4 5 6 7 8 9 10 11 12 13 14 15 16 17 18 19 20 21 22 23 |
.flex-container { show: flex; padding: 5px; flex-wrap: nowrap; background-color: #EEEEEE; }
.flex-container > * { flex-grow: 1 }
canvas#writing { width: 300px; top: 300px; margin: auto; padding: 10px; border: 3px stable #7f7f7f; background-color: #FFFFFF; }
pre#lastinput { font-size: 50%; } |
and the next is the principle Python program, server.py:
|
1 2 3 4 5 6 7 8 9 10 11 12 13 14 15 16 17 18 19 20 21 22 23 24 25 26 27 28 29 30 31 32 33 34 35 36 37 38 39 40 41 42 43 44 45 46 47 48 49 50 51 52 53 54 55 56 57 58 59 60 61 62 63 64 65 66 67 68 69 70 71 72 73 74 75 76 77 78 79 80 81 82 83 84 85 86 87 88 89 90 91 92 93 94 95 96 97 98 99 100 101 102 103 104 105 106 107 108 109 110 111 112 113 114 115 116 117 118 119 120 121 122 123 124 125 126 127 128 129 130 131 132 133 134 135 136 137 138 139 140 141 142 143 144 145 146 147 148 149 150 151 152 153 154 155 156 157 158 159 160 161 162 163 164 165 166 167 168 169 170 171 172 173 174 175 176 177 178 179 180 181 182 183 184 185 186 187 188 189 190 191 192 193 194 195 196 197 198 199 200 201 202 203 204 205 206 207 208 209 210 211 212 213 214 215 216 217 218 219 220 221 222 223 224 225 226 227 228 229 230 231 232 233 234 235 236 237 238 239 |
import json
import numpy as np import pandas as pd from tensorflow.keras.datasets import mnist from tensorflow.keras.fashions import Sequential, load_model from tensorflow.keras.layers import Conv2D, Dense, AveragePooling2D, Flatten from tensorflow.keras.utils import to_categorical from tensorflow.keras.callbacks import Callback, EarlyStopping
import plotly.categorical as px from sprint import Sprint, html, dcc from sprint.dependencies import Enter, Output, State from flask import Flask, request
server = Flask(“multi level marketing”) app = Sprint(server=server, external_scripts=[ “https://code.jquery.com/jquery-3.6.0.min.js” ])
# Load MNIST digits (X_train, y_train), (X_test, y_test) = mnist.load_data() X_train = np.expand_dims(X_train, axis=3).astype(“float32”) X_test = np.expand_dims(X_test, axis=3).astype(“float32”) y_train = to_categorical(y_train) y_test = to_categorical(y_test)
model_data = { “activation”: “relu”, “optimizer”: “adam”, “epochs”: 100, “batchsize”: 32, “mannequin”: load_model(“lenet5.h5”), } train_status = { “operating”: False, “epoch”: 0, “batch”: 0, “batch metric”: None, “final epoch”: None, }
class ProgressCallback(Callback): def on_train_begin(self, logs=None): train_status[“running”] = True train_status[“epoch”] = 0 def on_train_end(self, logs=None): train_status[“running”] = False def on_epoch_begin(self, epoch, logs=None): train_status[“epoch”] = epoch train_status[“batch”] = 0 def on_epoch_end(self, epoch, logs=None): train_status[“last epoch”] = logs def on_train_batch_begin(self, batch, logs=None): train_status[“batch”] = batch def on_train_batch_end(self, batch, logs=None): train_status[“batch metric”] = logs
def prepare(): activation = model_data[“activation”] mannequin = Sequential([ Conv2D(6, (5, 5), activation=activation, input_shape=(28, 28, 1), padding=“same”), AveragePooling2D((2, 2), strides=2), Conv2D(16, (5, 5), activation=activation), AveragePooling2D((2, 2), strides=2), Conv2D(120, (5, 5), activation=activation), Flatten(), Dense(84, activation=activation), Dense(10, activation=“softmax”) ]) mannequin.compile(loss=“categorical_crossentropy”, optimizer=model_data[“optimizer”], metrics=[“accuracy”]) earlystop = EarlyStopping(monitor=“val_loss”, endurance=3, restore_best_weights=True) historical past = mannequin.match( X_train, y_train, validation_data=(X_test, y_test), epochs=model_data[“epochs”], batch_size=model_data[“batchsize”], verbose=0, callbacks=[earlystop, ProgressCallback()]) return mannequin, historical past
app.structure = html.Div( id=“mother or father”, youngsters=[ html.H1( children=“LeNet5 training”, style={“textAlign”: “center”} ), html.Div( className=“flex-container”, children=[ html.Div(children=[ html.Div(id=“activationdisplay”), dcc.Dropdown( id=“activation”, options=[ {“label”: “Rectified linear unit”, “value”: “relu”}, {“label”: “Hyperbolic tangent”, “value”: “tanh”}, {“label”: “Sigmoidal”, “value”: “sigmoid”}, ], worth=model_data[“activation”] ) ]), html.Div(youngsters=[ html.Div(id=“optimizerdisplay”), dcc.Dropdown( id=“optimizer”, options=[ {“label”: “Adam”, “value”: “adam”}, {“label”: “Adagrad”, “value”: “adagrad”}, {“label”: “Nadam”, “value”: “nadam”}, {“label”: “Adadelta”, “value”: “adadelta”}, {“label”: “Adamax”, “value”: “adamax”}, {“label”: “RMSprop”, “value”: “rmsprop”}, {“label”: “SGD”, “value”: “sgd”}, {“label”: “FTRL”, “value”: “ftrl”}, ], worth=model_data[“optimizer”] ), ]), html.Div(youngsters=[ html.Div(id=“epochdisplay”), dcc.Slider(1, 200, 1, marks={1: “1”, 100: “100”, 200: “200”}, value=model_data[“epochs”], id=“epochs”), ]), html.Div(youngsters=[ html.Div(id=“batchdisplay”), dcc.Slider(1, 128, 1, marks={1: “1”, 128: “128”}, value=model_data[“batchsize”], id=“batchsize”), ]), ] ), html.Button(id=“prepare”, n_clicks=0, youngsters=“Practice”), html.Pre(id=“progressdisplay”), dcc.Interval(id=“trainprogress”, n_intervals=0, interval=1000), dcc.Graph(id=“historyplot”), html.Div( className=“flex-container”, id=“predict”, youngsters=[ html.Div( children=html.Canvas(id=“writing”), style={“textAlign”: “center”} ), html.Div(id=“predictresult”, children=“?”), html.Pre( id=“lastinput”, ), ] ), html.Div(id=“dummy”, model={“show”: “none”}), ] )
@app.callback(Output(component_id=“epochdisplay”, component_property=“youngsters”), Enter(component_id=“epochs”, component_property=“worth”)) def update_epochs(worth): model_data[“epochs”] = worth return f“Epochs: {worth}”
@app.callback(Output(“batchdisplay”, “youngsters”), Enter(“batchsize”, “worth”)) def update_batchsize(worth): model_data[“batchsize”] = worth return f“Batch dimension: {worth}”
@app.callback(Output(“activationdisplay”, “youngsters”), Enter(“activation”, “worth”)) def update_activation(worth): model_data[“activation”] = worth return f“Activation: {worth}”
@app.callback(Output(“optimizerdisplay”, “youngsters”), Enter(“optimizer”, “worth”)) def update_optimizer(worth): model_data[“optimizer”] = worth return f“Optimizer: {worth}”
@app.callback(Output(“historyplot”, “determine”), Enter(“prepare”, “n_clicks”), State(“activation”, “worth”), State(“optimizer”, “worth”), State(“epochs”, “worth”), State(“batchsize”, “worth”), prevent_initial_call=True) def train_action(n_clicks, activation, optimizer, epoch, batchsize): model_data.replace({ “activation”: activation, “optimizer”: optimizer, “epoch”: epoch, “batchsize”: batchsize, }) mannequin, historical past = prepare() model_data[“model”] = mannequin # preserve the educated mannequin historical past = pd.DataFrame(historical past.historical past) fig = px.line(historical past, title=“Mannequin coaching metrics”) fig.update_layout(xaxis_title=“epochs”, yaxis_title=“metric worth”, legend_title=“metrics”) return fig
@app.callback(Output(“progressdisplay”, “youngsters”), Enter(“trainprogress”, “n_intervals”)) def update_progress(n): return json.dumps(train_status, indent=4)
app.clientside_callback( “perform() { pageinit(); };”, Output(“dummy”, “youngsters”), Enter(“dummy”, “youngsters”) )
@server.route(“/acknowledge”, strategies=[“POST”]) def acknowledge(): if not model_data.get(“mannequin”): return “Please prepare your mannequin.” matrix = json.hundreds(request.kind[“matrix”]) matrix = np.asarray(matrix).reshape(1, 28, 28) proba = model_data[“model”].predict(matrix).reshape(–1) consequence = np.argmax(proba) return “Digit “+str(consequence)
# run server, with hot-reloading app.run_server(debug=True, threaded=True) |
If we run all of those, we should always see a display like the next: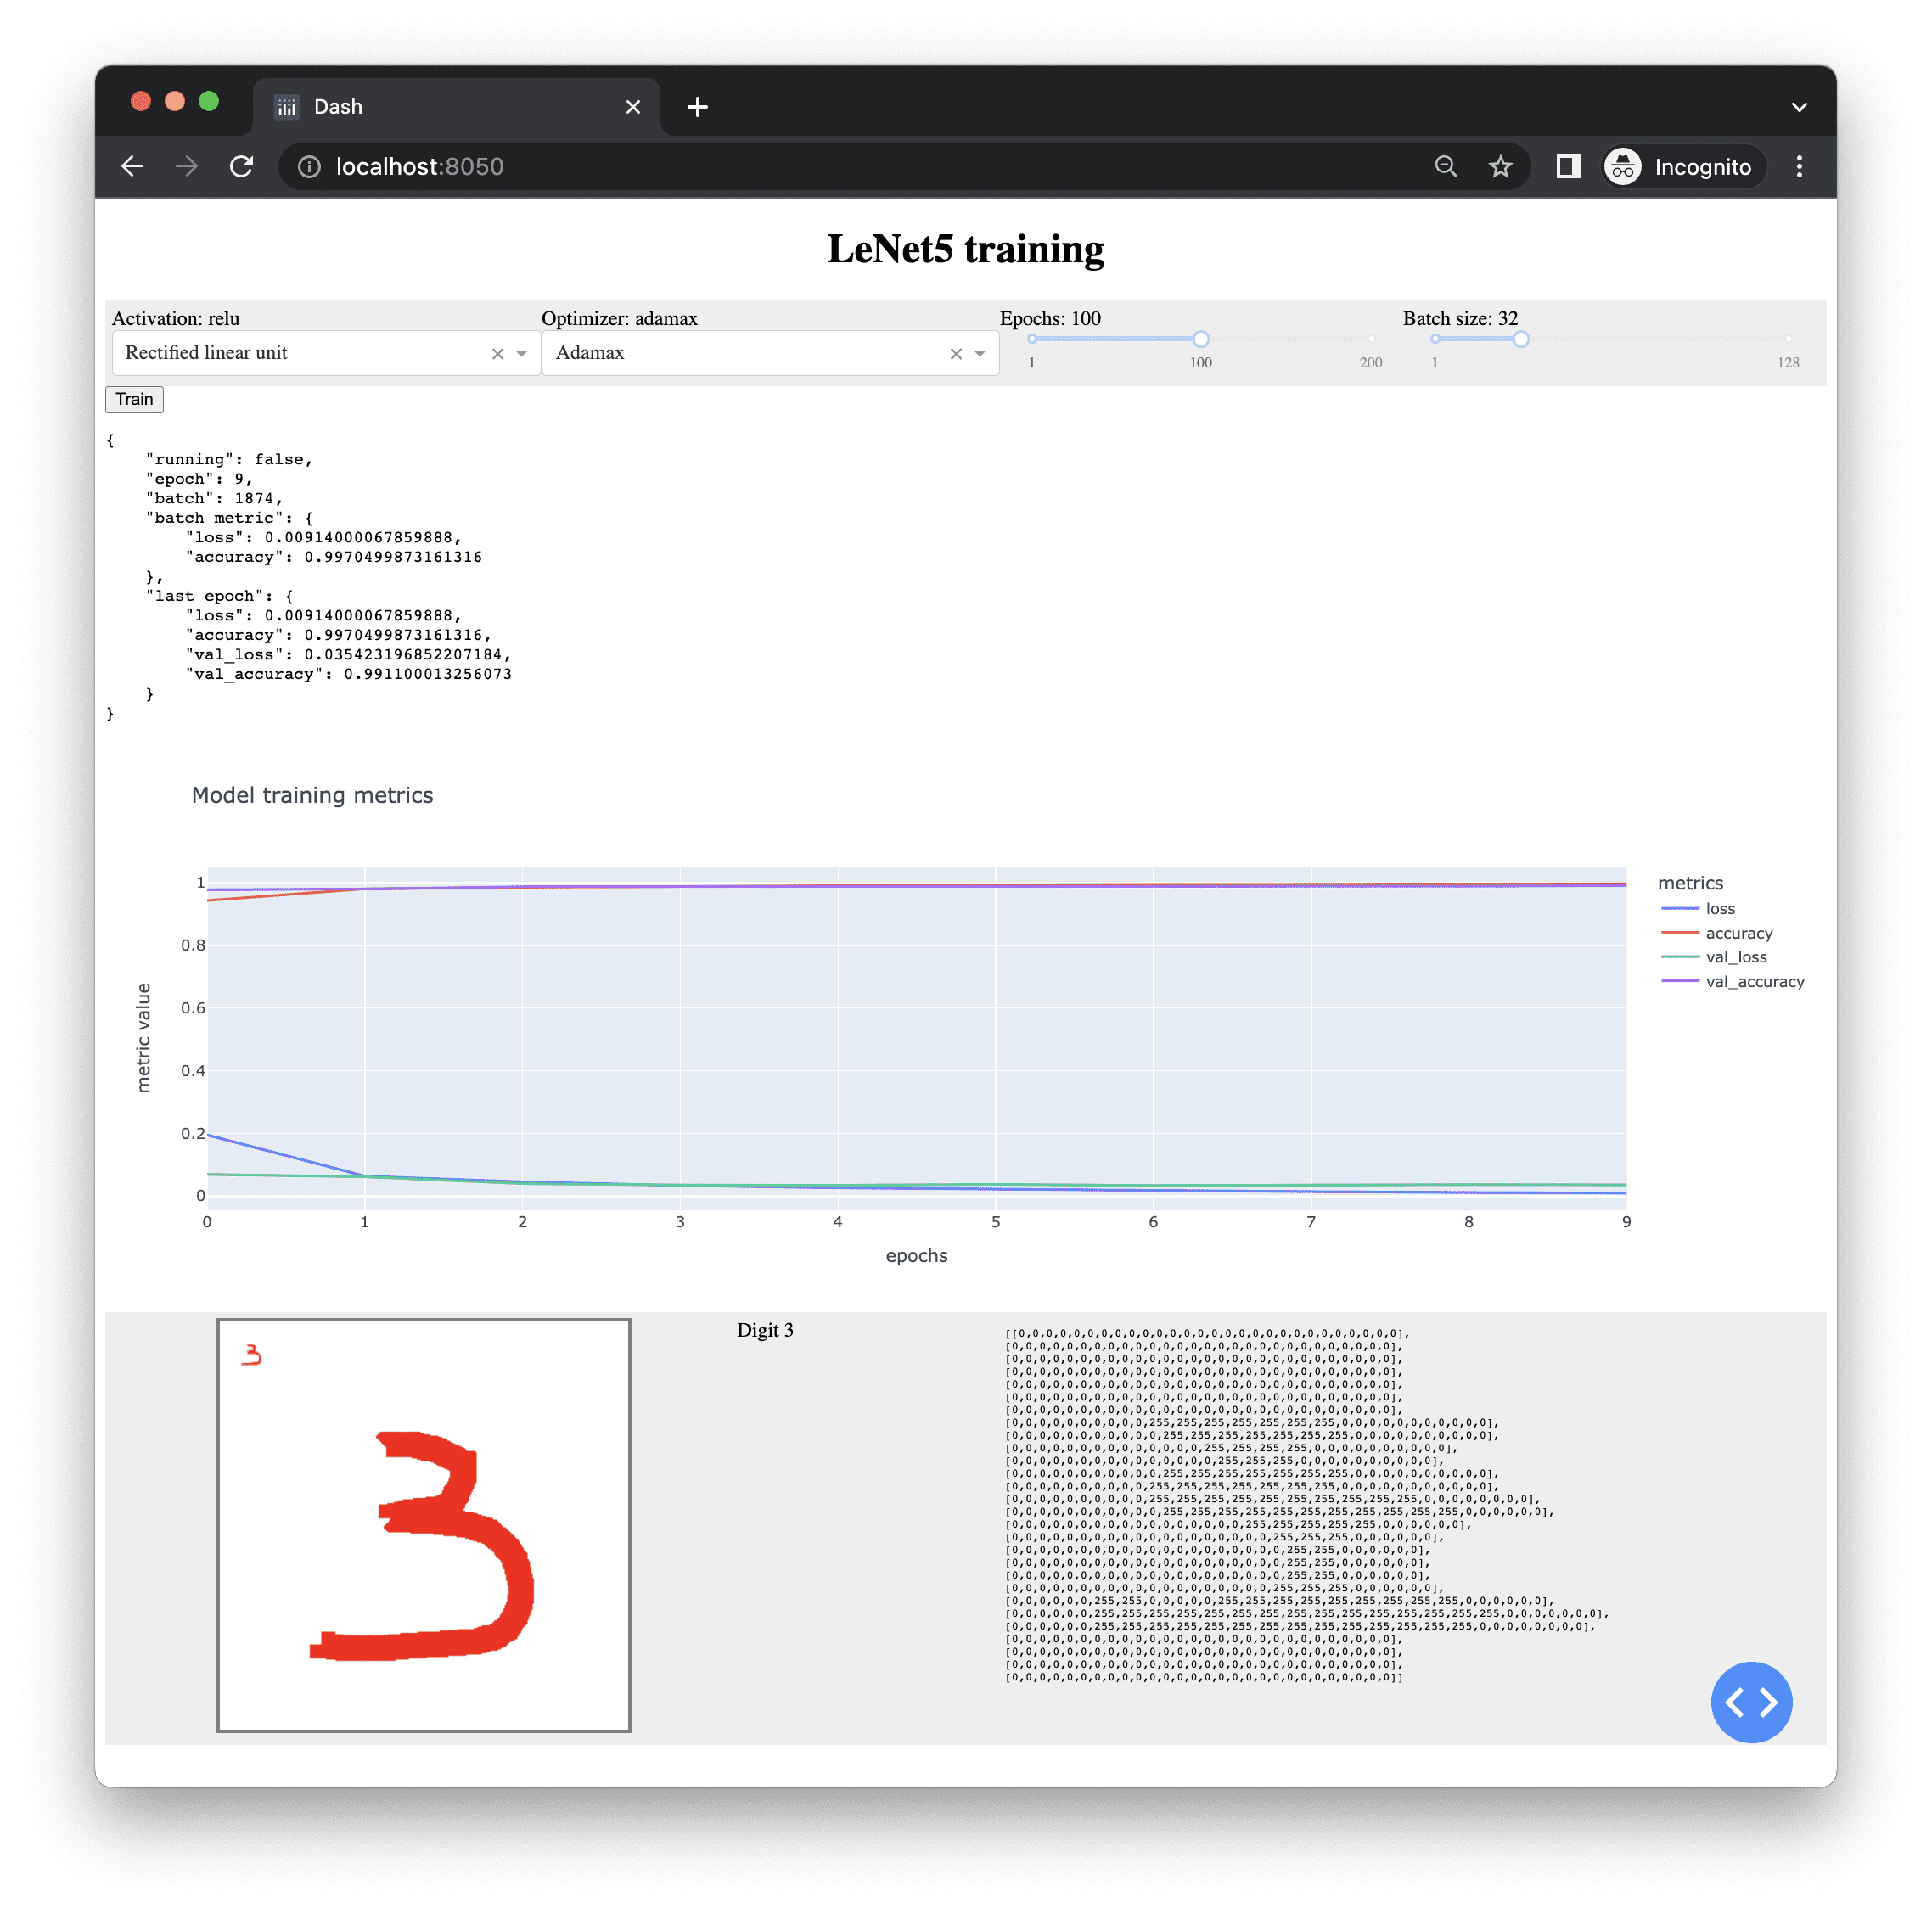
Additional Studying
There are an enormous quantity of internet framework accessible and Flask is only one of them. One other in style one is CherryPy. Beneath are sources on the subject in case you are trying to go deeper.
Books
Articles
APIs and software program
Abstract
On this tutorial, you realized how we will construct an online app simply in Python with the Sprint library. You additionally realized how we will create some internet API utilizing Flask. Particularly you realized
- The mechanism of an online utility
- How we will use Sprint to construct a easy internet utility triggered by internet web page elements
- How can we use Flask to create an online API
- How an online utility will be inbuilt Javascript and run on a browser that makes use of the online API we constructed with Flask
[ad_2]