

[ad_1]
The tip of Common Analytics is main information for all entrepreneurs counting on Google Analytics to research visitors, conduct, attribution, and extra regularly.
Particularly for ecommerce.
You see, GA4 shouldn’t be your typical software program improve.
It’s a very completely different platform, and establishing GA4 on ecommerce websites shouldn’t be as simple as flipping a toggle swap anymore.
The next is a complete information on easy methods to arrange GA4 for ecommerce.
1. Fundamental GA4 Configuration
Understandably, the shift to GA4 is hectic.
And it doesn’t assist that the implementation steps are far completely different from what we have been used to with Common Analytics.
The excellent news is that GA4 is full of options that have been beforehand unavailable.
For instance, there is no such thing as a knowledge sampling for normal studies, you’re not caught with last-click solely attribution, and there’s a actually useful funnel builder in Explorations.
To get began you will want so as to add GA4, create a purchase order knowledge layer, and create a product view knowledge layer.
Inexperienced persons ought to begin with our article Get to Know Google Analytics 4, to learn to arrange a GA4 account and knowledge property.
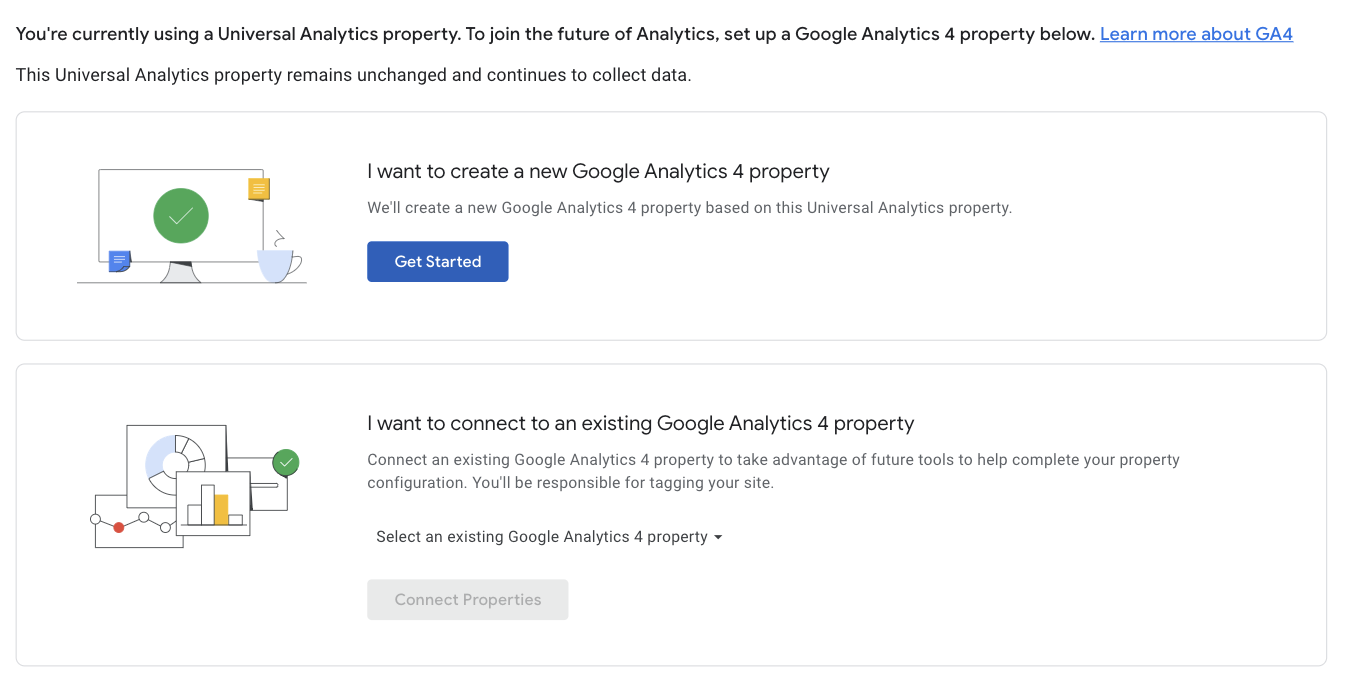 Screenshot from UA, April 2022
If you happen to’ve already configured Google Tag Supervisor for GA4, go forward and bounce to step 2 the place we get into creating knowledge layers for ecommerce.
After you’ve created the GA4 property, you’ll must create tags to ship knowledge out of your web site to your Google Analytics account.
There are two strategies for configuring GA4 in your store website: International Website Tag (gtag.js) or Google Tag Supervisor (GTM).
If you happen to’re utilizing the International Website Tag technique you will want to speak along with your developer. Here’s a hyperlink to Google Analytics’ information for builders to assist them get began.
Or, you should utilize Google Tag Supervisor (GTM).
Google Tag Supervisor is a free knowledge container by Google Analytics. You may study to handle GTM your self and it doesn’t require a developer on employees.
Learn SEJ’s Google Tag Supervisor GA4 information for an entire step-by-step masking setup, set up, and the essential GA4 configuration tag.
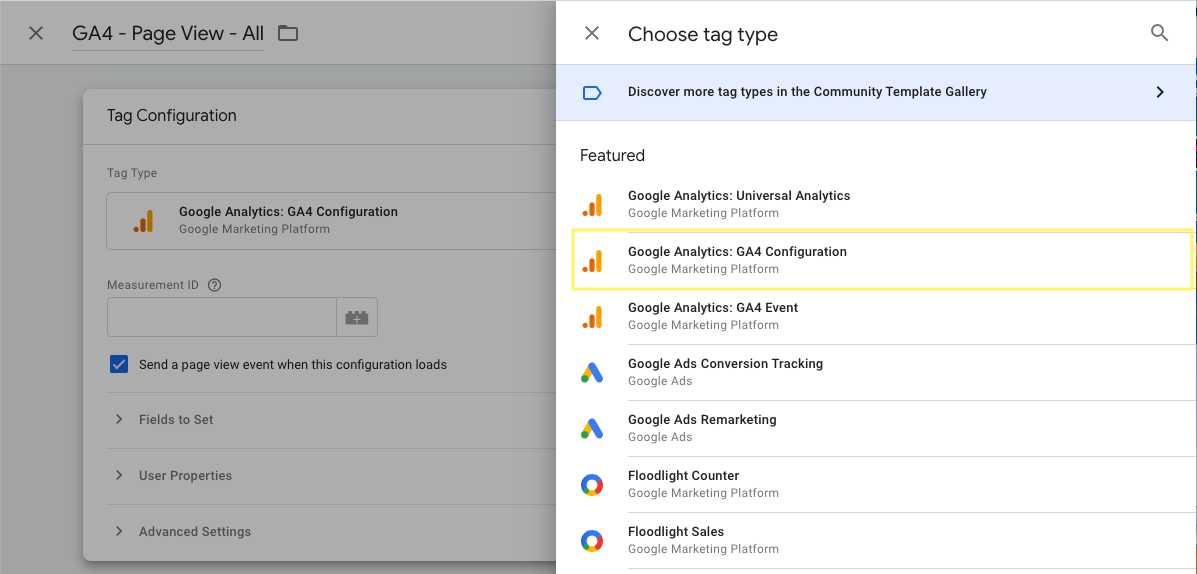 Screenshot from GA4, April 2022
As soon as GA4 is configured, you’ll discover that the GTM container alone shouldn’t be sufficient for ecommerce retailers.
To get our ecommerce studies working we have to add two further items of code, referred to as a knowledge layer, to cross buy and product view particulars to Google Analytics.
Let’s begin with the acquisition knowledge layer. That is the code that’s liable for conversions and gross sales income.
Be aware: This text makes use of Shopify because the ecommerce instance. You have to the power to edit your theme and checkout liquid file.
2. Buy Information Layer
When a buyer completes an order, the acquisition knowledge layer will cross variables to Google Tag Supervisor.
Variables are the information factors we need to monitor resembling income, tax, and delivery info.
There are 4 steps to establishing a purchase order knowledge layer:
- Including the code to the checkout web page.
- Making a customized occasion.
- Creating a knowledge layer variable.
- Creating a brand new tag in GTM.
Create Buy Information Layer Code
Your actual knowledge layer code might range relying in your knowledge assortment technique and I encourage you to talk along with your developer.
Right here is an instance of a purchase order knowledge layer for Shopify written by Adam Gorecki, Chief Options Officer at Intigress.
{% if first_time_accessed %}

<script>

window.dataLayer = window.dataLayer || [];

window.dataLayer.push({

'page_type': 'buy',

'occasion': 'SEJ_purchase', //create a customized occasion in GTM

'transaction_id': '{ order.order_number }',

'totalValue': { money_without_currency }, // Contains tax & delivery

'subtotalValue': { money_without_currency },

'tax': { take away:',' },

'delivery': { take away:',' },

'foreign money': '{{ store.foreign money }}',

'payment_type': '{{ order.transactions[0].gateway }}', //non-obligatory parameter

'objects': [

{% for line_item in line_items %}

{

'item_id': '{ line_item.product_id }', //if no SKU exists, use product Id

'item_name': '{{ line_item.product.title }}',

'discount': { money_without_currency },

'item_variant': '{{ line_item.variant.title }}',

'price': { money_without_currency },

'quantity': {{ line_item.quantity }}

},

{% endfor %}

]

});

</script>

{% endif %}
Be aware: Modify the customized occasion parameter “occasion: SEJ_purchase” by changing SEJ with the account identify you’re engaged on or use a common choice like “occasion: checkoutComplete.”
Add Buy Information Layer To Checkout Web page
Copy and paste the acquisition knowledge layer into the checkout web page of your Shopify retailer.
Click on on Admin settings within the far backside left-hand nook and choose “Checkout” from the left-hand navigation.
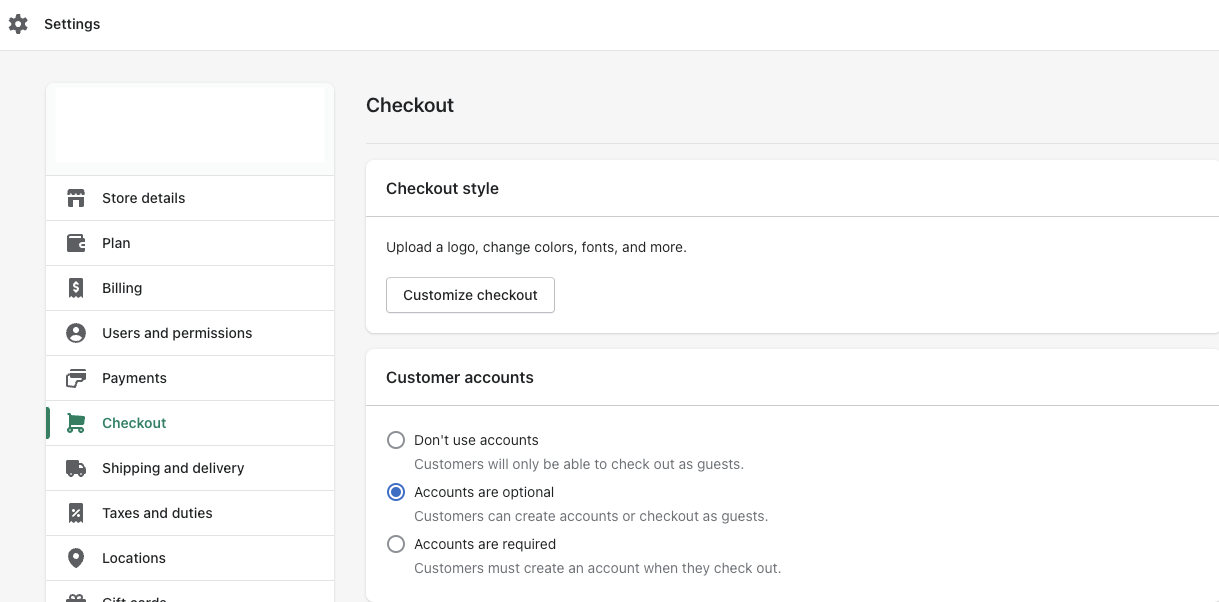 Screenshot from Shopify, April 2022
Scroll all the way down to the Order standing web page part. Paste the code you copied in Extra scripts proper beneath your GTM container snippet.
Click on Save.
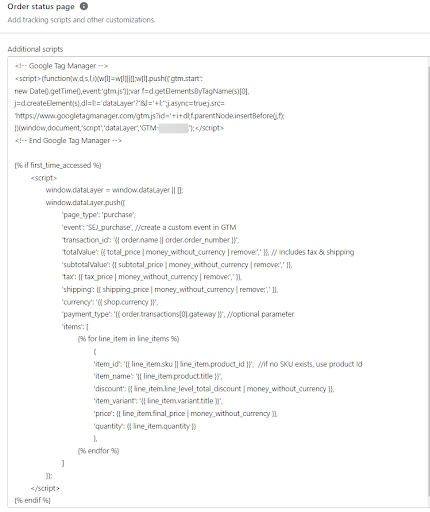 Screenshot from Shopify, April 2022
If you don’t see a GTM container snippet, learn SEJ’s Google Tag Supervisor GA4 information.
Create Customized Buy Occasion Set off In GTM
Your buy knowledge layer is prepared for Google Tag Supervisor.
Earlier than you go, copy the customized occasion out of your knowledge layer code.
Utilizing the instance above we’ll copy SEJ_purchase.
 Screenshot from Shopify, April 2022
Time to move over to Google Tag Supervisor. Open the GTM account and workspace for the corporate you’re engaged on.
Choose Triggers within the left-hand menu and click on the blue button within the prime proper nook to create a brand new set off.
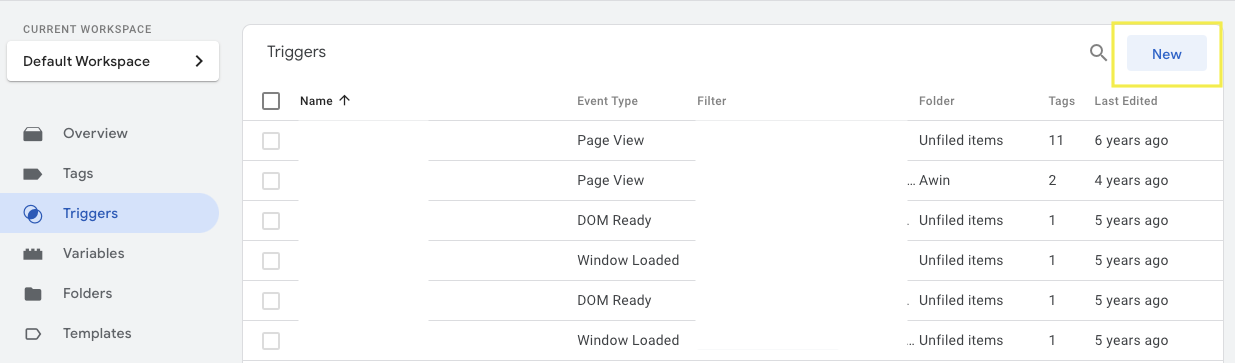 Screenshot from GTM, April 2022
Identify the brand new set off one thing that may make sense internally.
For instance, Customized Buy Occasion.
Click on to configure the set off and choose customized occasion from the choices on display.
Paste the occasion identify you copied beforehand.
It will be significant that the occasion identify matches the information layer code precisely. Finest observe is to repeat/paste.
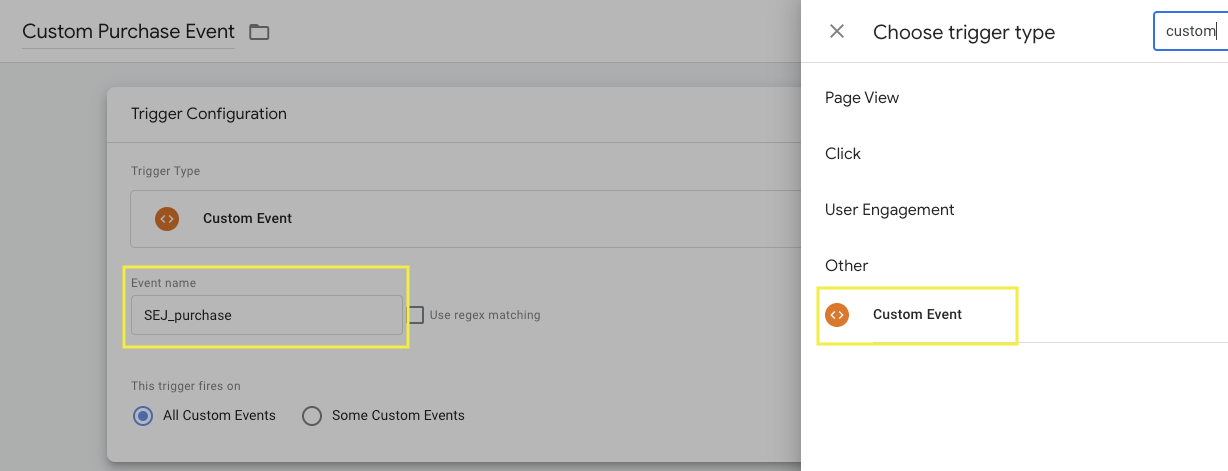 Screenshot from GTM, April 2022
For this instance, we’re making a set off for the customized buy occasion “SEJ_purchase.” Click on to avoid wasting your occasion set off.
It’s a good suggestion to check at this stage earlier than constructing out your entire GTM simply to make sure that the information layer is working as anticipated.
To check return to your workspace and click on Preview within the prime proper nook.
Enter your website’s URL and await the display to say “Related!”
Full a take a look at buy and watch in Tag Assistant for the brand new occasion set off.
Within the left-hand column, Abstract, click on the occasion SEJ_purchase.
Then click on the API Name dataLayer.push and you need to be capable to see all of the variables in your code.
 Screenshot from GTM debug instrument, April 2022
Because of this our buy knowledge layer is efficiently sending info to Google Tag Supervisor. Hooray!
Create Information Layer Variables
Return to your GTM workspace and click on Variables within the left-hand navigation.
Right here you will notice built-in variables and any variables you have got outlined beforehand, like your Common Analytics ID monitoring.
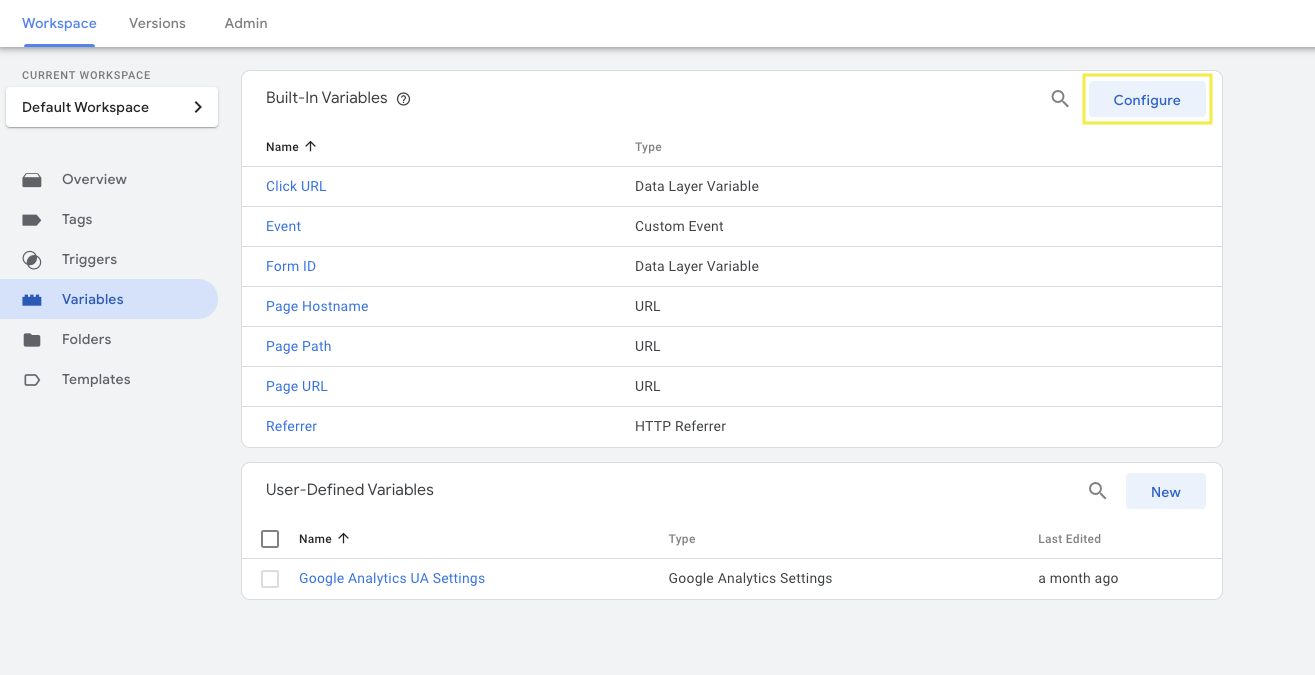 Screenshot from GTM, April 2022
Click on to create a brand new user-defined variable.
The naming of your variable is for inner use nevertheless it helps when different persons are working inside the Google Tag Supervisor to make use of one thing informative like “dlv-totalValue.”
Click on to decide on the variable sort and choose the Information Layer Variable choice.
The Information Layer Variable identify worth should match what’s in your knowledge layer precisely, in any other case, it is not going to work. It’s greatest to repeat and paste.
For instance, totalValue.
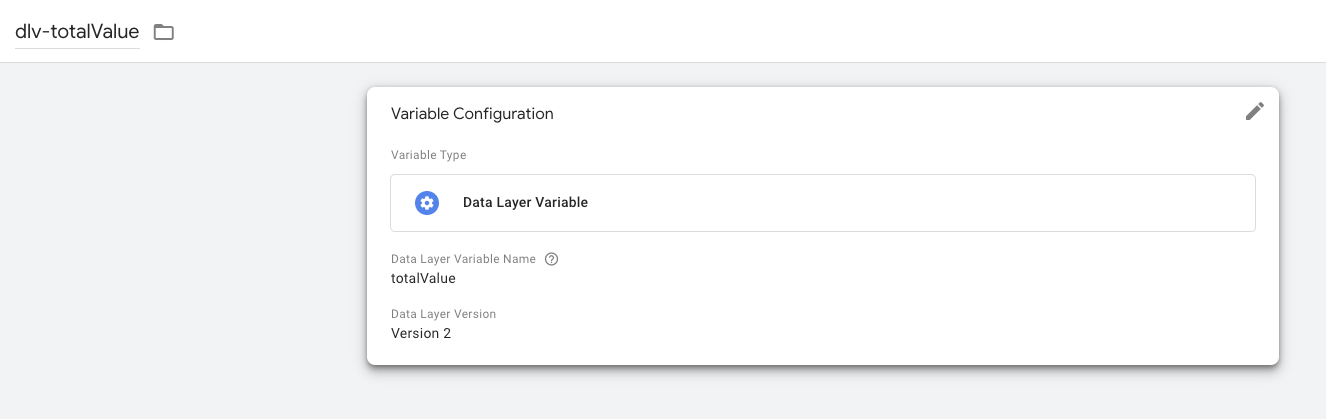 Screenshot from GTM, April 2022
You have to to repeat this course of for all seven variables:
- dlv-currency/foreign money.
- dlv-items/objects.
- dlv-payment_type/payment_type.
- dlv-shipping/delivery.
- dlv-tax/tax.
- dlv-totalValue/totalValue.
- dlv-transaction_id/transaction_id.
On the finish of this step, your GTM variable settings ought to seem like the screenshot beneath.
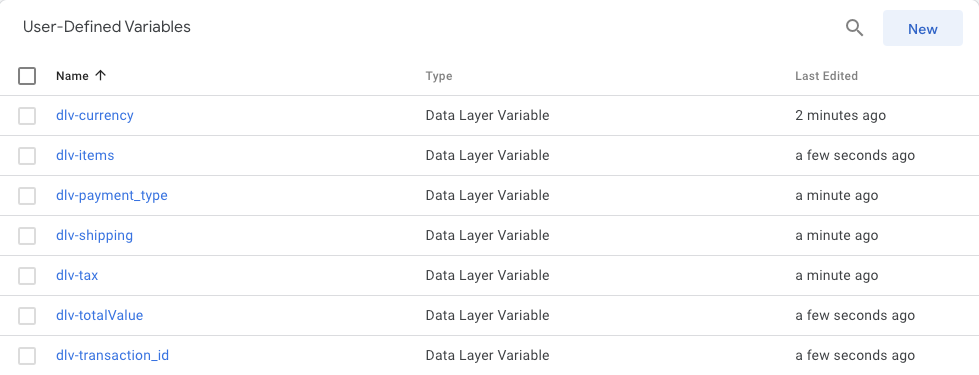 Screenshot from GTM, April 2022
Ship Conversions To GA4
Now, you could ship this buy info to your Google Analytics account so your advertising and marketing group can begin digging into studies.
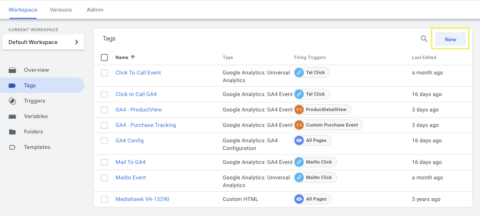
Click on Tags within the left-hand menu and choose New.
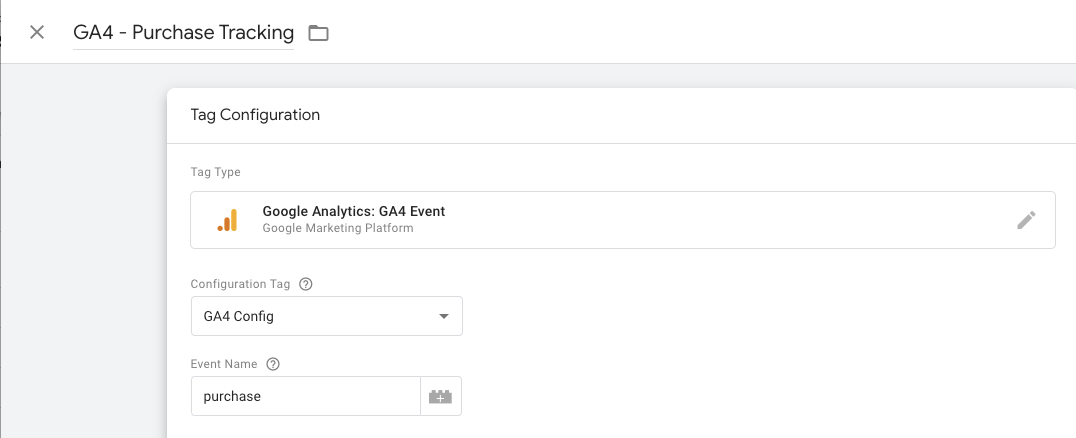
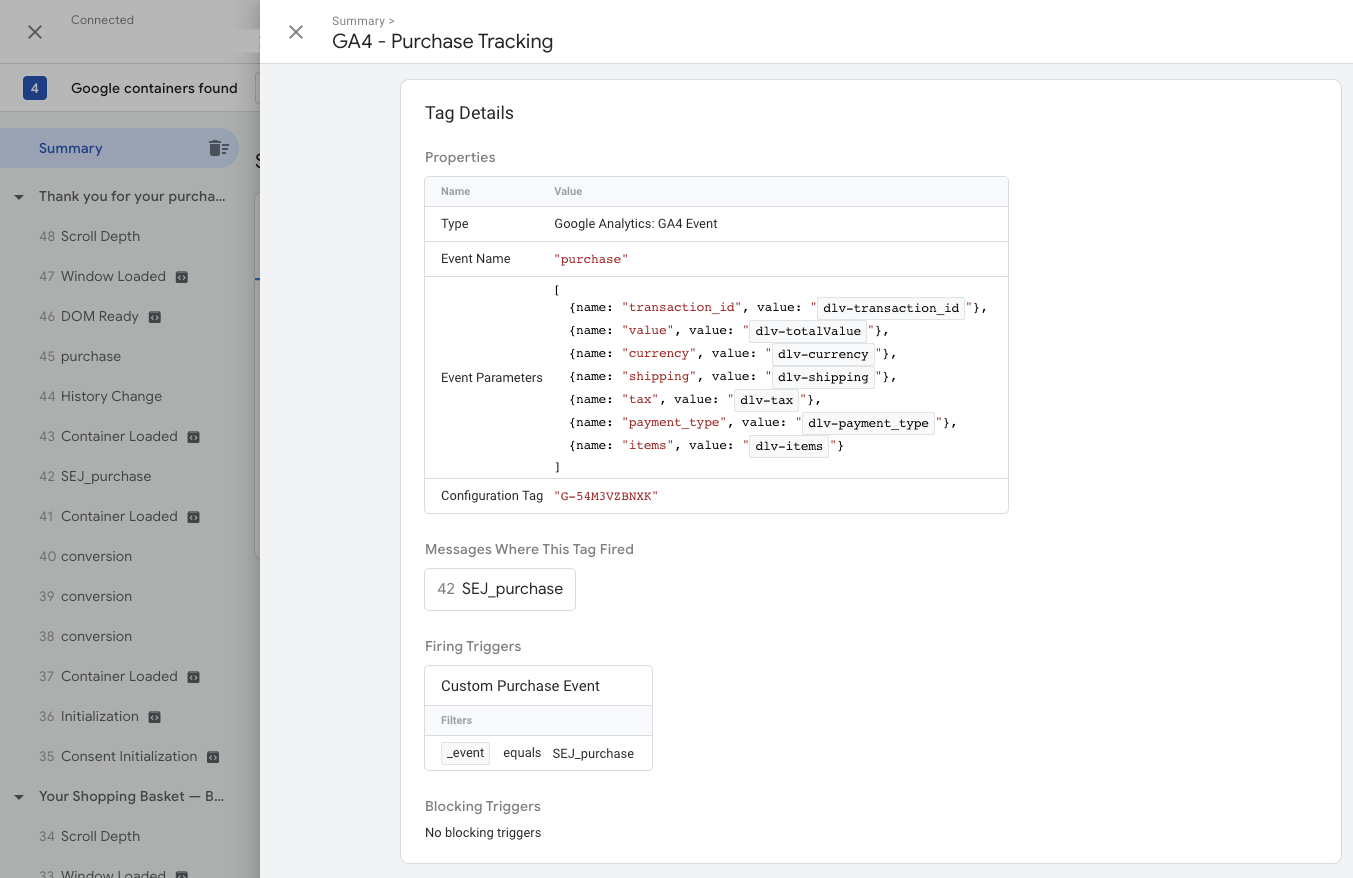
Identify your new tag “GA4 – Buy Monitoring” and click on inside the physique of the primary card to configure your tag.
Select the tag sort, Google Analytics GA4 Occasion.
 Screenshot from GTM, April 2022
Configuration tag can be your GA4 – International Tag which we created earlier.
If you don’t see a GA4 International Tag learn SEJ’s Google Tag Supervisor GA4 information.
The Occasion Identify can be “buy.”
 Screenshot from GTM, April 2022
With GA4 you additionally want so as to add occasion parameters.
This can be a hyperlink to the full documentation of accessible GA4 occasion parameters.
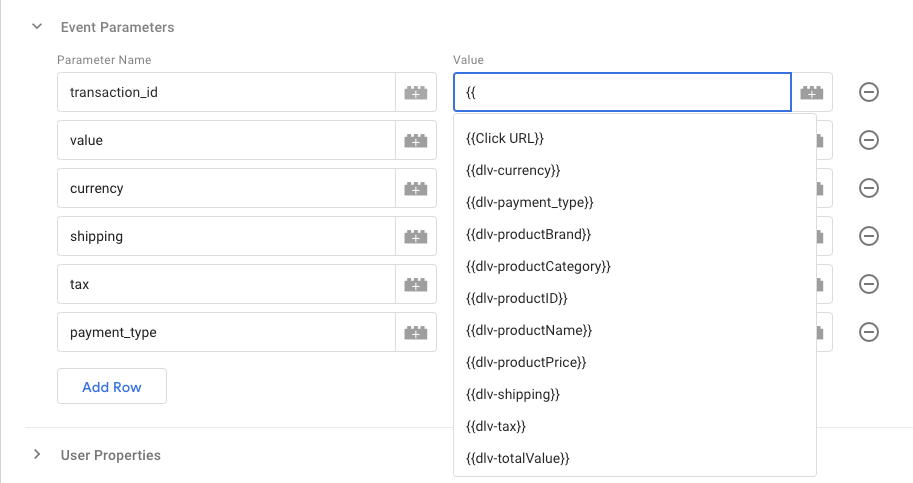
We can be including occasion parameters for the variables in our knowledge layer. Underneath Occasion Parameters, click on Add Row.
The parameter identify you’ll copy and paste from GA4 documentation.
For instance, “transaction_id.”
The worth would be the knowledge layer variable we created in step 4.
For instance, “dlv-transaction_id.”
So as to add your knowledge layer variable, you possibly can both click on the plus icon to open a popup with all of the variables out there or sort double brackets {{ which can open a dropdown with all your choices.
 Screenshot from GTM, April 2022
Right here is an instance of what your remaining occasion parameters display might seem like.
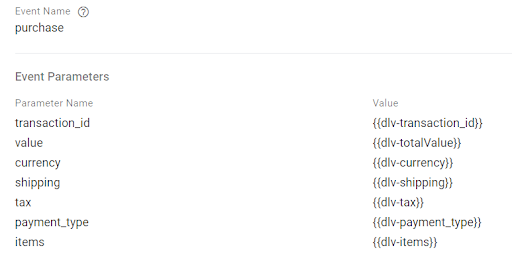 Screenshot from GTM, April 2022
Set off would be the customized buy occasion beforehand created. If you don’t see a customized buy occasion, revisit step 3 above.
Upon completion, your GA4 buy monitoring tag will look just like the screenshot beneath. Click on Save.
Undergo publish your container.
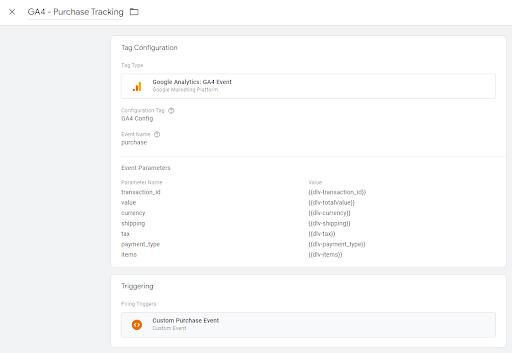 Screenshot from GTM, April 2022
Now, you will need details about which merchandise have been seen earlier than buying in your studies. Let’s hold going.
3. Product View Information Layer
To get product-level element in Google Tag Supervisor, we might want to add a second knowledge layer. The product view knowledge layer can be added to the Shopify theme.liquid file.
The identical 5 steps are concerned.
We can be including a knowledge layer code, making a customized occasion, creating knowledge layer variables, and creating a brand new set off in GTM.
You’ve completely acquired this!
Create A Product Information Layer
Your actual product knowledge layer code might range and I encourage you to talk along with your developer.
Right here is an instance of a Shopify product knowledge layer.
<script sort="textual content/javascript">

window.dataLayer = window.dataLayer || [];

window.appStart = perform(){

{% assign template_name = template.identify %}

window.productPageHandle = perform(){

var productName = "{ take away: "'" }";

var productId = "{{ product.id }}";

var productPrice = "{ money_without_currency }";

var productBrand = "{ take away: "'" }";

var productCollection = "{ take away: "'" }"

window.dataLayer.push({

occasion: 'SEJ_productDetail',

productName: productName,

productId: productId,

productPrice: productPrice,

productBrand: productBrand,

productCategory: productCollection,

});

};

{% case template_name %}

{% when 'product' %}

productPageHandle()

{% endcase %}

}

appStart();

</script>
Add Product Information Layer To Theme Recordsdata
To ship product info to GA4, you will want to edit your theme recordsdata.
Modifications to your theme file are comparatively risk-free as a result of Shopify robotically saves change historical past.
However, in the event you’re feeling not sure you possibly can completely work inside a duplicate of the dwell theme.
Open your Shopify Admin panel and click on On-line Retailer.
Choose Themes and select your dwell theme. Click on Actions and choose edit code from the drop-down menu.
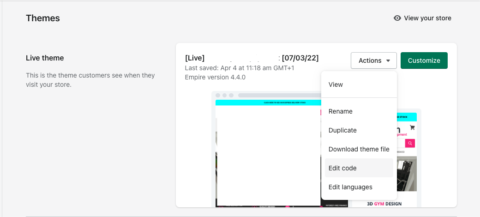 Screenshot from Shopify, April 2022
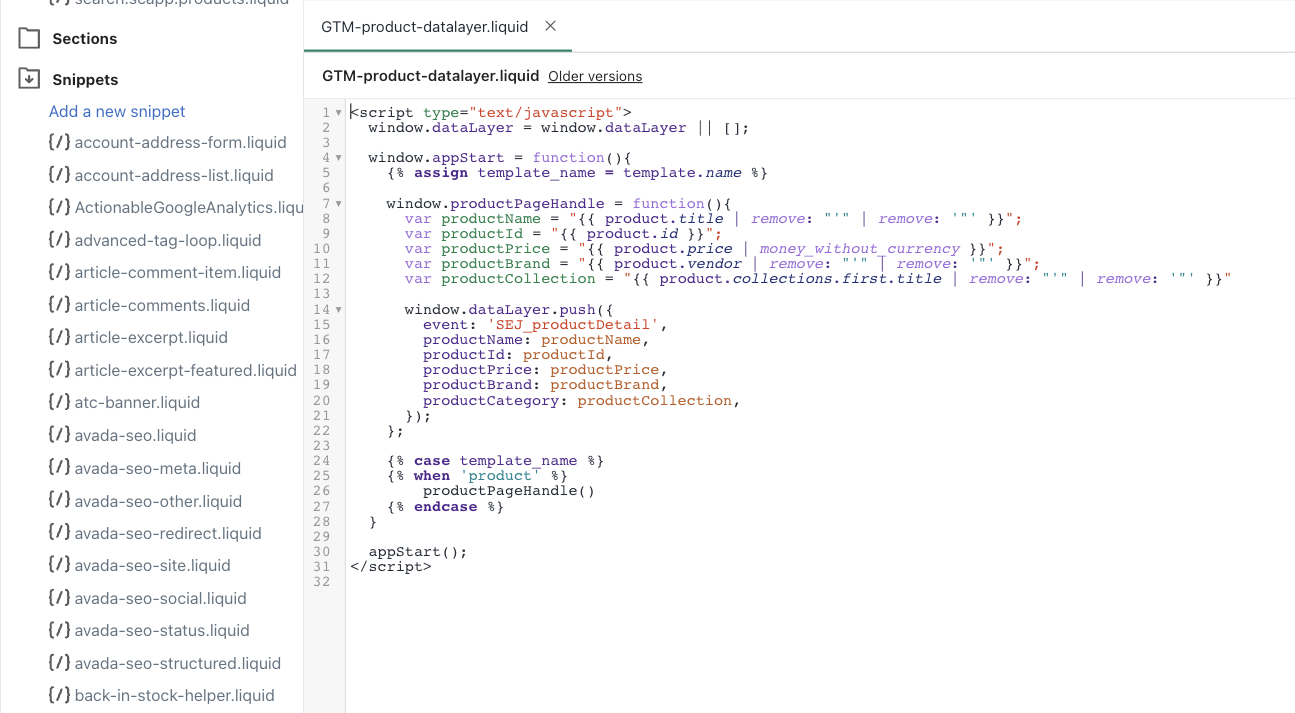
Scroll all the way down to the Snippets‘ part and click on Add new snippet.
Identify the brand new snippet GTM-product-datalayer and click on create.
Paste the code you copied from step 1 into this newly created snippet file and click on Save.
 Screenshot from Shopify, April 2022
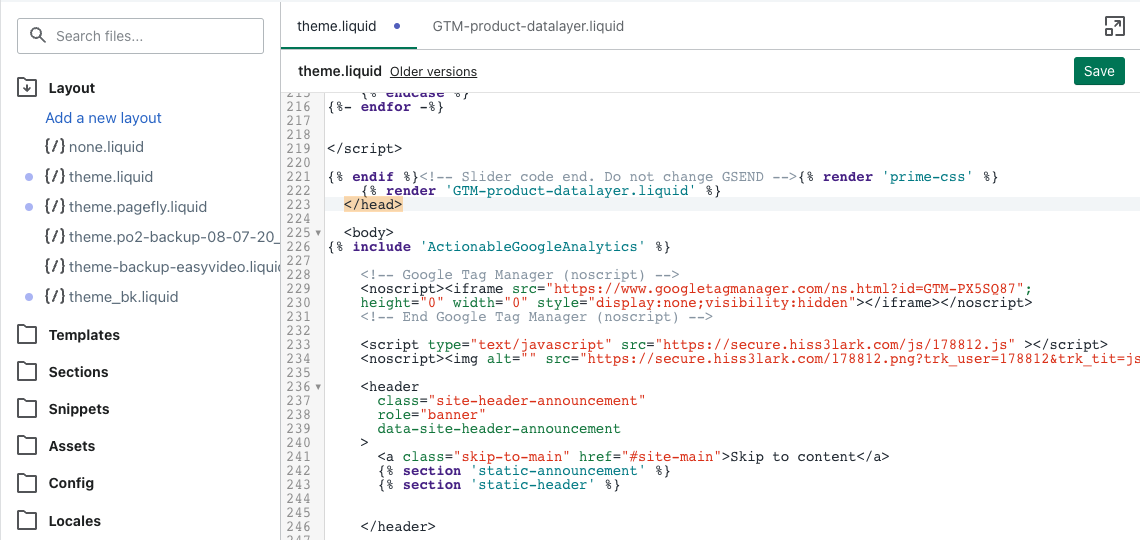
Within the left-hand menu, scroll as much as discover the theme.liquid file. It’s situated underneath the “Format” part.
Open the theme.liquid file and seek for “/head”.
Paste the next code simply above “/head”: {% render ‘GTM-product-datalayer.liquid’ %} and save your work.
 Screenshot from Shopify, April 2022
Now it’s time to check if the product knowledge layer is passing details about our product views to Google Tag Supervisor as anticipated.
Open Google Tag Supervisor and click on Preview.
Comply with the onscreen prompts after which full a take a look at buy.
If the product element knowledge layer is working you will notice the customized occasion SEJ_productDetail within the left-hand navigation.
While you click on on this tradition occasion you need to see all of the variables out of your code.
 Screenshot from GTM debug instrument, April 2022
Create Product Element View Set off
Your Shopify product view knowledge layer is prepared for Google Tag Supervisor.
Open Google Tag Supervisor and click on Triggers within the left-hand menu and click on “Add New.”
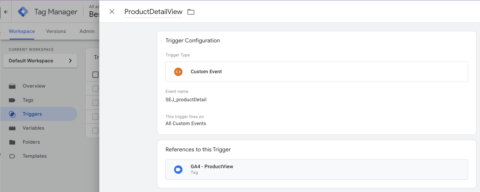
From the set off choices, select “Customized Occasion” and identify the brand new set off, “ProductDetailView.”
Now add “SEJ_productDetail” within the customized occasion identify area. This identify matches your knowledge layer occasion identify. Bear in mind to avoid wasting.
 Screenshot from GTM, April 2022
GTM Variables
Simply as we did earlier than, it’s time to add variables from our knowledge layer. This time will probably be to cross the product element info like product identify, model, and class.
Within the GTM left-hand menu choose Variables and click on New underneath Consumer-Outlined Variables.
When including your GTM variables this can be very essential that the textual content matches your knowledge layer precisely and that you just hold naming constant.
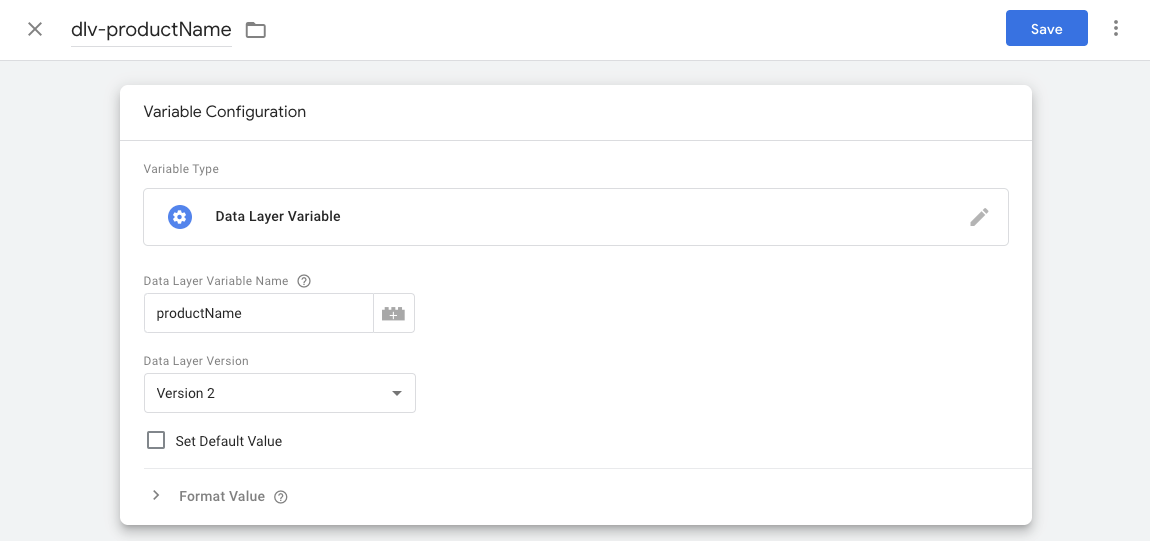
For instance, we’ll create a variable for the product identify. Enter the variable identify “dlv-productName.”
Select the variable sort, “Information Layer variable.”
Copy and paste the precise variable out of your product knowledge layer code and save.
The screenshot beneath is an instance of the configuration for “dlv-productName.”
 Screenshot from GTM, April 2022
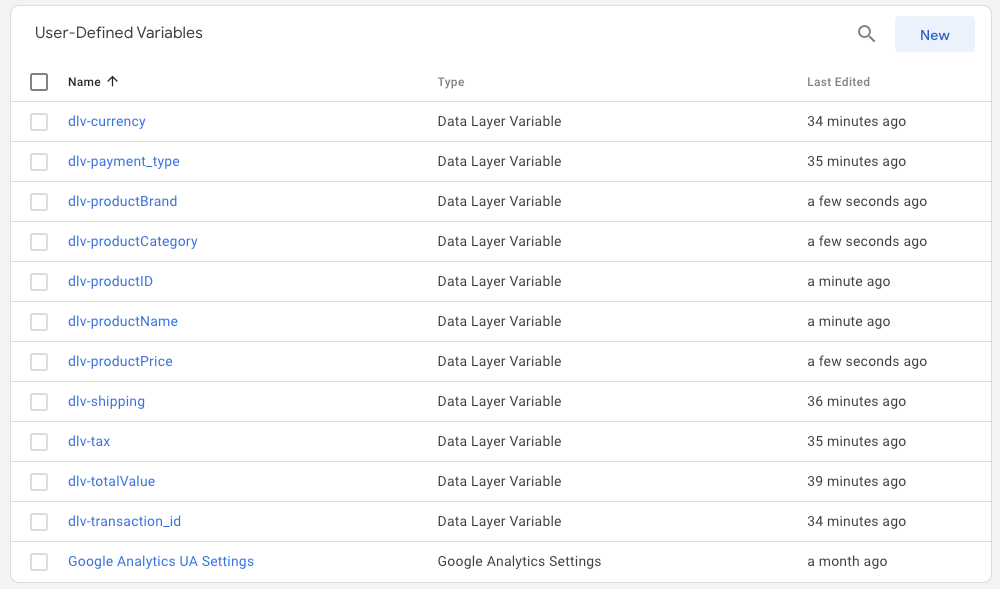
Repeat this course of for each variable in your product view knowledge layer. Our instance on this article has 5 variables:
- dlv-productID/productID.
- dlv-productName/productName.
- dlv-productBrand/productBrand.
- dlv-productCategory/productCategory.
- dlv-productPrice/productPrice.
On the finish, your user-defined variables record will embrace each buy and product variables and look just like the screenshot beneath.
 Screenshot from GTM, April 2022
5. Create Product View Occasion Tag
Again to Google Tag Supervisor, this time you’ll click on Tags.
Begin a brand new tag and identify it one thing like “GA4 – ProductView.”
Select the tag sort, “Google Analytics GA4 Occasion.”
 Screenshot from GTM, April 2022
Configuration tag can be your GA4 – International Tag which we created earlier. If you don’t see a GA4 International Tag learn SEJ’s Google Tag Supervisor GA4 information.
The Occasion Identify can be “view_item.”
With GA4 additionally, you will want so as to add occasion parameters. This can be a hyperlink to full GA4 documentation of accessible occasion parameters.
The primary parameter can be item_id and for the corresponding variable you possibly can both click on the plus icon to search out your user-generated variables or use a double bracket {{ and a dropdown record will seem.
 Screenshot from Shopify, April 2022
This half is case-sensitive and must match GA4 documentation and the information layer variable precisely.
Repeat this course of till you have got added all the 5 parameters and their corresponding variables:
- item_id/productID.
- item_name/productName.
- item_brand/productBrand.
- item_category/productCategory.
- item_price/productPrice.
Select the customized ProductDetailView set off that we created in step # because the set off.
The screenshot beneath is an instance of what your remaining product view tag might seem like.
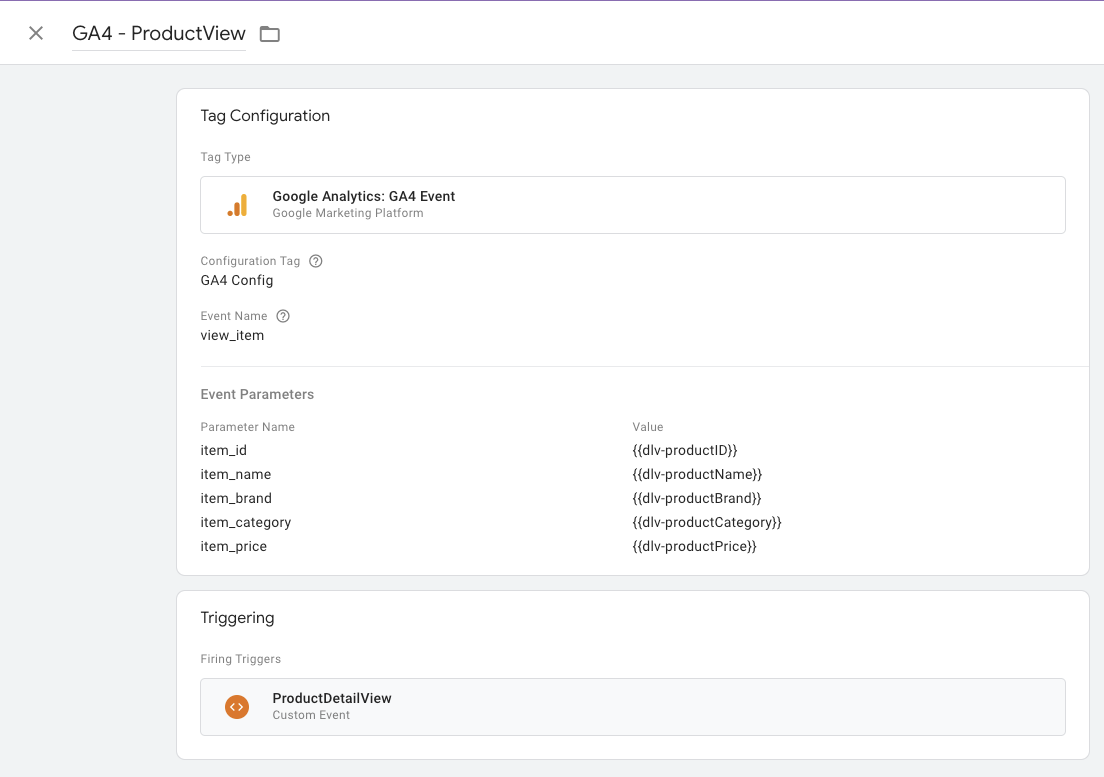 Screenshot from GTM, April 2022
GA4 Ecommerce Debugging
You might be within the remaining stretch! It’s time to make certain all the pieces is working as anticipated.
Open GTM preview and enter your website URL. As soon as the GTM preview instrument is related, view a number of merchandise, add-to-cart, and full a purchase order.
Watching in Google Tag Assistant for the product view occasion tag and buy view occasion tag to fireplace.
Underneath the abstract, click on on the customized buy occasion (SEJ_purchase) and open the API name particulars. You need to see all the objects out of your knowledge layer variable.
For instance, beneath is an instance screenshot for product element.
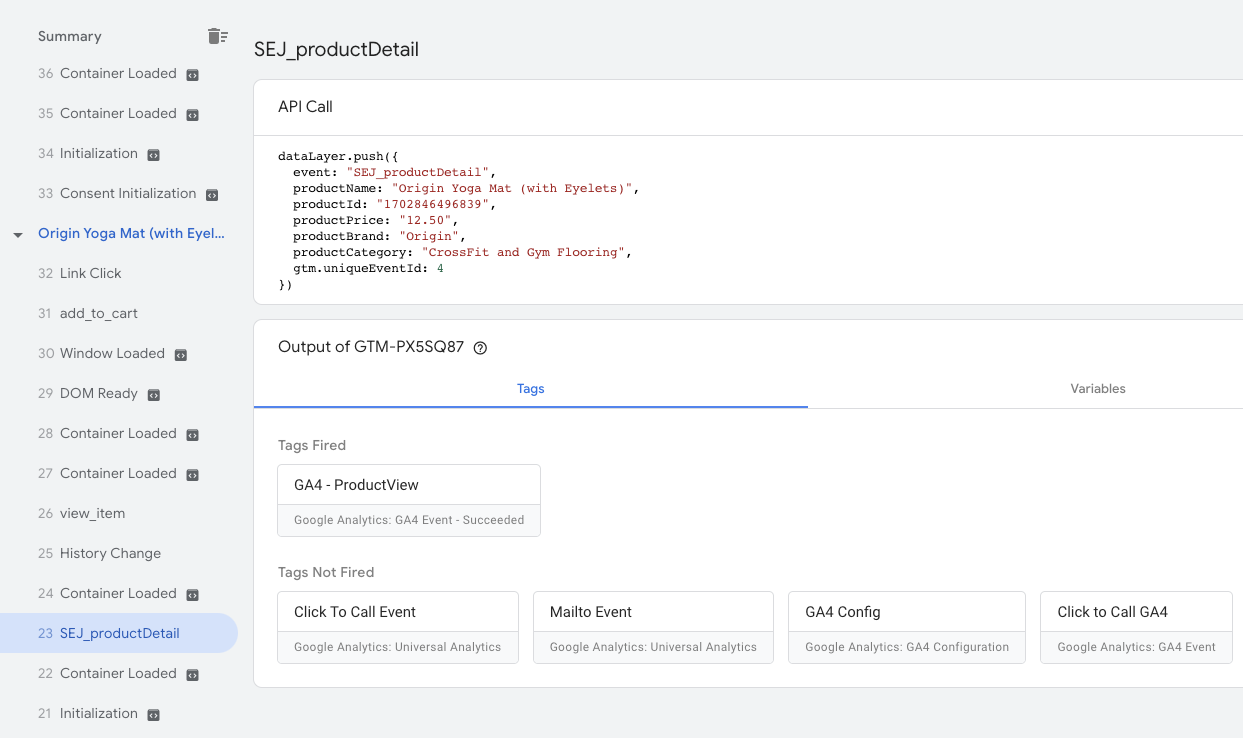 Screenshot from GTM debug instrument, April 2022
And right here is an instance for buy.
 Screenshot from GTM debug instrument, April 2022
This implies your Shopify retailer is passing ecommerce product view info and transaction knowledge to GTM. Hooray!
Subsequent, we open GA4 Realtime studies and verify that person occasions have recorded our product element view and buy occasion.
 Screenshot from GA4 realtime report, April 2022
The ultimate verify is to verify in GA4 Debugger that each one of our occasion parameters and objects array are working as supposed.
Within the left-hand menu navigation, click on Configure > DebugView.
It’s not tremendous clear however you will want to search out your gadget within the dropdown menu for DEBUG DEVICE.
From this view, you will notice a timeline of your exercise on the location. Within the far proper column titled TOP EVENTS click on on the acquisition occasion.
Then click on on objects to verify the acquisition occasion is sending the product merchandise info to GA4. With out “objects” the complete studies cannot show.
It ought to look just like the screenshot beneath.
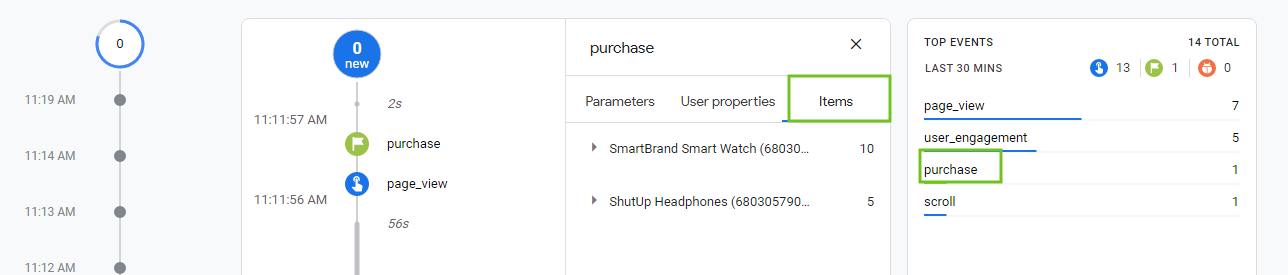 Screenshot from GA4 Debugger, April 2022
Congratulations!
Because of this your Shopify retailer is passing buy and product view knowledge completely. Remember the fact that customary GA4 ecommerce studies might take 24 – 48 hours to completely populate.
Finally your Monetization > Ecommerce purchases report will look just like the screenshot beneath.
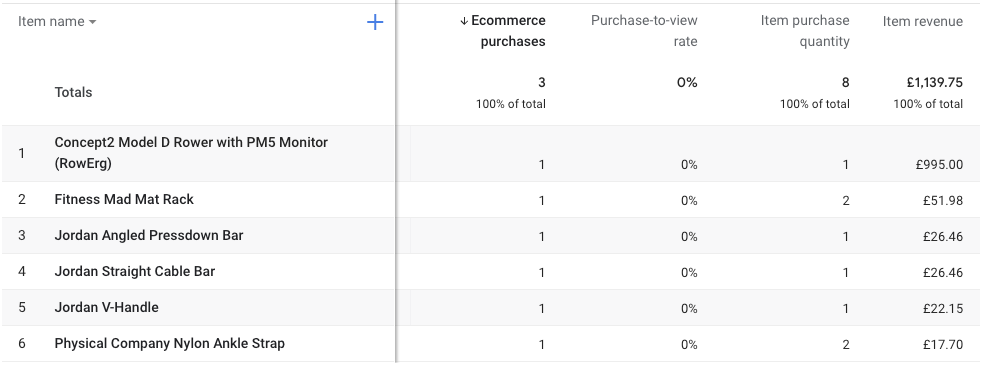 Screenshot from GA4 Debugger, April 2022
Remaining Ideas
To make use of GA4 ecommerce studies, we added a Google Tag Supervisor container script to our on-line store, s buy knowledge layer to our checkout web page, and a product view knowledge layer to our Shopify theme.liquid file.
Then we created a customized set off, customized occasion, and knowledge layer variables inside Google Tag Supervisor.
Final we used GA4 tags to ship info on income, tax, delivery, product identify, model, and class into our GA4 studies.
Don’t overlook to check utilizing GTM preview and GA4 debugger instruments. Your customary studies might take 24 to 48 hours to populate.
GA4 is an evolving product and I hope ecommerce monitoring turns into simpler as third-party platforms, like Shopify, make changes on their finish.
Extra sources:
Featured Picture: Paulo Bobita
[ad_2]