

[ad_1]
By this Stripe cost gateway integration within the Android information, you’ll discover ways to combine stripe cost gateway into Android software. By the top of this Stripe Android tutorial submit, you’ll get the reply of learn how to combine stripe cost gateway within the Android software and capable of settle for funds out of your Android app. Excited? Let’s get going.
Introduction
If you’re creating a cell app for your corporation, then you need to someway settle for funds in your software. Whether or not it’s a journey app or eCommerce cell app, you’ll have to present an possibility for patrons to pay for the products or providers that your app presents.
To make it occur, varied cell cost gateways are typically getting used. Now, there are a lot of cost gateways accessible out there which let you course of bank card transaction information by way of their APIs. However, by integrating one such cost gateway additionally places the duty of the safety of bank card information in your shoulders as that bank card information might be passing by way of your cell app.
Usually, when a cell cost gateway is carried out in your app, the API ought to hand again a token out of your server’s safe authenticated atmosphere. This token represents the submitted card and is used for the precise transaction.
Now, if you wish to combine a cost gateway to create commission-based transactions, there are only some choices accessible. And amongst these few choices, Stripe is the perfect.
Stripe cost gateways enable each, people and companies to just accept funds over cell apps. Stripe was principally launched in 2011 and now helps 100+ currencies, turning into one of the common cost gateways on the earth.
Actually, you possibly can be taught extra about Stripe funds, defined by certainly one of our Senior Android builders sharing his expertise of utilizing Stripe as a cost gateway in one of many Android purposes.
Now, in case you’re an Android developer and searching ahead to studying learn how to Combine Stripe cost gateway in an Android Software, the under information will assist you to learn how to do it proper.
Stripe Fee Gateway Integration with Fee Primarily based Transaction
We combine a stripe cost gateway in Android and together with that, our shopper desires us to get a fee on each transaction and desires to hook up with the consumer’s account for the fee.
We offer a commission-based answer that enables our purchasers to earn some quantity for each transaction.
Are you prepared to find the stripe cost gateway integration in android instance? Allow us to information you step-by-step to finish the complete integration course of.
👉 Step 1) For the developer: Add under two dependencies within the Gradle file of your venture.
1) compile 'com.stripe:stripe-java:1.47.0'

2) compile 'com.stripe:stripe-android:1.0.4'
👉 Step 2) To get the fee, it’s essential to join with a consumer account and for that, it’s essential to get an authorization code.
To authorize this code it’s essential to have a shopper id which you’ll get by way of register your software on stripe.
That is only a one-time course of for acquiring the shopper id. This provides you with entry to Stripe Join settings.
Use this hyperlink to get register your software with Stripe and start creating with Stripe Join.
Right here we’re displaying how one can register your platform (Platform means your software) after. Login into the stripe and register the platform.
👉 Click on on Your Account which might be on the highest proper nook of your dashboard. See the under screenshot.
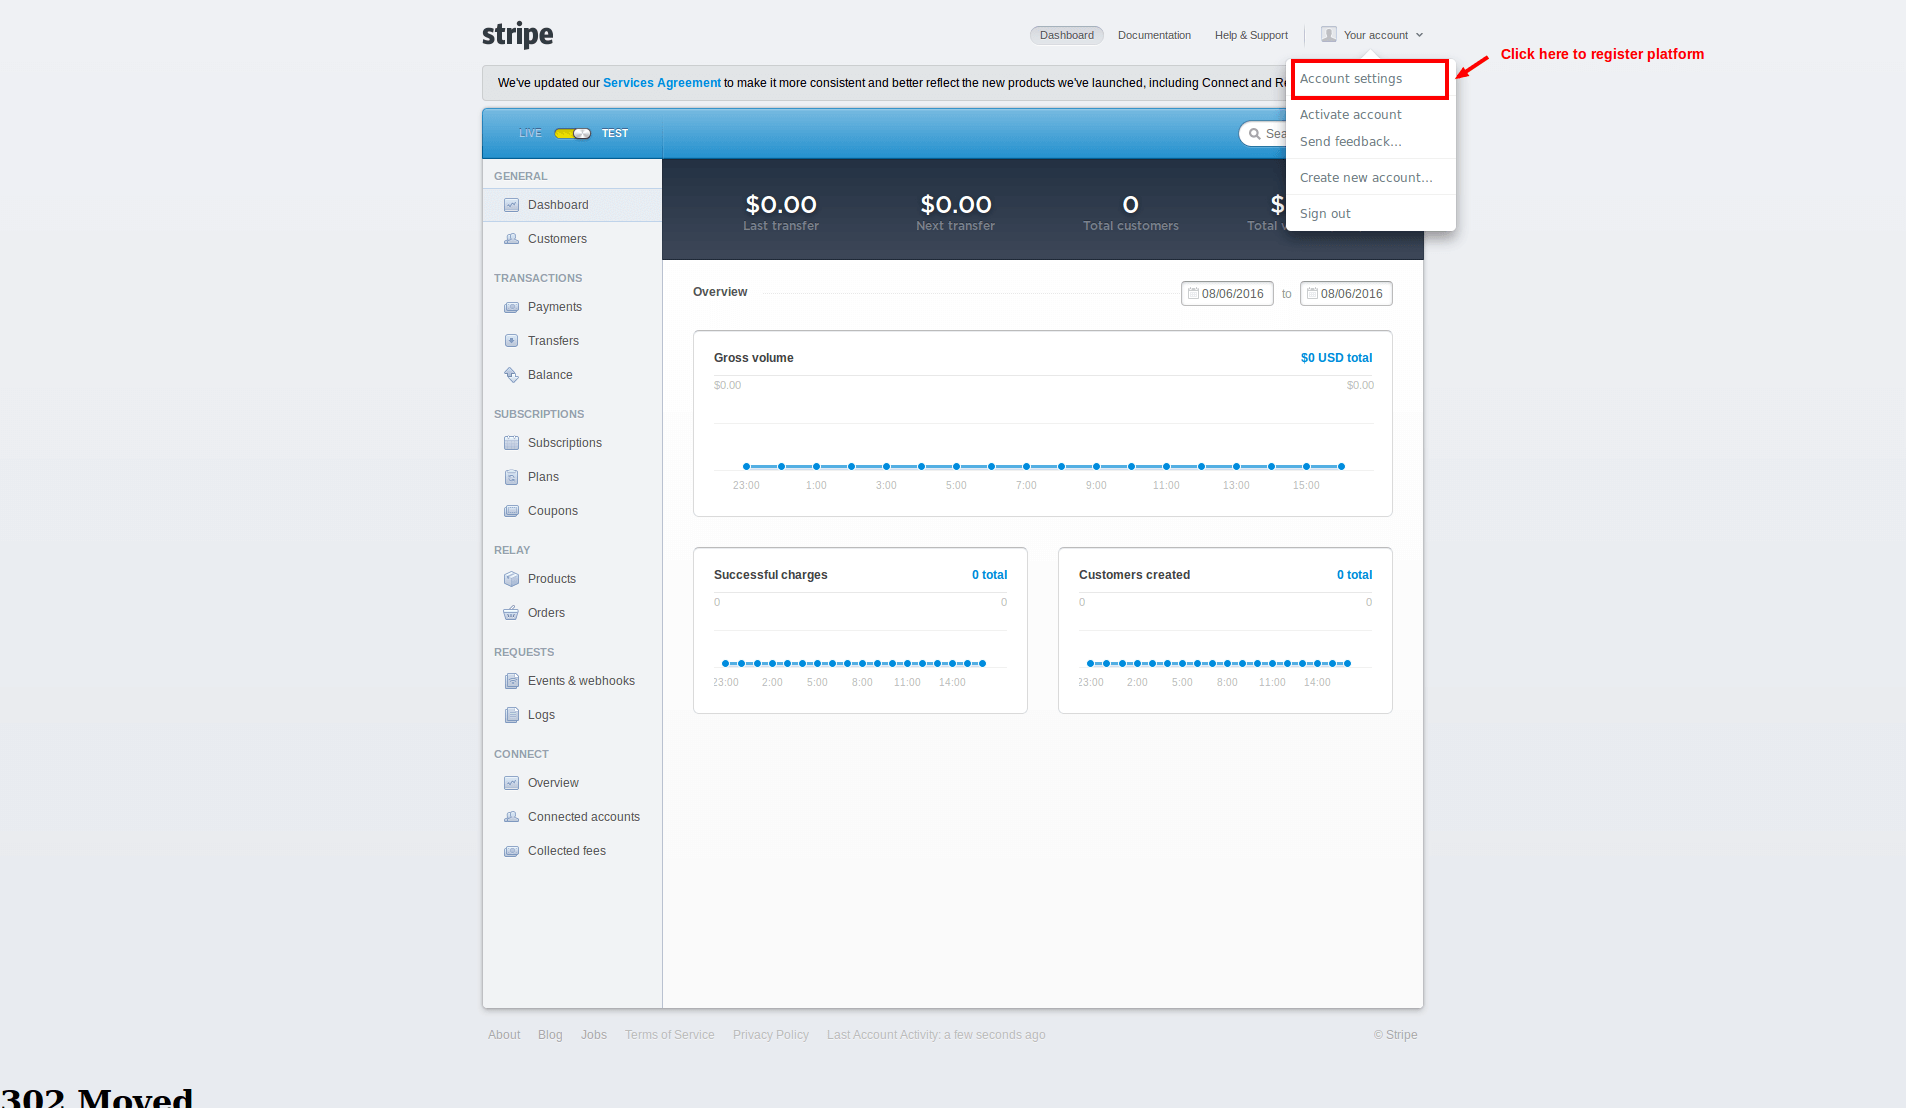
👉 Now the window might be a pop as much as register your platform. Click on on join and you’ll have a display screen to register your platform. See the under screenshot for more information.
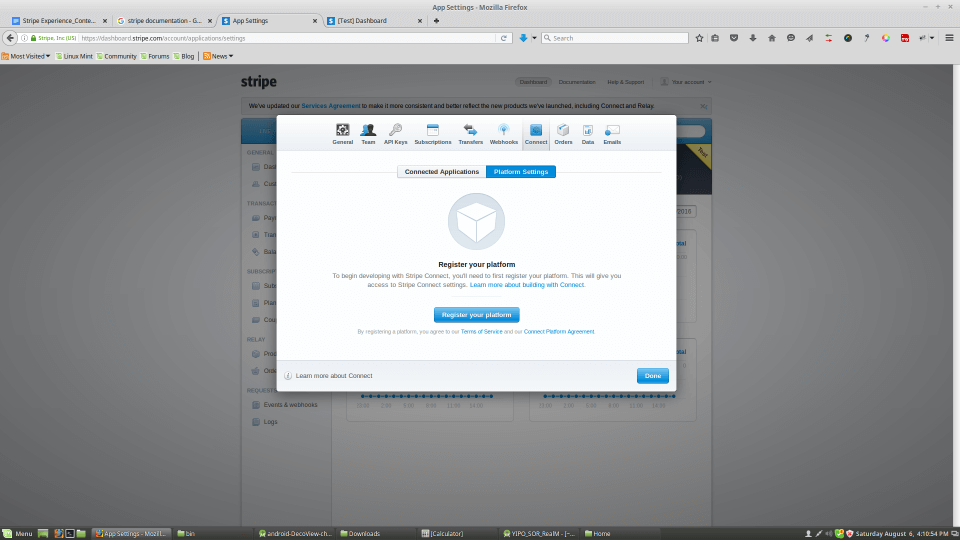
👉 Click on on the register your platform button then you’ll have another window which strikes to your closing vacation spot to register the platform. Simply refill all the data and press on the Carried out button.
[Developer note we experienced: You need to enter website url and redirect urls with having https:// format. See below screenshot.]

By filling in all of the above-mentioned info, you’ll have a shopper id that might be used to authorize your account.
Step 3) A course of to get Stripe authentication code (OAuth 2.0) by way of shopper ID
To attach with the consumer’s account – the consumer must undergo OAuth2.0 for a managed account. This entire authentication course of is managed by Stripe. Substitute Consumer ID textual content within the under URL and open it within the browser.
https://join.stripe.com/oauth/authorize?response_type=code&client_id=YOUR_CLIENTID&scope=read_write
For Check and Stay modes of Growth, you’ll get completely different shopper ids, so maintain shopper id passing with the above URL.
Listed below are the micros steps to get the authorization code:
3.1) After logging, a consumer is redirected to the URL set, which is Step 1.
http://www.yourredirectionurl.com/?scope=read_write&code=AUTHORIZATION_CODE
Right here, we get “AUTHORIZATION_CODE”.
3.2) This AUTHORIZATION_CODE must cross by way of the curl which returns the “stripe_user_id”
curl https://join.stripe.com/oauth/token
-d client_secret=CLIENT_SECRET_KEY
-d code=AUTHORIZATION_CODE
-d grant_type=authorization_code
Within the step 3.2) you might have query that what’s the CLIENT_SECRET_KEY.
And the way do you get it?
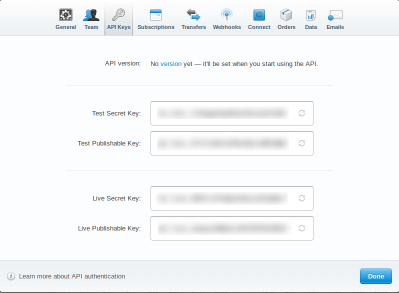
That is the important thing to that shopper who must get some quantity of each transaction into his account. To get SECRET_KEY click on on API_KEYS which seems on the third place of the under screenshot. And use Check Secret Key from that every one itemizing keys.
3.3) You must save this stripe_user_id and cross this stripe_user_id to get a fee. You simply have to take of check and stay modes of improvement and be sure you change the key key and shopper id.
Primarily based on our shopper’s requirement, we want you to share the XML file for acquiring particulars of the bank card quantity, Expiry Date, CVV quantity, Quantity of Transaction, Description of Transaction and E mail of Receipt.
👉 XML File Code
<RelativeLayout xmlns:android="http://schemas.android.com/apk/res/android"

android:id="@+id/LinearLayout1"

android:layout_width="match_parent"

android:layout_height="match_parent"

android:background="@drawable/gredientbg"

android:orientation="vertical">


<ScrollView

android:layout_width="match_parent"

android:layout_height="wrap_content">


<LinearLayout

android:layout_width="match_parent"

android:layout_height="wrap_content"

android:orientation="vertical">


<LinearLayout

android:id="@+id/llTop"

android:layout_width="match_parent"

android:layout_height="wrap_content"


android:orientation="vertical">


<ImageView

android:id="@+id/imgLogo"

android:layout_width="match_parent"

android:layout_height="wrap_content"

android:layout_marginTop="30dp"

android:src="https://www.spaceotechnologies.com/integrate-stripe-payment-gateway-android-app-create-commission-based-transaction/@drawable/brand" />


<com.paynow.utils.MyTextView

android:id="@+id/textTitle"

android:layout_width="wrap_content"

android:layout_height="wrap_content"

android:layout_gravity="center_horizontal"

android:layout_marginTop="@dimen/scal_10dp"

android:textual content="@string/text_charge_card_title"

android:textColor="@coloration/color_white"

android:textSize="@dimen/scal_16sp" />

</LinearLayout>


<LinearLayout

android:layout_width="match_parent"

android:layout_height="wrap_content"

android:orientation="vertical">


<FrameLayout

android:layout_width="match_parent"

android:layout_height="wrap_content"

android:layout_marginLeft="@dimen/scal_20dp"

android:layout_marginRight="@dimen/scal_20dp"

android:layout_marginTop="@dimen/scal_20dp">


<com.paynow.utils.MyEditText

android:id="@+id/editAmount"

android:layout_width="match_parent"

android:layout_height="wrap_content"

android:layout_marginTop="@dimen/scal_10dp"

android:background="@coloration/color_white"

android:trace="@string/edit_amount_hint"

android:imeOptions="actionNext"

android:inputType="numberDecimal"

android:maxLength="15"

android:paddingBottom="@dimen/scal_10dp"

android:paddingLeft="@dimen/scal_70dp"

android:paddingRight="@dimen/scal_10dp"

android:paddingTop="@dimen/scal_10dp"

android:singleLine="true"

android:textual content="0.00"

android:textAllCaps="false" />


<Spinner

android:id="@+id/spinnerCurrency"

android:layout_width="@dimen/scal_70dp"

android:layout_height="@dimen/scal_40dp"

android:layout_marginTop="@dimen/scal_10dp"

android:background="@drawable/dropdown_selector"

android:drawSelectorOnTop="true"

android:paddingBottom="@dimen/scal_0dp"

android:paddingRight="@dimen/scal_10dp"

android:paddingTop="@dimen/scal_5dp"

android:immediate="@string/currency_prompt"

android:textColor="@coloration/color_currency"

android:textSize="18sp" />

</FrameLayout>


     <FrameLayout

android:layout_width="match_parent"

android:layout_height="wrap_content"

android:layout_gravity="center_vertical"

android:layout_marginLeft="20dp"

android:layout_marginRight="20dp"

android:layout_marginTop="10dp">


<LinearLayout

android:layout_width="match_parent"

android:layout_height="wrap_content"

android:orientation="vertical">


<com.paynow.utils.MyEditText

android:id="@+id/editCardNumber"

android:layout_width="match_parent"

android:layout_height="wrap_content"

android:background="@coloration/color_white"

android:drawableLeft="@drawable/icon_card"

android:drawablePadding="@dimen/scal_15dp"

android:trace="@string/edit_cardnumber_hint"

android:imeOptions="actionNext"

android:inputType="telephone"

android:maxLength="25"

android:paddingBottom="@dimen/scal_10dp"

android:paddingLeft="@dimen/scal_10dp"

android:paddingRight="80dp"

android:paddingTop="@dimen/scal_10dp"

android:singleLine="true"

android:textAllCaps="false" />

</LinearLayout>


<ImageView

android:id="@+id/ivCamera"

android:layout_width="wrap_content"

android:layout_height="wrap_content"

android:layout_gravity="proper|center_vertical"

android:layout_marginRight="@dimen/scal_10dp"

android:src="https://www.spaceotechnologies.com/integrate-stripe-payment-gateway-android-app-create-commission-based-transaction/@drawable/camera_icon" />


<ImageView

android:id="@+id/ivWireless"

android:layout_width="wrap_content"

android:layout_height="wrap_content"

android:layout_gravity="proper|center_vertical"

android:layout_marginRight="45dp"

android:src="@drawable/pay_icon" />

</FrameLayout>


<LinearLayout

android:layout_width="match_parent"

android:layout_height="wrap_content"

android:layout_marginLeft="20dp"

android:layout_marginRight="20dp"

android:layout_marginTop="@dimen/scal_10dp"

android:orientation="vertical">


<com.paynow.utils.MyEditText

android:id="@+id/editEpiryDate"

android:layout_width="match_parent"

android:layout_height="wrap_content"

android:background="@coloration/color_white"

android:digits="@string/text_char_set_exp_date" <!-- Permits solely digits -->

android:drawableLeft="@drawable/icon_calender"

android:drawablePadding="@dimen/scal_15dp"

android:trace="@string/edit_expirydate_hint"

android:imeOptions="actionNext"

android:inputType="quantity"

android:maxLength="10"

android:padding="@dimen/scal_10dp"

android:singleLine="true"

android:textAllCaps="false" />

</LinearLayout>


<LinearLayout

android:layout_width="match_parent"

android:layout_height="wrap_content"

android:layout_marginLeft="20dp"

android:layout_marginRight="20dp"


android:layout_marginTop="@dimen/scal_10dp"

android:orientation="vertical">


<com.paynow.utils.MyEditText

android:id="@+id/editCvcNumber"

android:layout_width="match_parent"

android:layout_height="wrap_content"

android:background="@coloration/color_white"

android:digits="@string/text_char_set_numeric"

android:drawableLeft="@drawable/icon_lock"

android:drawablePadding="@dimen/scal_15dp"

android:trace="@string/edit_cvc_hint"

android:imeOptions="actionNext"

android:inputType="quantity"

android:maxLength="4"

android:padding="@dimen/scal_10dp"

android:singleLine="true"

android:textAllCaps="false" />

</LinearLayout>


<LinearLayout

android:layout_width="match_parent"

android:layout_height="wrap_content"

android:layout_marginLeft="20dp"

android:layout_marginRight="20dp"

android:layout_marginTop="@dimen/scal_10dp"

android:orientation="vertical">


<com.paynow.utils.MyEditText

android:id="@+id/editRefDesc"

android:layout_width="match_parent"

android:layout_height="wrap_content"

android:background="@coloration/color_white"

android:drawableLeft="@drawable/icon_pencil"

android:drawablePadding="@dimen/scal_15dp"

android:trace="@string/edit_ref_desc_hint"

android:imeOptions="actionNext"

android:inputType="textual content"

android:maxLength="50"

android:padding="10dp"

android:singleLine="true"

android:textAllCaps="false" />

</LinearLayout>


<LinearLayout

android:layout_width="match_parent"

android:layout_height="wrap_content"

android:layout_marginLeft="@dimen/scal_20dp"

android:layout_marginRight="@dimen/scal_20dp"


android:layout_marginTop="@dimen/scal_10dp"

android:orientation="vertical">


<com.paynow.utils.MyEditText

android:id="@+id/editEmail"

android:layout_width="match_parent"

android:layout_height="wrap_content"

android:background="@coloration/color_white"

android:drawableLeft="@drawable/icon_email"

android:drawablePadding="@dimen/scal_15dp"

android:ems="10"

android:trace="@string/edit_email_hint"

android:imeOptions="actionDone"

android:inputType="textEmailAddress"

android:maxLength="50"

android:padding="@dimen/scal_10dp"

android:singleLine="true"

android:textAllCaps="false" />

</LinearLayout>


<Button

android:id="@+id/btnChargeCard"

android:layout_width="match_parent"

android:layout_height="wrap_content"

android:layout_marginBottom="@dimen/scal_20dp"

android:layout_marginLeft="20dp"

android:layout_marginRight="20dp"

android:layout_marginTop="20dp"

android:background="@drawable/blank_botton"

android:gravity="middle"

android:paddingBottom="@dimen/scal_5dp"

android:textual content="@string/btn_charge_card"

android:textAllCaps="false"

android:textColor="@coloration/button_text_color"

android:textSize="@dimen/button_text_size" />


<RelativeLayout

android:id="@+id/rlBottom"

android:layout_width="match_parent"

android:layout_height="wrap_content"

android:layout_alignParentBottom="true"

android:background="#04BECB"

android:padding="@dimen/scal_18dp">


<TextView

android:layout_width="wrap_content"

android:layout_height="wrap_content"

android:layout_centerVertical="true"

android:layout_marginRight="@dimen/scal_20dp"

android:layout_toLeftOf="@+id/switchLive"

android:textual content="LIVE"

android:textColor="@coloration/color_white"

android:textSize="@dimen/txt_17" />


<android.help.v7.widget.SwitchCompat

android:id="@+id/switchLive"

android:layout_width="wrap_content"

android:layout_height="wrap_content"

android:layout_centerInParent="true"

android:checked="true" />


<TextView

android:layout_width="wrap_content"

android:layout_height="wrap_content"

android:layout_centerVertical="true"

android:layout_marginLeft="@dimen/scal_20dp"

android:layout_toRightOf="@+id/switchLive"

android:textual content="TEST"

android:textColor="@coloration/color_white"

android:textSize="@dimen/txt_17" />

</RelativeLayout>

</LinearLayout>

</LinearLayout>


</ScrollView>

</RelativeLayout>
Need To Combine Stripe Fee Gateway In Android Software?
Validate your app concept and get a free quote.
👉 3.3.2) With the above XML, you’ll get the above-mentioned particulars, however if you wish to scan the bank card, it is best to observe the under technique for your Java class file.
personal void scanCard() {
if (CardIOActivity.canReadCardWithCamera()) {
onScanPress();
isCardIo = true;
} else {
myUtility.setAlertMessage(getString(R.string.app_name), "Enter bank card info handbook.");
}
}
public void onScanPress() {
Intent scanIntent = new Intent(this, CardIOActivity.class);

// customise these values to fit your wants.
scanIntent.putExtra(CardIOActivity.EXTRA_SCAN_EXPIRY, true);
scanIntent.putExtra(CardIOActivity.EXTRA_REQUIRE_EXPIRY, true); // default: false
scanIntent.putExtra(CardIOActivity.EXTRA_REQUIRE_CVV, false); // default: false
scanIntent.putExtra(CardIOActivity.EXTRA_REQUIRE_POSTAL_CODE, false); // default: false
scanIntent.putExtra(CardIOActivity.EXTRA_USE_CARDIO_LOGO, false);
scanIntent.putExtra(CardIOActivity.EXTRA_HIDE_CARDIO_LOGO, true);
scanIntent.putExtra(CardIOActivity.EXTRA_USE_PAYPAL_ACTIONBAR_ICON, false);
scanIntent.putExtra(CardIOActivity.EXTRA_GUIDE_COLOR, Colour.parseColor("#33b5e5"));
// hides the handbook entry button
// if set, builders ought to present their very own handbook entry mechanism within the app
scanIntent.putExtra(CardIOActivity.EXTRA_SUPPRESS_MANUAL_ENTRY, true); // default: false
startActivityForResult(scanIntent, MY_SCAN_REQUEST_CODE);
}
👉 3.3.3) To validate the bank card – use the under talked about technique in your Java class file.
personal boolean isCardValid() {
cardNumber = editCardNumber.getText().toString().substitute(" ", "");
cardCVC = editCvcNumber.getText().toString();
StringTokenizer tokens = new StringTokenizer(editEpiryDate.getText().toString(), "/");
cardExpMonth = Integer.parseInt(tokens.nextToken());
cardExpYear = Integer.parseInt(tokens.nextToken());
// Card card = new Card("4242424242424242", 12, 2016, "123");
Card card = new Card(cardNumber, cardExpMonth, cardExpYear, cardCVC);
boolean validation = card.validateCard();
if (validation) {
return true;
} else if (!card.validateNumber()) {

myUtility.setAlertMessage("Error", “The cardboard quantity that you just entered is invalid.”);
} else if (!card.validateExpiryDate()) {

myUtility.setAlertMessage("Error", “The expiration date that you just entered is invalid.”);
} else if (!card.validateCVC()) {
myUtility.setAlertMessage("Error",”The CVC code that you just entered is invalid.”);
} else {
myUtility.setAlertMessage("Error", “The cardboard particulars that you just entered are invalid.”);

}
return false;
}
👉 3.3.4) After card validation, the subsequent step is to get stripeToken and to get stripe token you want add under code in your java class file.
👉 3.3.4.1) Within the code, there’s a publishable key. You’re going to get the publishable key from API keys within the Stripe account. We wish you to verify the screenshot of step quantity 3.2. The place it is possible for you to to see the publishable key under the SECRET_KEY.
As per Stripe’s suggestion, we fetch the keys by making an API name to https URL. One of the best observe is to avoid wasting the keys on a secured database in encrypted type and on consumer request decrypt it and ship the keys to the consumer on making an API name for keys.
Now we have to name an API to get these keys from a secured server. For that we will have an https API name which can return us the publishable key from server.
personal String userPublishableKey = "";
personal String userSecretKey = "";
/**
* That is standerd api name technique which can get the consumer's key from server
**/
personal void getUserKey() {
// Name api and get consumer publishable & secret key right here and assign key worth in userPublishableKey & userSecretKey

}

Card card = new Card(cardNumber, cardExpMonth, cardExpYear, cardCVC);
attempt {
Stripe stripe = new Stripe(userPublishableKey); stripe.createToken(
card,
publishableKey,
new TokenCallback() {
public void onSuccess(Token token) {
if (myUtility.checkInternetConnection())

sendCardToInfoToStripe(token.getId(), isLive);
else {
myUtility.setInternetAlertMessage();

}

}

public void onError(Exception error) {
myUtility.setAlertMessage("Error", error.getMessage());
}
});
👉 3.3.4.1) Within the case of the cost course of with out login, it’s essential to add the under code to open dialogue of webview of Stripe.
closing Dialog dialog = new Dialog(ChargeCardActivity.this);
dialog.requestWindowFeature(Window.FEATURE_NO_TITLE);
dialog.setContentView(R.structure.custom_connect_alert_dialog_with_msg);
dialog.setCanceledOnTouchOutside(false);

TextView textDialog = (TextView) dialog.findViewById(R.id.textDialog);
textDialog.setText(getString(R.string.lbl_stripe_not_connected));
TextView textCancel = (TextView) dialog.findViewById(R.id.textCancel);
TextView textOk = (TextView) dialog.findViewById(R.id.textOk);
// if button is clicked, shut the customized dialog
textCancel.setOnClickListener(new View.OnClickListener() {
@Override
public void onClick(View view) {
dialog.dismiss();
}
});

textOk.setOnClickListener(new View.OnClickListener() {
@Override
public void onClick(View v) {
dialog.dismiss();
Intent intent = new Intent(ChargeCardActivity.this, WebviewPaymentActivity.class);
intent.putExtra(Constants.ISLIVE, isLive);
intent.putExtra(Constants.CARD_NUMBER, cardNumber);
intent.putExtra(Constants.CARD_CVC, cardCVC);
intent.putExtra(Constants.CARD_EXP_MONTH, cardExpMonth);
intent.putExtra(Constants.CARD_EXP_YEAR, cardExpYear);
intent.putExtra(Constants.CENT_AMOUNT, centAmount);
intent.putExtra(Constants.USER_DESCRIPTION, userDescription[bad code]);
intent.putExtra(Constants.USER_EMAIL, userEmail);
intent.putExtra(Constants.USER_CURRENCY, sessionManager.getStringDetail(Constants.USER_CURRENCY));
intent.putExtra(Constants.USER_PUBLISHABLE_KEY, userLivePublishableKey);
startActivity(intent);
}
});
dialog.present();
👉 Custom_connect_alert_dialog_with_msg.xml
<?xml model="1.0" encoding="utf-8"?>
<LinearLayout xmlns:android="http://schemas.android.com/apk/res/android"
android:layout_width="match_parent"
android:layout_height="wrap_content"
android:background="@coloration/color_dialog_background"
android:orientation="vertical">

<TextView
android:id="@+id/textDialog"
android:layout_width="match_parent"
android:layout_height="wrap_content"
android:layout_margin="10dp"
android:gravity="left"
android:padding="10dp"
android:textual content="Your stripe stay account will not be connceted. DO you wan't to attach it and make cost?"
android:textColor="@android:coloration/white"
android:textSize="17sp" />
<View
android:layout_width="match_parent"
android:layout_height="1dp"
android:background="@coloration/color_dialog_button_border" />

<LinearLayout
android:layout_width="match_parent"
android:layout_height="wrap_content"
android:orientation="horizontal"
android:weightSum="2">

<TextView
android:id="@+id/textOk"
android:layout_width="0dp"
android:layout_height="wrap_content"
android:layout_weight="1"
android:gravity="middle"
android:padding="@dimen/scal_15dp"
android:textual content="Proceed"
android:textColor="@coloration/color_white"
android:textSize="17sp" />
<View
android:layout_width="1dp"
android:layout_height="match_parent"
android:background="@coloration/color_dialog_button_border" />

<TextView
android:id="@+id/textCancel"
android:layout_width="0dp"
android:layout_height="wrap_content"
android:layout_weight="1"
android:gravity="middle"
android:padding="@dimen/scal_15dp"
android:textual content="Cancel"
android:textColor="@android:coloration/white"
android:textSize="17sp" />

</LinearLayout>

</LinearLayout>
👉 3.4) The under code is to make your Stripe cost integration based mostly on the fee transaction you wish to set.
Within the under code we’ve used cents 1000 as a complete quantity transaction and 100 as a fee. You may also outline the foreign money by way of the under code.
NOTE: Whereas integrating Stripe Fee Gateway, stripe itself doesn’t advocate storing key information within the software we retailer the important thing info in encrypted type on the database and we make an https internet API name to get the decrypted keys.
We get userSecretKey from an API name to the server.
personal void sendCardToInfoToStripe(closing String cardToken, closing boolean isLive) {
userDescription = editRefDesc.getText().toString(); // Get Consumer Description[bad code]
userEmail = editEmail.getText().toString(); // Get Consumer E mail Id
new Thread(new Runnable() {
@Override
public void run() {

Map<String, Object> chargeParams = new HashMap<String, Object>();
chargeParams.put("quantity", 1000);
chargeParams.put("foreign money", "usd");
chargeParams.put("supply", cardToken);
chargeParams.put("description", [Variable name]userDescription[bad code]);[Variable name]
chargeParams.put("receipt_email", userEmail);
chargeParams.put("application_fee", 100);
RequestOptions requestOptions;
requestOptions = RequestOptions.builder().setStripeAccount(sessionManager.getStringDetail(Stripe-user-id)).setApiKey(userSecretKey).construct();

attempt {
Cost.create(chargeParams, requestOptions);
callSuccess();
} catch (closing Exception e) {
myUtility.dismissDialog();
e.printStackTrace();
runOnUiThread(new Runnable() {
@Override
public void run() {
myUtility.setAlertMessage("Error", e.getMessage());
}
});
}
}
}).begin();

}
Developer Be aware: Above codes have used a few frequent courses for common strategies like web checking, alert dialogues. We’re placing right here all of the frequent strategies code.
Public class Utility{
public boolean checkInternetConnection() {

ConnectivityManager conMgr = (ConnectivityManager) context
.getSystemService(Context.CONNECTIVITY_SERVICE);
// ARE WE CONNECTED TO THE NET
if (conMgr.getActiveNetworkInfo() != null
&& conMgr.getActiveNetworkInfo().isAvailable()
&& conMgr.getActiveNetworkInfo().isConnected()) {
return true;
} else {
return false;
}
}

public void setInternetAlertMessage() {
if (context == null)
return;

dialog = new Dialog(context);
dialog.requestWindowFeature(Window.FEATURE_NO_TITLE);
dialog.setContentView(R.structure.custom_alert_dialog);
dialog.setCanceledOnTouchOutside(false);
TextView textDialog = (TextView) dialog.findViewById(R.id.textDialog);
textDialog.setText(context.getString(R.string.msg_internet_connection));
textDialog.setPadding(15, 15, 15, 15);
textDialog.setGravity(Gravity.CENTER);

TextView textOk = (TextView) dialog.findViewById(R.id.textOk);
// if button is clicked, shut the customized dialog
textOk.setOnClickListener(new View.OnClickListener() {
@Override
public void onClick(View v) {
dialog.dismiss();

}
});
dialog.present();
}
public void setAlertMessage(String title, String msg) {

if (context == null)
return;

dialog = new Dialog(context);
dialog.requestWindowFeature(Window.FEATURE_NO_TITLE);
dialog.setContentView(R.structure.custom_alert_dialog);
dialog.setCanceledOnTouchOutside(false);
TextView textDialog = (TextView) dialog.findViewById(R.id.textDialog);
textDialog.setText(msg);
textDialog.setPadding(15, 15, 15, 15);
textDialog.setGravity(Gravity.CENTER);

TextView textOk = (TextView) dialog.findViewById(R.id.textOk);
textOk.setOnClickListener(new View.OnClickListener() {
@Override
public void onClick(View v) {
dialog.dismiss();

}
});
dialog.present();
}
}
Re-Be aware: Carry out all steps fastidiously if you are transferring the codes from Check to Stay.
The difficult process was to get a consumer by way of the authentication, which could be carried out on the net solely. Thus, we allow a consumer to the identical expertise in native software and managed all redirection of an online, as we’re not getting any callbacks from stripe SDK, and in the long run, we achieved this by observing the redirections.
We wish to share with the app house owners that when they’re in a state of affairs of selecting a cost gateway or any of the cost integration providers, it might be prompt to verify the audience, after which search the cost gateway help of that area.
For instance, if it’s essential to have cost from the Center East or Northern Africa then Hyper Pay is among the finest cost gateway options or if you’re concentrating on the US, UK, Canada, Australia then Stripe cost gateway integration is the perfect answer. After that, we have to verify the costing construction, refund charges and time utilized by the cost gateway to switch cash to the checking account.
We might love to listen to again your phrases for Stripe cost gateway integration in Android and share your suggestions for the above content material.
Incessantly Requested Questions
What if an Android app will not be redirecting again to the app after finishing a PaymentIntent?
To resolve this, be sure you have carried out a return_url within the PaymentIntent and that the URL is within the AndroidManifest.xml file.
Is Stripe a great cost gateway?
At present, Stripe is among the finest on-line bank card processors, permitting companies to construct a customized eCommerce expertise by leveraging its free API. It’s straightforward to implement and presents bank-grade safety to retailers and their clients.
Will my clients want a Stripe account to pay?
No. Your clients can full their transactions with their debit/bank cards. They don’t want a person Stripe account to finish their cost.
Will my clients know that I’m utilizing the Stripe cost gateway on my software?
Not essentially. Your clients gained’t have the ability to know that you’re utilizing the Stripe cost gateway in your software.
Conclusion
Stripe is making a distinction within the developer neighborhood by way of its cost service integration, user-friendly paperwork and API. We used our cell software improvement providers for the Stripe integration in Android, and our latest cell software improvement in Stripe obtained 3000 customers within the first week of the launch, 45000 quantity of transaction occurring each day, and nearly 100+ evaluations and a 4.1-star ranking on the Google Play retailer. This software was in prime charted apps within the finance class within the first quarter of the 12 months 2016. We might love to listen to again your phrases for Stripe cost gateway integration in Android and share your suggestions.
Aside from this, you probably have any Android app concept that you just need to focus on with any main Android app improvement firm, join it with us and we might be guiding you additional.
Helpful sources
[ad_2]