

[ad_1]
59596
Being an Android app improvement company, we encourage our greatest Android app builders to write down and share their information with our viewers by writing an Android tutorial. This text is one among them. This text is all about find out how to create a number of tabs in a single display screen utilizing Android Tab Structure.
Whereas utilizing tablayout In Android, there’s a new ingredient launched in Design Assist Library. Principally, it supplies horizontal layouts to show Android tabs on the display screen. Utilizing Android tablayout, we will show a couple of display screen in a single display screen.
What’s Android Tab Structure?
Tab view in android or tab format is mainly a view class required to be added into the format of our app to create sliding tabs.
Nevertheless, you possibly can create sliding in addition to non-sliding tabbed exercise through the use of the Android tablayout. If you wish to add Android tabs with out sliding, then exchange the format with the fragment on tab chosen listener occasion. And, if you wish to add sliding tabs, then use ViewPager.
On this Android tablayout instance, we’ll see find out how to create tabs in android studio with sliding utilizing ViewPager.
Let’s Get Began
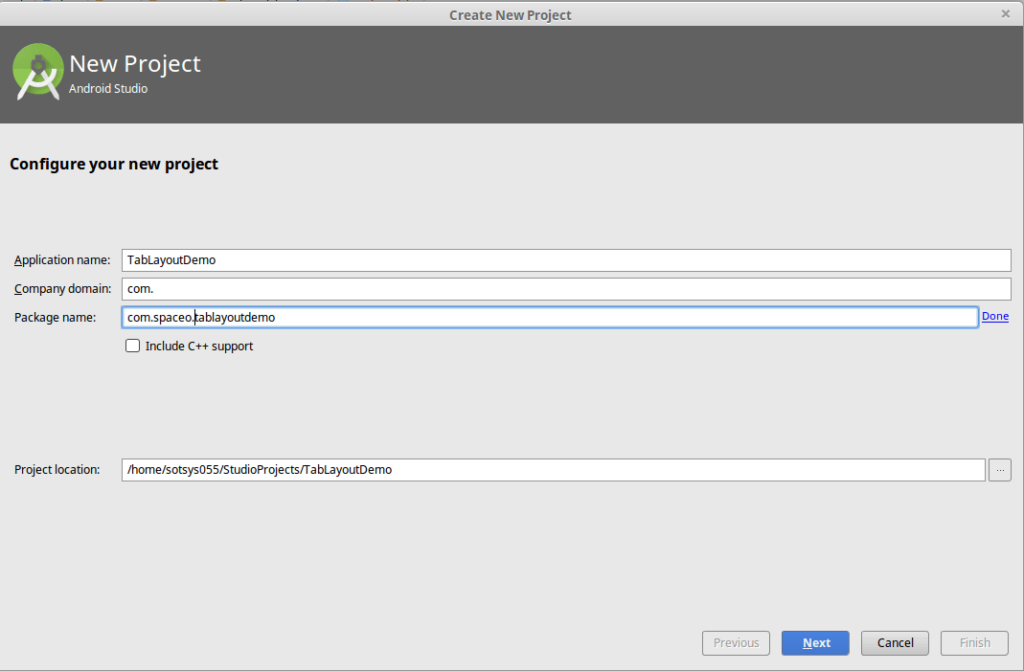
👉 Create a brand new challenge “Android TabLayout” or “Android Tabs Structure“.
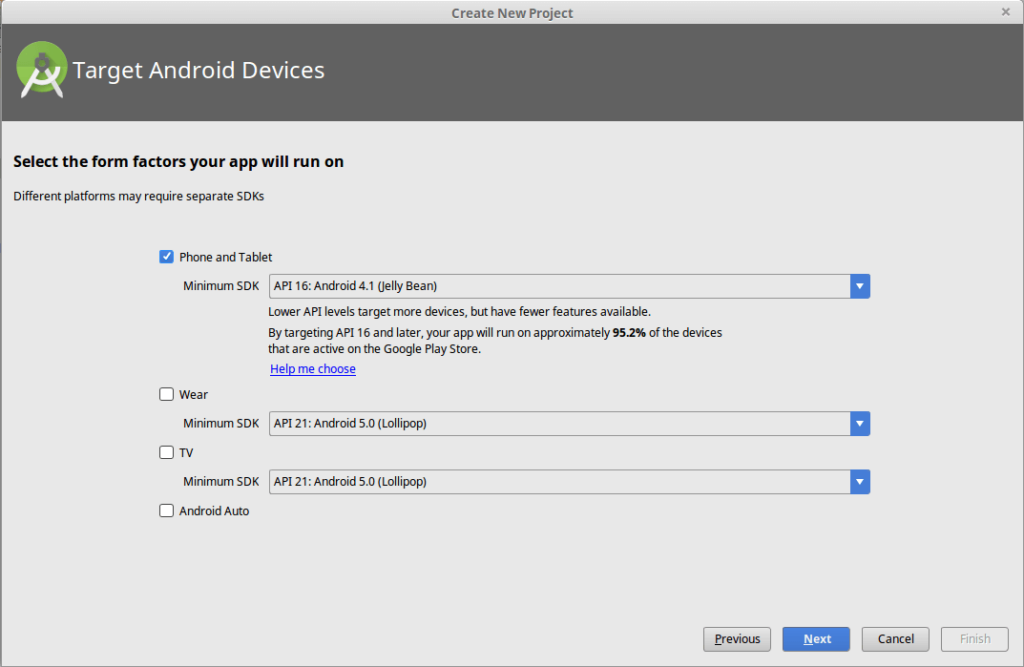
👉 Choose focused Android machine.
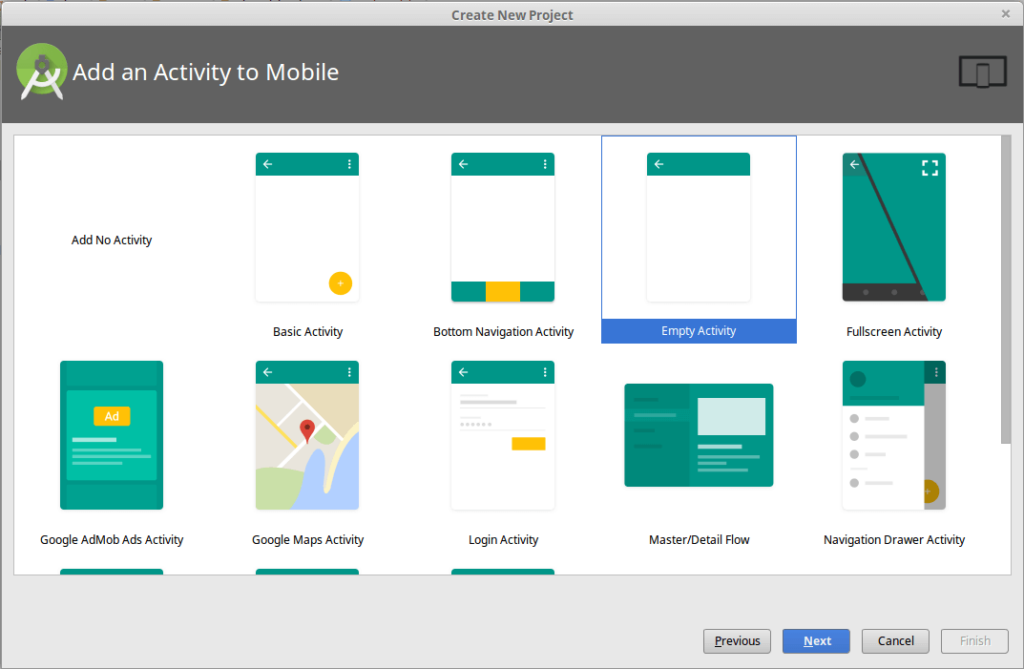
👉 Add an exercise to cell => Choose Empty Exercise.
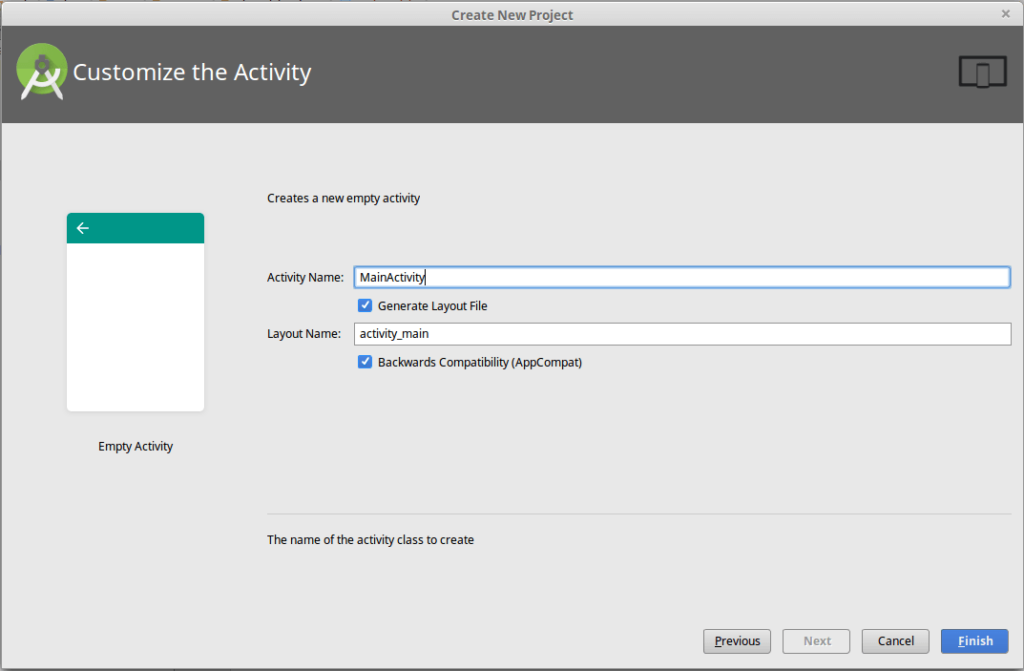
👉 Customise the exercise.
👉 Create Java class identify “ViewPagerAdapter”
bundle com.spaceo.tablayoutdemo;

import android.assist.v4.app.Fragment;
import android.assist.v4.app.FragmentManager;
import android.assist.v4.app.FragmentPagerAdapter;

class ViewPagerAdapter extends FragmentPagerAdapter {

    personal String title[] = {"One", "Two", "Three"};

    public ViewPagerAdapter(FragmentManager supervisor) {
        tremendous(supervisor);
    }

    @Override
    public Fragment getItem(int place) {
        return TabFragment.getInstance(place);
    }

    @Override
    public int getCount() {
        return title.size;
    }

    @Override
    public CharSequence getPageTitle(int place) {
        return title[position];
    }
}
TabFragment.java
bundle com.spaceo.tablayoutdemo;

import android.os.Bundle;
import android.assist.annotation.Nullable;
import android.assist.v4.app.Fragment;
import android.view.LayoutInflater;
import android.view.View;
import android.view.ViewGroup;
import android.widget.TextView;

public class TabFragment extends Fragment {

    int place;
    personal TextView textView;

    public static Fragment getInstance(int place) {
        Bundle bundle = new Bundle();
        bundle.putInt("pos", place);
        TabFragment tabFragment = new TabFragment();
        tabFragment.setArguments(bundle);
        return tabFragment;
    }

    @Override
    public void onCreate(Bundle savedInstanceState) {
        tremendous.onCreate(savedInstanceState);
        place = getArguments().getInt("pos");
    }

    @Override
    public View onCreateView(LayoutInflater inflater, ViewGroup container,
                             Bundle savedInstanceState) {
        return inflater.inflate(R.format.fragment_tab, container, false);
    }

    @Override
    public void onViewCreated(View view, @Nullable Bundle savedInstanceState) {
        tremendous.onViewCreated(view, savedInstanceState);
        textView = (TextView) view.findViewById(R.id.textView);

        textView.setText("Fragment " + (place + 1));

    }
}
MainActivity
bundle com.spaceo.tablayoutdemo;

import android.os.Bundle;
import android.assist.design.widget.TabLayout;
import android.assist.v4.view.ViewPager;
import android.assist.v7.app.AppCompatActivity;
import android.assist.v7.widget.Toolbar;

public class MainActivity extends AppCompatActivity {

    personal Toolbar toolbar;
    personal TabLayout tabLayout;
    personal ViewPager viewPager;

    @Override
    protected void onCreate(Bundle savedInstanceState) {
        tremendous.onCreate(savedInstanceState);
        setContentView(R.format.activity_main);

        toolbar = (Toolbar) findViewById(R.id.toolbar);
        setSupportActionBar(toolbar);

        getSupportActionBar().setDisplayHomeAsUpEnabled(true);

        viewPager = (ViewPager) findViewById(R.id.viewpager);
        ViewPagerAdapter adapter = new ViewPagerAdapter(getSupportFragmentManager());
        viewPager.setAdapter(adapter);

        tabLayout = (TabLayout) findViewById(R.id.tabs);
        tabLayout.setupWithViewPager(viewPager);
    }
}
AndroidManifest.xml
<?xml model="1.0" encoding="utf-8"/>
<manifest
    xmlns:android="http://schemas.android.com/apk/res/android"
    bundle="com.spaceo.tablayoutdemo">

    <utility
        android:allowBackup="true"
        android:icon="@mipmap/ic_launcher"
        android:label="@string/app_name"
        android:roundIcon="@mipmap/ic_launcher_round"
        android:supportsRtl="true"
        android:theme="@model/AppTheme">
        <exercise android:identify=".MainActivity">
            <intent-filter>
                <motion android:identify="android.intent.motion.MAIN"/>

                <class android:identify="android.intent.class.LAUNCHER"/>
            </intent-filter>
        </exercise>
    </utility>

</manifest>
Need To Develop An Android Software?
Validate your app concept and get a free quote.
construct.gradle
apply plugin: 'com.android.utility'

android {
    compileSdkVersion 25
    buildToolsVersion "25.0.2"
    defaultConfig {
        applicationId "com.spaceo.tablayoutdemo"
        minSdkVersion 16
        targetSdkVersion 25
        versionCode 1
        versionName "1.0"

    }
    buildTypes {
        launch {
            minifyEnabled false
            proguardFiles getDefaultProguardFile('proguard-android.txt'), 'proguard-rules.professional'
        }
    }
}

dependencies {
    compile fileTree(dir: 'libs', embrace: ['*.jar'])
    compile 'com.android.assist:appcompat-v7:25.2.0'
    compile 'com.android.assist:design:25.2.0'
}
activity_main.xml
<?xml model="1.0" encoding="utf-8"?>
<android.assist.design.widget.CoordinatorLayout
    xmlns:android="http://schemas.android.com/apk/res/android"
    xmlns:app="http://schemas.android.com/apk/res-auto"
    android:layout_width="match_parent"
    android:layout_height="match_parent">

    <android.assist.design.widget.AppBarLayout
        android:layout_width="match_parent"
        android:layout_height="wrap_content"
        android:theme="@model/ThemeOverlay.AppCompat.Darkish.ActionBar">

        <android.assist.v7.widget.Toolbar
            android:id="@+id/toolbar"
            android:layout_width="match_parent"
            android:layout_height="?attr/actionBarSize"
            android:background="?attr/colorPrimary"
            app:layout_scrollFlags="scroll|enterAlways"
            app:popupTheme="@model/ThemeOverlay.AppCompat.Mild"/>

        <android.assist.design.widget.TabLayout
            android:id="@+id/tabs"
            android:layout_width="match_parent"
            android:layout_height="wrap_content"
            app:tabGravity="fill"
            app:tabMode="mounted"/>
    </android.assist.design.widget.AppBarLayout>

    <android.assist.v4.view.ViewPager
        android:id="@+id/viewpager"
        android:layout_width="match_parent"
        android:layout_height="match_parent"
        app:layout_behavior="@string/appbar_scrolling_view_behavior"/>
</android.assist.design.widget.CoordinatorLayout>
fragment_tab.xml
<?xml model="1.0" encoding="utf-8"?>
<LinearLayout xmlns:android="http://schemas.android.com/apk/res/android"
              android:layout_width="match_parent"
              android:layout_height="match_parent"
              android:orientation="vertical">

    <TextView
        android:id="@+id/textView"
        android:layout_width="match_parent"
        android:layout_height="match_parent"
        android:gravity="middle"
        android:padding="10dp"
        android:textSize="40sp"
        android:textStyle="daring"/>

</LinearLayout>
And accomplished!
In case you suppose this android tablayout tutorial will assist your folks as properly, share it now with only one click on!
[bctt tweet=”I found this easiest tutorial to develop multiple tabs in a single screen using Android Tab Layout. Check this now.”]
When you efficiently implement this code, you possibly can simply add Android tabs and carry out tab exercise in android or we will say Android tab navigation.
Though, if an app is complicated with numerous contents added dynamically, then tab format integration turns into a bit troublesome so in case you’re not fully conscious with it, you possibly can seek the advice of with Android app improvement firm so as to add Android tabbed activityand can also check out the Android viewpager in your Android app work appropriately.
Get a free copy of Tab Structure in Android Demo from Github.
Helpful useful resource
[ad_2]