

[ad_1]
One of the best ways to get your legs with any software program software is to leap proper in. That’s simpler stated than finished with an software as massive, highly effective, and sophisticated as Kubernetes, the software program that underpins fashionable container-based software deployments at scale. How can one get a deal with on Kubernetes with out organising a whole {hardware} cluster?
You can begin small with Minikube. Minikube is an incarnation of Kubernetes, absolutely API-compatible with its massive brother version, however designed to run on native {hardware} — a developer’s desktop or pocket book. It really works cross-platform (Linux, Mac, Home windows), helps all of Kubernetes’s container runtimes, and could be prolonged so as to add extra of Kubernetes’s superior performance.
Please observe: This text assumes you already perceive the fundamentals of Kubernetes and have labored with it to some extent. In case you’re on the lookout for a base tutorial for Kubernetes, you’ll discover some good choices right here.
Minikube necessities
Minikube runs on all three main working methods (though at this level solely on x86-64 {hardware}), and requires a system with web connectivity and the next specs:
- No less than two CPUs (e.g., a processor with two or extra {hardware} threads). {Hardware}-assisted virtualization shouldn’t be required however helpful.
- 2GB of free reminiscence — that’s, 2GB of RAM you’ll be able to spare above and past the system’s regular workload necessities.
- 20 GB of disk area.
Additionally, you will want a container or digital machine supervisor, one thing which will fluctuate relying on what platform you’re operating:
- Any platform that helps Docker can use it because the container system. (You can even use the Docker various Podman.)
- Parallels, VirtualBox, VMware Fusion, or VMware Workstation will work as properly on any platform that helps them, though these functions include the extra useful resource overhead and licensing necessities.
- On MacOS, HyperKit is supported.
- On Home windows, you should utilize Hyper-V.
In case you plan to run Minikube on a system that has no web entry, or solely intermittent entry, that is potential, however you might have to arrange an area container registry from which to tug pictures.
Putting in Minikube
Relying on which working system you’re utilizing, you have to to observe completely different steps to put in Minikube.
Linux
The best technique to set up Minikube on Linux is to put in its common binary, which ought to work in any widespread distribution:
curl -LO https://storage.googleapis.com/minikube/releases/newest/minikube-linux-amd64
sudo set up minikube-linux-amd64 /usr/native/bin/minikube
MacOS
MacOS customers can use a extremely related set up methodology as Linux customers:
curl -LO https://storage.googleapis.com/minikube/releases/newest/minikube-darwin-amd64
sudo set up minikube-darwin-amd64 /usr/native/bin/minikube
Homebrew customers can use brew set up minikube.
Home windows
On Home windows, one can use the next PowerShell script (as per the Minikube docs) to put in Minikube. Make sure you run it as administrator. Observe that the listing proven within the script is a short lived set up listing; Minikube doesn’t stay in that listing.
The second line of the script ensures that the goal listing is within the system PATH; you might want to change the script if you wish to change the short-term set up listing.
New-Merchandise -Path 'c:' -Title 'minikube' -ItemType Listing -Drive
Invoke-WebRequest -OutFile 'c:minikubeminikube.exe' -Uri 'https://github.com/kubernetes/minikube/releases/newest/obtain/minikube-windows-amd64.exe' -UseBasicParsing

$oldPath = [Environment]::GetEnvironmentVariable('Path', [EnvironmentVariableTarget]::Machine)
if ($oldPath.Cut up(';') -inotcontains 'C:minikube'){ `
  [Environment]::SetEnvironmentVariable('Path', $('{0};C:minikube' -f $oldPath), [EnvironmentVariableTarget]::Machine) `
}
Utilizing virtualization with Minikube
One doesn’t want to make use of virtualization to run containers, however it will possibly ease the way in which. Step one is to guarantee that hardware-assisted virtualization is enabled in your machine’s BIOS.
Typically it may be troublesome to find this feature. As an example, on some methods, comparable to those who use a motherboard constructed primarily for gaming, the choice to manage {hardware} virtualization in firmware might be within the part of the BIOS dedicated to overclocking choices. What’s extra, the virtualization choice will not be seen by default, however solely after you allow visibility for expert-level controls.
In case you do use virtualization, it’s best to make use of the choice in Minikube that’s most native to your working system. On Home windows, this might be Hyper-V; on MacOS, HyperKit. On Linux, native containers are supreme, making virtualization fully non-obligatory, though you could have your personal causes for utilizing it (e.g., for enhanced isolation).
Establishing a Minikube driver
Minikube interacts together with your system’s container or hypervisor system by way of a driver. The out there drivers fluctuate by working system, however you should utilize Docker as a protected default on all widespread platforms.
To set a driver to make use of because the default, run the command
minikube config set driver <driver_type>
the place <driver_type> is certainly one of a lot of choices. These are the commonest (and ought to be self-explanatory):
Different drivers can be found relying on the platform and one’s put in software program:
virtualbox– Makes use of VirtualBox as a VM supplier. It is a helpful choice on Home windows if you’re unable to make use of Hyper-V (e.g., for those who’re operating Home windows House). Observe that Minikube won’t set up VirtualBox; you could set that up your self.podman– An various container runtime to Docker that makes use of a daemonless structure and doesn’t require root privileges. Observe that this driver continues to be thought of experimental and shouldn’t be utilized in manufacturing.vmware– Driver for all VMware-based hypervisors. (Putting in the precise VMware software program is your accountability.)hyperkit– Driver for the open supply hypervisor for MacOS. That is put in with Docker Desktop, so for those who’re already utilizing Docker, you won’t want to make use of this.parallels– Driver for Parallels Desktop for Mac, which doesn’t require VT-x {hardware} assist.ssh– Means that you can run on a user-supplied VM overssh. Observe that if you runminkube begin, you could go the deal with of the VM with a command-line swap, e.g.,--ssh-ip-address=vm.machine.com.none– Use a bare-metal driver, sometimes on Linux. For superior or experimental use solely.
You can even provide a driver by utilizing a command-line swap everytime you begin Minikube:
minikube begin --driver=docker
That is helpful if you should quickly swap drivers to check one thing. For probably the most half, although, you’ll need to set a driver to make use of full-time as a part of your normal workflow.
Beginning Minikube
After you’ve got put in Minikube and configured its default driver, you can begin the cluster by typing minikube begin. The startup course of could take some time, as Minikube could have to fetch pictures and configure them.
You may then use kubectl to work with Minikube simply as you’d with Kubernetes.
Observe that somewhat than kind kubectl alone, you could have to prefix it with minikube and use the -- swap to go parameters alongside. As an example, as an alternative of kubectl create deployment (plus different choices for a deployment), you’d kind minikube kubectl -- create deployment.
Minikube tries to remain up-to-date with the newest model of Kubernetes. If you should work with an earlier model, you are able to do so by specifying a model with the begin command:
minikube begin --kubernetes-version=v1.16.0
Minikube dashboard
Minikube comes with a web-based dashboard that gives a complete view of the cluster: workloads, companies, configuration data, cluster knowledge, customized useful resource definitions, and much extra.
To open the dashboard within the default browser, merely kind minikube dashboard on the command line. Observe that for those who shut the command session the place you’ve launched the dashboard, the dashboard will shut down routinely, except you launch the dashboard as a indifferent course of.
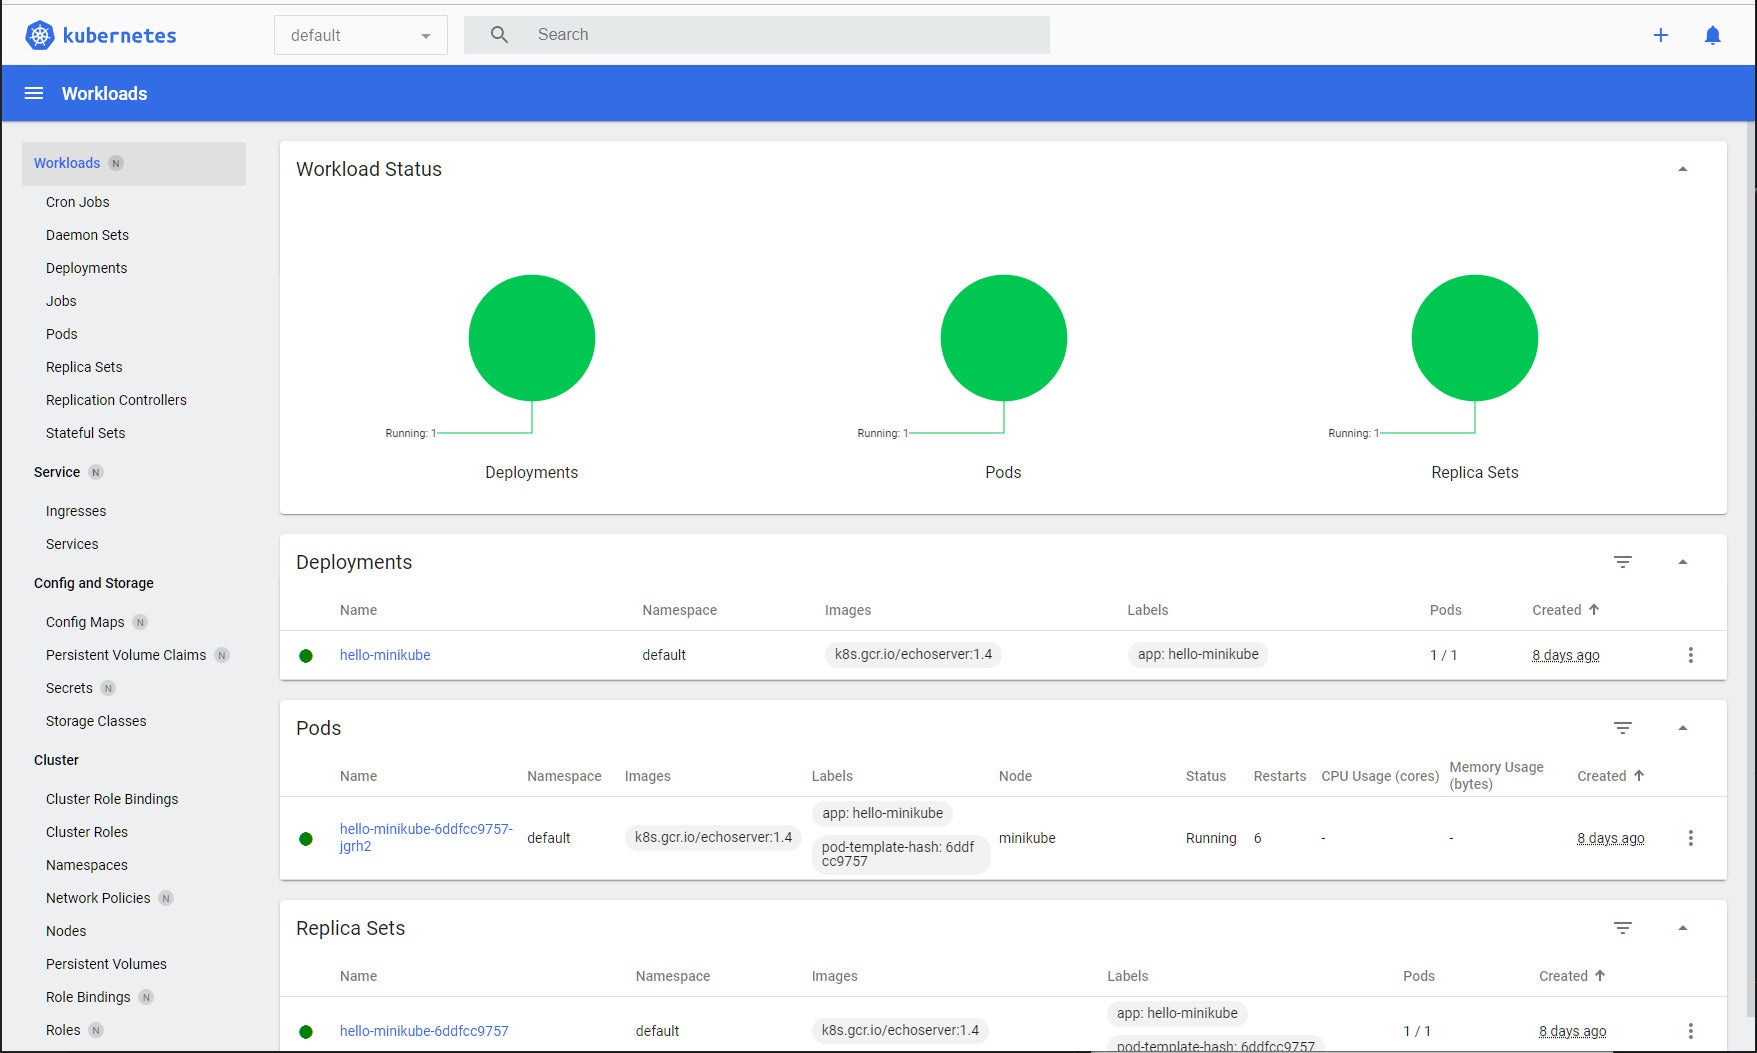 IDG
IDGThe Minikube dashboard offers an all-in-one interactive view to your desktop Kubernetes setup.
Utilizing Minikube as an alternative of Docker Desktop
Due to the modifications within the licensing and prices of Docker Desktop, many builders are exploring alternate options. Minikube can perform as a good substitute for Docker Desktop with out an excessive amount of further work. Right here’s how:
- If you have already got Docker Desktop put in, take away it and reboot.
- Examine that you’ve the atmosphere variable
DOCKER_BUILDKITset to1. (This allows BuildKit for higher efficiency through the construct course of.) - Set up the Docker CLI — not Docker Desktop or the Docker daemon, simply the command line software. A technique to do that is with a package deal supervisor — e.g., utilizing Chocolatey on Home windows.
- Launch Minikube usually. If you wish to construct Docker pictures, you should use the Docker driver; for those who simply need to run containers, you should utilize a hypervisor or VM.
- In case you don’t plan to make use of Kubernetes (simply run containers as-is with out orchestration options), you should utilize
minikube begin --no-kubernetesbecause the command to start out Minikube. - Run
minikube docker-env(you might want to do that as admin) to generate a listing of directions wanted to configure Docker to make use of Minikube as its runtime host. These directions fluctuate by working system. - After you observe these directions, the
dockercommand-line software ought to use Minikube as its host. You may confirm this by typingdocker psand seeing for those who get a listing of operating containers.
Observe that you’ll want to invoke the instructions described by Minkube in step 6 for every command session the place you need to use Docker.
Copyright © 2021 IDG Communications, Inc.
[ad_2]